Operating Instructions Microwave Combination Oven H 158 MB, H 168 MB It is essential to read these operating instructions before installing or using the machine, to avoid the risk of accident, or damage to the machine. Q\}@ä M.-Nr.
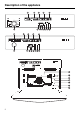
Description of the appliance Description of the appliance 2
Description of the appliance b Display field (according to model) - for operating modes - MANUAL / AUTOMATIC Accessories c Display for entering data d Display for selected settings e Display for: - Food groups - Automatic-Programmes - f Digital display for the clock g Function selector: Setting the operating mode / Setting the programmes 1 Rack, 2 Glass tray, 3 Boiling rod h “– /+” Touch controls with lamp for selecting a microwave setting or temperature, time, food group, weight i Touch control for i
Contents Contents Description of the appliance . . . . . . . . . . . . . . . . . . . . . . . . . . . . . . . . . . . . . . . . . 2 Accessories . . . . . . . . . . . . . . . . . . . . . . . . . . . . . . . . . . . . . . . . . . . . . . . . . . . . . . . 3 Description of the functions Functions . . . . . . . . . . . . . . . . . . . . . . . . . . . . . . . . . . . . . . . . . . . . . . . . . . . . . . . . . 7 Safety features . . . . . . . . . . . . . . . . . . . . . . . . . . . . . . . . . . . . . . . . . . .
Contents Memory function . . . . . . . . . . . . . . . . . . . . . . . . . . . . . . . . . . . . . . . . . . . . . . . . . Short step system . . . . . . . . . . . . . . . . . . . . . . . . . . . . . . . . . . . . . . . . . . . . . . . . Automatic pre-selection . . . . . . . . . . . . . . . . . . . . . . . . . . . . . . . . . . . . . . . . . . . Opening the door . . . . . . . . . . . . . . . . . . . . . . . . . . . . . . . . . . . . . . . . . . . . . . . . . When the time has elapsed Audible tone . . . . . .
Contents Grilling Preparing food for grilling . . . . . . . . . . . . . . . . . . . . . . . . . . . . . . . . . . . . . . . . . . . Grilling . . . . . . . . . . . . . . . . . . . . . . . . . . . . . . . . . . . . . . . . . . . . . . . . . . . . . . . . . . Test to see if cooked . . . . . . . . . . . . . . . . . . . . . . . . . . . . . . . . . . . . . . . . . . . . . . . Chart for grilling . . . . . . . . . . . . . . . . . . . . . . . . . . . . . . . . . . . . . . . . . . . . . . . . Roasting . . . . . . . .
Description of the functions Description of the functions Functions Automatic programmes User responsive For cooking Q, reheating P, and defrosting N selected food groups using the microwave. The appliance is designed to be “user responsive”. When the user presses a function control the relevant display and control lamp will automatically light up. Operating modes The automatic programmes are dependent on weight, i.e.
Description of the functions Safety features Energy saving functions Door lock Door contact switch Once a cooking process using the microwave has begun, the door will remain locked until the end of the programme. You can cancel the door lock by pressing the Stop/C touch control. The programme will then be interrupted. If the door is opened during a process using the hot air fan and / or heating element(s), a contact switch for the door switches these off automatically.
Warning and Safety instructions Warning and Safety instructions This appliance complies with all relevant legal safety requirements. Improper use of the appliance can, however, present a risk of both personal injury and material damage. Before installation and before using the appliance for the first time, read the operating instructions carefully. They contain important notes on safety, on the operation and care of the appliance. This way you will avoid the risk of accidents and damage to the appliance.
Warning and Safety instructions The electrical safety of this appliance can only be guaranteed when continuity is complete between the appliance and an effective earthing system, which complies with local and national regulations. It is most important that this basic safety requirement is tested by a qualified electrician. The manufacturer cannot be held responsible for the consequences of an inadequate earthing system. This appliance must only be operated as a built-in appliance.
Warning and Safety instructions Do not use full power if you warm empty dishes or dry herbs. The lack or minimum amount of food could cause damage to the appliance. Do not leave the oven unattended when cooking with oils and fats as these can be a fire hazard if allowed to overheat. If you see smoke rising from the food in the oven keep the oven door closed, to avoid fuelling any flame. Turn the oven selector switch to “0", or remove the plug from the socket.
Warning and Safety instructions Microwave mode Always check the temperature of the actual food itself after taking it out of the oven. Do not be misled by the temperature of the container. In particular when preparing food for babies, children, and the elderly or infirm, it is essential to check the temperature of the food or liquid itself, after stirring and before serving. The temperature of the container does not necessarily give a correct indication of the temperature of the food or liquid in it.
Warning and Safety instructions Eggs can be cooked without their shells in the microwave oven only if the yolk membrane has been punctured several times first. The pressure would otherwise cause the egg yolk to explode. Do not reheat food in the oven in heat-retaining bags intended for normal ovens. These heat-retaining bags usually contain a thin layer of aluminium foil which reflects microwaves. This reflected energy can, in turn, cause the outer paper covering to become so hot that it ignites.
Warning and Safety instructions Disposal of your old machine Before discarding an old machine switch off and disconnect it from the power supply. Cut off and render any plug useless. Cut off the cable directly behind the machine to prevent misuse. The manufacturer cannot be held liable for damage caused by noncompliance with safety instructions.
Before using for the first time Before using for the first time Wipe out the oven interior with hot water and washing up liquid. Dry using a soft cloth. Do not shut the oven door until the interior is completely dry, to avoid odours and the possibility of corrosion developing. Enter Enter the highest possible temperature with the "+" touch control. Wash the accessories. With new appliances there is usually a smell during the first use.
Operating modes Operating modes Microwave Mode h When using the microwave mode, food is cooked, reheated or defrosted in a short time. Functional description This oven is equipped with two magnetrons b, which convert electrical energy into microwaves. There are two stirrer fans c, one above the oven ceiling and the other under the oven floor. These two interior surfaces can be penetrated by microwaves.
Operating modes Normal oven operating systems In Miele ovens these include Fan Heat, Auto Roast, Grill and Fan Grill. With these normal oven methods food is cooked and browned. Auto Roast E After the selected temperature is entered, the oven heats initially to a preset high temperature which seals the meat to keep it succulent and tasty. The oven temperature is then automatically returned to the temperature setting selected. Fan Heat D This method works by the circulation of hot air.
Operating modes Combination programmes Automatic programmes By using the combination programmes you can quickly reheat and cook food while browning it at the same time. The microwave’s automatic programmes can be used to cook, warm up or defrost food. The relevant power setting and time are selected automatically. You only need to enter the food group and the weight. You can combine the microwave operating mode with each of the normal oven modes.
Suitable containers for microwave ovens Suitable containers for microwave ovens Microwaves Material and shape The material and shape of containers used in the microwave oven can have an effect on the result. Round and oval shaped dishes offer a better distribution of heat in the food than rectangular dishes. Metal When working in microwave mode metal containers, aluminium foil and metal cutlery, as well as china with metallic decor (e.g. gold trim, cobalt blue), must not be placed in the microwave oven.
Suitable containers for microwave ovens tips or other thin parts for the last few minutes of the process. Make sure that the aluminium foil is at least 2 cm from the oven walls at all times. It must not touch the walls. – Metal meat skewers or clamps Metal skewers and clamps should only be used if they are very small in comparison to the size of the cut of meat. The microwave oven rack supplied with the appliance is suitable for use in a microwave oven. Do not place the rack on the oven floor.
Suitable containers for microwave ovens Plastic boiling bags can be used for cooking and reheating. They should be pierced beforehand so that steam can escape. This prevents a build-up of pressure and reduces the risk of the bag bursting. Roasting bags and -tubes can be used. Roasting tubes should be about 40 cm longer and roasting bags about 20 cm longer than the food being roasted, and carefully tied with string. Turn the ends over and secure them.
Suitable containers for microwave ovens – shortens and evens out the cooking process, – prevents food from drying out, Press the Start control. – prevents any loss of aroma. If a crackling noise is heard accompanied by sparks during the test, switch off the appliance immediately. Turn the function selector switch to the “0" position. The water in the glass should be warm, but the dish cool. If the dish is very hot and the water is cold, it would be unwise to use the dish.
Operation - Controls Operation - Controls The function selector switch and the touch controls are used to operate the appliance. h + J Microwave + Grill h + IMicrowave + Fan Grill Automatic programmes: Function selector Q Cooking P Reheating N Defrosting If the function selector switch is not at position “0", the cool air fan will run at a very low level and the oven interior light will be switched on.
Operation - Controls – to cancel the door locking function (a microwave feature). Enter – to select a microwave power setting, – to enter or alter the temperature or time step by step (press the control for a brief moment several times) or quickly (press and hold the touch control), – to select a food group and to enter a weight (Automatic programme), – to store in the memory various stages for a cooking process using the microwave operating mode.
Time of day Time of day After the appliance has been connected to the power supply or after a power cut “12:00" will appear in the display. The colon will flash. Turning off the time of day display If the time of day is not then entered immediately, the time will start to run from “12:00" onwards. Setting time of day (24 hour clock) To enter or alter the time of day the function selector switch must be set to position “0". 2x Press the m touch control twice.
Notes on use Notes on use Selecting an operating mode / programme Selecting a microwave setting/ temperature Each operating mode has been assigned a suggested power setting (for the microwave) or a suggested temperature (for normal oven modes). These will appear in the data entry display. Microwave – Solo. . . . . . . . . . . . . . . . . . . . . . 600 W – Combination programmes . . . . 300 W Fan Heat . . . . . . . . . . . . . . . . . . Auto Roast* . . . . . . . . . . . . . . . . Grill . . . . . . . . . .
Notes on use When using normal oven modes the following settings are possible: Solo, combination programmes: Fan Heat. . . . . . . . . . . . . . . 30 – 200 °C Auto Roast . . . . . . . . . . . . 110 – 200 °C Grill . . . . . . . . . . . . . . . . . . 200 – 250 °C Fan Grill . . . . . . . . . . . . . . 100 – 200 °C If you have chosen the Microwave + Grill combination programme, you can set a time up to a maximum of 30 minutes. The time entered will appear in the display in minutes : seconds.
Operating modes Operating modes With microwave mode, a power setting and time are entered. With normal oven mode a temperature is selected and a time can also be entered. Use the function selector switch to select the operating mode. - + Enter Use the " – /+" touch control to enter a time for the cooking process. The display will show the pre-programmed power setting or temperature. - + Enter Press the Start touch control.
Combination programmes Combination programmes Microwave mode can be combined with one of the normal oven mode functions. Before starting enter microwave power setting, time and a temperature. A time can also be entered for the selected normal oven mode. Use the function selector switch to select the programme you want. The pre-programmed microwave power setting “300 W” will appear in the display. - + Confirm the entry by pressing the Enter touch control.
Combination programmes If the two operating modes are run for a different length of time from each other, a time must be entered for the normal oven mode at the start of the programme. At the end of the time for the operating mode with the shorter duration an audible tone will sound. That operating mode will be switched off automatically. The settings will remain in the display area, however, until the end of the entire programme. Example: After selecting the temperature, press the Enter touch control.
Automatic programmes Automatic programmes The cooking, reheating or defrosting processes are divided up into various food groups. The time and microwave power settings are selected automatically by the system. Use the function selector switch to select the programme you want. - + Enter Use the "– /+" touch control to select the food groups. The relevant text area will light up.
Automatic programmes Depending on which programme and food group has been selected, a weight up to a maximum of 4 kg can be entered. Programme Cooking Reheating Defrosting Food Group maximum weight in kg meat poultry fish fruit soup casseroles vegetables meat poultry fish soup plated meals casseroles vegetables 2.0 2.0 2.0 2.0 2.5 2.5 2.0 2.0 2.0 2.0 2.0 2.0 2.0 2.0 meat poultry fish fruit bread soup plated meals casseroles vegetables 3.0 4.0 2.0 2.0 2.0 2.5 2.0 2.5 2.0 Entries with a weight of .
Automatic programmes A short audible tone will sound after about half of the time has elapsed, indicating that the food should now be turned or stirred. Exception: No tone will sound if a weight which has a corresponding time of less than 2 minutes has been entered. The automatic programmes in the system use various power settings. Operating noise may vary during a programme due to the fact that the cool air fan rotates more slowly on the lower power settings.
Altering entered data Altering entered data Before starting a process After starting a process If you discover before the start of a process that you have made an error with the data entry then If you discover after the process has begun that you have made an error with the data entry, then you can use the Stop/C touch control to interrupt the process. Start The time is halted at the point of interruption. press the Stop /C touch control once.
Altering entered data To correct a microwave power setting / temperature, or a food group: Start 2x Press the Stop/C touch control twice. The power setting (for the microwave and combination programmes) or the temperature (for the normal oven mode) previously entered and stored in the memory will appear in the display area. If an automatic programme has been chosen then the text/symbol for the relevant food group will light up. Use the touch controls to enter the settings you require.
Memory function Memory function Frequently when using the microwave different power settings may be required by the one process, e.g. defrosting followed by reheating or cooking food. These different power settings can be stored together with the relevant times required and called up all at once using the Memory touch control. Food should be left to stand for a few minutes at room temperature when it has been cooked in the microwave.
Short step system Short step system Using the short step system you can store microwave power settings and times for frequently used processes. Use the function selector switch to choose the microwave mode. Press the c touch control. Up to a maximum of 5 programme stages can be stored. You can call up the individual programme stage by pressing the c touch control several times.
Short step system Starting the Short Step system Select the programme by pressing the c touch control once or several times. If necessary, alter the stored settings using the touch controls. Begin the process by pressing the Start touch control. The time will count down in the display area for data entry.
Automatic pre-selection Automatic pre-selection You can delay the switching on of the appliance by up to 23 hours and 59 minutes after starting a process. Set the time of day before using automatic pre-selection (refer to “Setting the time of day”). This makes the start time easier to enter. Enter the process required. Every operating mode and programme can be pre-selected. Press the m touch control once before starting the process. The text/symbol for “Start time” will light up in the display area.
Opening the door Opening the door After a microwave process has started the door will remain locked until the time entered has elapsed. In order to cancel the door lock you must interrupt the process. Start Press the Stop/C touch control to release the door lock. The time is halted at the point of interruption. The cool air fan continues to run during this period. If the door is kept open for longer than 5 minutes then the settings which have been selected will be cancelled.
When the time has elapsed When the time has elapsed Audible tone An audible tone will sound 3 times at the end of a process. A colon will appear in the display area for the data entry. If the appliance is not used afterwards, an audible tone will sound at 5 minute intervals for approx. one hour . This reminder can be terminated by turning the function selector switch to Position “0". The time of day will appear in the display area.
Minute Minder Minute Minder You can set the minute minder to monitor the progress of other kitchen activities, e.g. boiling eggs on a hob. The function selector switch must be at Position “0" before the minute minder is used. Altering a minute minder entry Start Press the Stop/C touch control. The minute minder time will be interrupted. Use the "– / +" touch control to alter the time. Press the m touch control once. The text/symbol for “Minute minder” appears in the display area.
Energy saving functions Energy saving functions If preferred you can Press the Enter touch control. – programme the appliance so that the display is not as bright at night (“Night time dimming” function), “01:1" will appear in the display area. – switch off the oven compartment light. “Night time dimming” function When this function is switched on the display is programmed to be less bright during the hours between 10 pm and 6 am (22.00 to 6.00 hours).
Energy saving functions Switching off the oven interior light The function selector switch must be at Position “0". Press and hold the “+” and Enter touch controls and turn the function selector switch one position to the right. The oven compartment light will now switch itself off after a programme has begun. Press the Enter touch control if you want to switch the oven compartment light on for a short while. It will switch itself off automatically after approx. 10 seconds.
Programming lock Programming lock This safety feature prevents functions being entered unintentionally. How to activate the programming lock: How to cancel the locking feature: Press the “–” touch control until the key symbol in the display area goes out. The appliance can now be used again. The programming lock can only be activated when – no minute minder entry has been made, – the function selector switch is at Position “0".
Defrosting Defrosting Defrost with – the automatic defrosting programme N, – or the microwave h mode. We recommend the Automatic Defrost programme for defrosting meat, poultry, fish, fruit, bread, soup, plated meals, casseroles and vegetables. This programme is also the best for defrosting dishes containing other ingredients besides meat, poultry or fish, e.g goulash, casseroles, soups etc. Select “Casseroles” from the food groups.
Defrosting Defrosting Chart for defrosting food 150 W 80.W time in mins. Standing time in mins * at room temperature Quantity AutoWeight 1/4 l 250 g 250 g 1 /2 l 250 g – – – – – – – – 12 – 14 10 – 12 12–14 8 – 10 6–8 – – 5 – 10 5 – 10 10 – 15 10 – 15 10 – 15 pce appx 100 g. 300 g 3 pieces 300 g 3 pieces 300 g . 1 piece 100 g. 4 pieces.
Reheating Reheating Reheat with – the automatic programme for reheating P, – the microwave h. We recommend the Automatic Reheat programme for reheating meat, poultry, fish, soup, plated meals, casseroles and vegetables. Use the Microwave mode to reheat foodstuffs which are unsuitable for the automatic programme. Select the following microwave power settings to reheat food – drinks 1200 W, – food 850 W or 600 W – * food for babies 450 W.
Reheating Reheating Heating on two levels Because of the way that microwaves are distributed from top and bottom it is possible to reheat food on two levels at the same time. After reheating Be careful when removing a dish from the oven. It may be hot. Although heat is not normally produced in the container itself by the microwaves, (apart from stoneware and similar dishes), heat transfer from the food to the container may be considerable, making the container itself hot.
Reheating Reheating Chart for reheating food Quantity AutomaticProgramme 1 cup, 0.2 l – Drinks ** Coffee, drinking temp. 60 – 65 °C Milk, drinking temp. 60 – 65 °C Water to the boil Baby bottle (Milk) !! Mulled wine, Grog drink temp. 60–65°C Food *** Baby food !! Powder potato Hollandaise sauce 1 cup, 0.2 l 1 cup, 1/8 l apx 200ccm – – – – 1 glass, 0.2 l Quantity AutomaticProgramme 1 jar, 200 g 250 g 1 /4 l – – – Microwave setting 1200 W 450 W Time Time in mins. in mins.
Cooking Cooking The following modes are suitable for cooking – the Automatic-Programme, Cooking Q – the Microwave mode h, – the Oven mode Fan Heat D – the Combination programme Microwave + Fan Heat h + D, – the Combination programme Microwave + Grill h + J The Automatic-Programme is suitable for cooking meat and poultry which are not required to be crisped or browned, fish, soups, casseroles and vegetables. The Microwave mode is suitable for cooking noodles, etc, pasta, rice and semolina pudding.
Cooking Fan Heat Slide the glass tray with the rack into the lowest runner level. The following pots are suitable: ovenproof china or glassware, earthenware, pans with heat resistant handles. Cover foods such as potatoes or vegetables which are to be simmered or poached, to avoid them drying out. Where a crisp finish is required e.g. for meat, cook without a lid. Combination programmes Slide the glass tray with the rack into the lowest runner level.
Cooking Cooking Chart for cooking food Microwave setting 850 W + 450 W Quantity Trout Desserts Apricot creme Vanilla creme 2 at 250 g 1 1 /2 l /2 l AutomaticProgramme Time mins. – 4 – – 4–5 5–6 Time mins. + X – Fish and Poultry dishes (not browned) Fish, Fruit, Soup, Casserole, Vegetables X = Enter the weight of the food, time and power are selected automatically * During this time the temperature spreads evenly through the food. Standing time * in mins at room temperaure.
Cooking Chart for cooking and crisping/browning food Pre-cook* Microwave Cook + Brown, Crisp Microwave + Grill 850 W Time in mins. + 3 4 – 4 – – – + + Paprika boats 1) Root veg. Lasagne 1) Emmental-Noodles 2) Vegetable Burger 3) Potato Dauphinoise3) Coated Fish 1) Fish in Cheese Sauce 1) + Microwave setting in W Temperature in °C Time in mins.
Defrosting and Re-heating / Cooking Defrosting and Re-heating / Cooking For simultaneous defrosting and reheating or cooking one of two procedures is suitable – using Microwave mode h, – using the combination programme Microwave + Grill h + J. The Microwave mode is suitable for deep frozen food which you do not wish to brown. The Combination programme is suitable for deep frozen pre-cooked meals, which are to be crisped and browned.
Defrosting and Re-heating / Cooking Chart for defrosting and reheating or cooking of deep frozen pre-prepared meals Quantity Microwave setting 850 W + 450 W Time Time in mins. in mins. Standing time at room temperature * in mins. Soups Cream soups Clear beef broth with vegetables Special recipe soup 0.75 l 7 + 8 – 10 2 0.8 l 0.
Defrosting and Re-heating / Cooking Defrosting and reheating, or cooking and crisping or browning of deep frozen pre-prepared meals combined operating Microwave + Grill Quantity Microwavesetting in W Temp. in °C Time in mins. Standing time at room temp. * in mins.
Grilling Grilling The following offer a grilling option: – Grill mode J, – Fan Grill mode I, – The combination programme Microwave + Grill h + J, – The Combination programme Microwave + Fan Grill h + I. Remember to fit the grease filter to the back panel in front of the fan when using Fan Grill, either Solo or in a Combination programme. Grill mode is suitable for grilling flat pieces of food, e.g. chops, steak, toast, burgers. Fan Grill mode is suitable for grilling larger pieces of meat, e.g.
Grilling Chart for grilling Pre-heat the grill for approx five minutes. Flat items 1) Grill Temp. Steaks in °C 250 Total grill time in mins. 3) 10 – 20 Burgers 220 10 – 20 Sausage 240 8 – 14 Fish fillet 250 10 – 20 Toast 250 2–5 Toast with topping Tomatoes 250 250 5–7 8 – 10 Peaches 230 6 – 10 Larger pieces 2) Fan Grill4) Temp. Microwave + Fan Grill4) in °C total grill time in mins. 3) Microwave power in W Temp. in °C total grill time in mins.
Roasting Roasting Suitable cooking modes for roasting are: – Auto Roast E, – the combination programme Microwave + Auto Roast h + E When open roasting on the rack fit the grease filter in front of the fan grille at the rear of the oven. Use Auto roast to give meat or poultry a crisp browned finish. Select a combination programme to cook in a shorter time. The combination programme is not usually suitable for cooking roast beef or fillet steak.
Roasting Browning only occurs towards the end of the roasting time. 15 – 20 minutes before the end of roasting time take the lid off the pot. Useful hints Roasting in a covered pot Microwave + Auto Roast Season the meat and place in the pot. Add some knobs of butter or margarine or a little oil or cooking fat. Add about 1 /8 l water when roasting a big lean joint of meat (2 – 3 kg), or roasting poultry with a high fat content.
Roasting Chart for roasting Auto Roast1) Beef topside (appx. 1 kg) Sirloin, Steak 3) (appx. 1 kg) Venison (appx. 1 kg) Pork, Shoulder (appx. 1 kg) Pork fillet, Chops in piece (appx. 1 kg) Ham (appx. 1 kg) Microwave + Auto Roast1) Temperature in °C 2) Time in mins. Microwavesetting in W Temp. in °C 2) Time in mins.
Baking Baking The following settings are recommended for baking: – Fan Heat D – the combination programme Microwave + Fan Heat h + D. Select Fan Heat for baking small cakes, swiss roll, pastry doughs. Baking time should not be too long. This can lead to the cake etc. drying out. Increasing the temperature from suggested levels and reducing the time can have an adverse effect on browning.
Baking With metal baking tins there may be sparking. Try positioning the tin differently on the glass tray, and make sure the tin does not touch the interior walls. If sparking continues, do not use this tin again in microwave combination mode. Temperature settings and microwave power settings are given within a range in the Baking Chart. These take into account different types of baking tin, quantities of dough and recipe preparation. Select an average temperature for first attempts and adapt accordingly.
Baking Chart for baking Fan Heat Microwave + Fan Heat Temp. in °C Time in mins. Microwavesetting in W Temp. in °C Time in mins.
Cleaning and care Cleaning and care Stainless steel surfaces Never use abrasive cleaning agents or those containing sand, soda or chlorides, as these will damage the surface. For the stainless steel surfaces use a non-abrasive mild cream cleaner. Apply with even pressure, afterwards using a damp cloth to wipe away and then a soft cloth to dry the surfaces. Glass front, controls Wipe the glass front and the controls with a damp cloth and a little washing up liquid in water. Wipe dry with a soft cloth.
Cleaning and care Glass back panel Oven interior roof The glass back panel can be removed for cleaning. If the oven interior roof is particularly soiled, the grill element can be lowered to make cleaning easier. Wait until the grill element has cooled down before lowering it. Otherwise there is the danger of being burnt. Gently lift the glass panel and take it out carefully. Clean in the dishwasher or wash by hand. When washing the glass panel by hand lay it on a smooth surface, to avoid any damage.
Cleaning and care After cleaning the grill element, raise it gently back up again and secure. The fixing knob must engage. Door interior Always keep the door interior clean. Do not use any scouring agent. Check the door and door seal at regular intervals for any sign of damage. If any damage is noticed, the oven should not be used again in microwave mode until the fault has been rectified by a service technician.
Problem solving guide Problem solving guide Repairs to electrical appliances should only be carried out by suitably qualified and competent service technicians trained by Miele. Improper repairs may pose a serious risk to the user. The following minor malfunctions can be corrected without calling the Service Department: What to do if . . . . . . .
Problem solving guide . . . the microwave / heating functions but not the interior lighting. Check whether the oven interior lighting has been switched off, (see Section on Choosing oven with or without interior lighting). If this is not the case, the halogen bulb needs replacing. Change for a new one as follows: Disconnect the appliance from the electricity supply, (switch off and unplug at the socket, or remove the fuse, or switch off at the isolator as appropriate). Fit new halogen lamps.
Problem solving guide . . . Cakes or biscuits are not cooked after a recommended time Check whether: – the correct temperature was set. – there has been a change to the recipe. The addition of more liquid or more eggs makes a moister mix which would take longer to cook. – whether the grease filter had been left in place. A longer time would be needed if this were the case. . . . cakes or biscuits are unevenly browned There will always be a degree of difference in browning.
Problem solving guide . . . strange noises are heard when the microwave or microwave / combination mode is being used. Check whether: – sparks are being created by the use of metallic crockery, (see Section on Suitable crockery). – the food is covered with aluminium foil. If so, remove it. . . . a programme can not be stored using “M”. Check whether: – Microwave mode has been selected, – a power setting and time have been entered. . . .
After sales service After sales service Customer contact In the events of any faults which you cannot easily remedy, please contact – your Miele dealer or – the nearest Miele Service Department See address on the back page. – When contacting the Service department please quote the Model and Serial number of your appliance, given on the data plate which is located on the front of the oven interior, visible when the door is opened.
Electrical connection IRL, U.K., ZA Electrical connection IRL, U.K., ZA All electrical work should be carried out by a competent person, in accordance with national and local safety regulations. Depending on the version, the appliance is supplied with a mains cable, or a mains cable and plug for connection to a.c. 50 Hz, 230 - 240 V. The voltage, rated load and fuse rating are given on the data plate situated at the front of the oven interior. Please ensure that these match the household mains supply.
Electrical connection IRL, U.K., ZA U.K. Non-rewireable plugs BS 1363 If this machine is fitted with a non-rewireable plug, the following information applies: If the socket outlets are not suitable for the plug supplied with this product, it must be cut off and an appropriate plug fitted. The plug cut off from the flexible cord should be disposed of and on no account be inserted into a 13A socket elsewhere in the house (electric shock hazard).
Electrical connection AUS, NZ Electrical connection AUS, NZ All electrical work should be carried out by a competent person, in accordance with national and local safety regulations. Depending on the version, the appliance is supplied with a mains cable, or a mains cable and plug for connection to a.c. 50 Hz, 230 - 240 V. The voltage, rated load and fuse rating are given on the data plate situated at the front of the oven interior. Please ensure that these match the household mains supply.
Installation Installation Possibilities for installation and combination Installation in a tall unit The appliance is suitable for installation: – in a tall unit in combination with an oven, – in a tall unit, – in a base unit. Installation measurements Installation in a tall unit in combination with an oven Installation in a base unit If combination with a hob is being considered, the instructions for the installation of the hob must also be taken into account.
Installation Installation instructions Turn off the mains electricity supply for connecting to an isolator. Connect the oven to the electricity supply. Place the oven into the furniture unit as far as the oven trim and align. Open the oven door, and with two screws secure the oven to the side walls of the furniture unit through the holes in the oven trim. The appliance must only be operated after it has been built in.
Alteration rights reserved / 22 / 001 GB, IRL, ZA, AUS, NZ - 1798 M.-Nr. 05 031 660 (H 158 MB, H 168 MB) This paper consists of cellulose which has been bleached without the use of chlorine.