
Operating instructions/Installation instructions
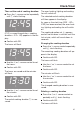


Table Of Contents
- Contents
- Warning and Safety instructions
- Caring for the environment
- Guide to the appliance
- Oven controls
- Features
- Data plate
- Scope of delivery
- Accessories supplied and available to order
- Side runners
- Baking tray, universal tray and rack with non-tip notches
- FlexiClip runners HFC 70-C
- Fitting the FlexiClip runners
- Removing the FlexiClip runners
- Perforated gourmet baking tray HBBL 71
- Baking stone HBS 70
- Round baking trays
- Grilling and roasting insert HGBB 71
- HUB gourmet oven dishes HBD gourmet oven dish lids
- Handle HEG
- Catalytic enamelled liners
- Accessories for cleaning and care
- Safety features
- PerfectClean treated surfaces
- Hob control elements
- Before using for the first time
- Overview of functions
- Energy saving tips
- Operation
- Clock/timer
- Baking
- Roasting
- Grilling
- Further applications
- Cleaning and care
- Unsuitable cleaning agents
- Removing normal soiling
- Removing stubborn soiling (excluding the runners)
- Stubborn soiling on the FlexiClip runners
- Cleaning the catalytic enamelled back panel
- Door removal
- Dismantling the door
- Fitting the door
- Removing the side runners with FlexiClip runners
- Removing the back panel
- Lowering the top heat/grill element
- Problem solving guide
- Service
- Installation
- Cooking charts
- Notes for test institutes

Clock/timer
41
Then set the end of cooking duration:
Press the sensor control repeatedly
until starts flashing.
(= current time of day + cooking
duration = +) appears in the dis-
play.
Confirm withOK.
The hours will flash.
Use theorsensor control to set
the hours.
Confirm withOK.
The hours are saved and the minutes
will flash.
Use theorsensor control to set
the minutes.
Confirm withOK.
The end of cooking duration is now
saved.
The oven heating, lighting and cooling
fan will switch off.
The selected end of cooking duration
will then appear in the display.
As soon as the start time (- =
) has been reached, the oven heat-
ing, lighting and cooling fan will switch
on.
The cooking duration set appears
and will count down in minutes until the
last minute, which will count down in
seconds.
Changing the cooking duration
Press the sensor control repeatedly
until starts flashing.
The remaining cooking duration will ap-
pear in the display.
Confirm withOK.
The hours will flash.
Use theorsensor control to set
the hours.
Confirm withOK.
The minutes will flash.
Use theorsensor control to set
the minutes.
Confirm withOK.
The changed cooking duration is now
saved.
Deleting a cooking duration
Press the orsensor control re-
peatedly until starts flashing.
Confirm withOK.
The hours will flash.