Operating instructions Microwave combination oven H 4050 BM, H 4060 BM To avoid the risk of accidents or damage to the appliance, it is essential to read these instructions before it is installed and used for the first time. G M.-Nr.
Contents Description of the appliance . . . . . . . . . . . . . . . . . . . . . . . . . . . . . . . . . . . . . . . . . 4 Warning and Safety instructions . . . . . . . . . . . . . . . . . . . . . . . . . . . . . . . . . . . . . 6 Caring for the environment . . . . . . . . . . . . . . . . . . . . . . . . . . . . . . . . . . . . . . . . . 13 Controls . . . . . . . . . . . . . . . . . . . . . . . . . . . . . . . . . . . . . . . . . . . . . . . . . . . . . . . . 14 Before using for the first time . . . . . . .
Contents Defrosting and Reheating / Cooking . . . . . . . . . . . . . . . . . . . . . . . . . . . . . . . . . 53 Grilling . . . . . . . . . . . . . . . . . . . . . . . . . . . . . . . . . . . . . . . . . . . . . . . . . . . . . . . . . 54 Chart for grilling . . . . . . . . . . . . . . . . . . . . . . . . . . . . . . . . . . . . . . . . . . . . . . . . 55 Roasting . . . . . . . . . . . . . . . . . . . . . . . . . . . . . . . . . . . . . . . . . . . . . . . . . . . . . . . . 56 Using the roast probe . . . . .
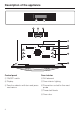
Description of the appliance Control panel Oven interior a ON/OFF switch d Grill element b Display e Oven interior lighting c Function selector with turn and press mechanism f Connection socket for the roast probe g Three shelf levels h Oven door 4
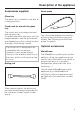
Description of the appliance Accessories supplied Roast probe Glass tray The glass tray is suitable for use with all cooking functions. Combi rack for use with the glass tray The combi rack must always be used with the glass tray. It can be used either way up to vary the height between it and the grill element and depending on the cooking function and type of food being cooked. The combi rack is designed to be compatible with microwaves.
Warning and Safety instructions This appliance complies with all relevant legal safety requirements. Improper use can present a risk of both personal injury and material damage. To avoid the risk of accidents and damage to the appliance please read these instructions carefully before installation and before using it for the first time. They contain important notes on installation, safety, operation and care of the appliance. Keep these instructions in a safe place and pass them on to any future user.
Warning and Safety instructions Before connecting the appliance, make sure that the connection data on the data plate (voltage and connected load) match the mains electricity supply. This data must correspond in order to avoid risk of damage to the appliance. Consult a qualified electrician if in any doubt. Do not connect the appliance to the mains electricity supply by an extension lead. Extension leads do not guarantee the required safety of the appliance (e.g. danger of overheating).
Warning and Safety instructions Use General notes Always ensure that food is sufficiently cooked or reheated. Many factors will affect the overall cooking time, including the size and amount of food, its initial temperature, changes to recipe and the shape and size of cooking container. Some foods may contain micro-organisms which are only destroyed by thorough cooking, therefore when cooking or re-heating foods, e.g.
Warning and Safety instructions When not in use do not leave the roast probe in the oven, especially when grilling. The high temperatures used for grilling could cause plastic components on the roast probe to melt. Never heat undiluted alcohol in the oven as this can easily ignite. Do not heat up tins in the appliance. Pressure can build up and they may explode, resulting in injury or damage.
Warning and Safety instructions Microwave function Before serving, remember to allow a sufficient standing time and then always check the temperature of the food after taking it out of the oven. The temperature of the container is not an indication of the temperature of the food or liquid in it. When heating food and drink, remember that the heat is created in the food itself and that the container will normally be cooler. The dish is only warmed by the heat of the food.
Warning and Safety instructions Do not use any containers or cutlery made from or containing metal, aluminium foil, lead crystal glassware, temperature-sensitive plastics, wooden utensils or cutlery, metal clips or wire ties. Do not use bowls with milled rims, or cream pots with the tinfoil lid only partially removed. Such items could be damaged or cause a fire hazard. The combi rack supplied with the appliance must be used with the glass tray.
Warning and Safety instructions Traditional oven functions: Fan plus, Auto roast, Grill, Fan grill Caution. Danger of burning. When the oven is being used as a traditional oven, it can get very hot. Great care should be taken to ensure that small children do not touch the oven when it is being used. Children's skin is far more sensitive to high temperatures than that of adults. External parts of the oven such as the door glass, vents, handle and fascia panel can become quite hot. Danger of burning.
Caring for the environment Disposal of the packing material The transport and protective packing has been selected from materials which are environmentally friendly for disposal and can normally be recycled. Ensure that any plastic wrappings, bags etc. are disposed of safely and kept out of the reach of babies and young children.
Controls The appliance has a large electronic display and two controls which are used to operate the appliance. Controls Both controls are retracted when the appliance is delivered. The appliance can only be operated when these controls are released. Both the controls can be pressed but only the right hand control can be turned. The left hand control is the ON/OFF switch. Pressing this control switches the appliance on or off.
Before using for the first time Cleaning the appliance Remove any protective foil from the oven front. ^ Wipe out the oven interior with hot water and a little washing up liquid. Dry using a soft cloth. Do not close the oven door until the oven interior is dry. Otherwise this could cause a build up of unpleasant odours and corrosion in the appliance. ^ Wash the accessories. Using for the first time A welcome screen will appear in the display when the appliance is connected to the electricity supply.
Before using for the first time When the selection of a language has been confirmed, a tick L will appear next to it. You now need to set the correct time of day. 12 : 00 Please set the time of day ^ Turn the multi-function dial until the correct hour appears. ^ Press the multi-function dial to confirm your selection. The minutes will then be highlighted and can be set in the same way. Once confirmed, the time of day will appear in the display.
Before using for the first time Heating up for the first time With new appliances there is usually a smell during the first use. High temperatures will help dissipate this smell more quickly. Run the empty appliance on the Fan plus setting for at least an hour. Please ensure the room is well ventilated during this operation. ^ Press the ON/OFF switch to call up the main menu. ^ Turn the multi-function dial until the Fan plus function is highlighted. Then press the dial to confirm your selection.
Minute minder The minute minder can be used to time any activity in the kitchen, e.g. boiling eggs. You can use the minute minder on its own or at the same time as other functions. To set the minute minder 12 : 18 Min minder Time ^ Turn the multi-function dial until "Min minder" is highlighted in the bottom line of the display. ^ Then press the multi-function dial.
To alter the time of day 12 : 20 Min minder Time ^ If you want to alter the time of day, turn the multi-function dial until "Time" is highlighted in the bottom of the display. ^ Then press the multi-function dial. ^ Turn the multi-function dial until the correct hour appears. ^ Press the multi-function dial to confirm your selection. ^ Now turn the dial until the correct minutes appear and press the dial to confirm the entry.
Modes of operation Functions "Solo" functions: – Microwave For defrosting, reheating and cooking food in a short time. – Fan plus For baking, cooking food using hot air circulation. – Auto roast This function provides an initial high temperature to seal meat followed by a lower temperature for normal roasting. – Grill For grilling flat pieces of meat and fish. Grill with the oven door closed. – Fan grill Ideal for grilling thicker items such as stuffed meat, kebabs and pieces of poultry etc.
Modes of operation Safety features Energy saving functions System lock Door contact switch This safety feature prevents functions being entered unintentionally. See ("Settings - Safety"). If the door is opened during a programme the heater element and fan are automatically switched off. The programme will continue to run again as soon as the door is shut and the start button has been pressed. If the door is opened during a conventional programme, i.e.
Operating modes Microwave function Microwave cooking offers the benefits of speed, convenience and nutritional advantages when food does not require browning or crisping. The following power levels can be selected: 80 W, 150 W, 300 W, 450 W, 600 W, 850 W and 1000 W. How does the microwave oven function? In a microwave oven there is a high-frequency tube called a magnetron. This converts electrical energy into microwaves.
Operating modes Traditional oven functions Auto roast This oven offers the following traditional oven functions: After the selected temperature is entered, the oven heats initially to a high temperature which seals the meat to keep it succulent and tasty. The oven temperature is then automatically returned to the pre-selected setting after this initial boost of heat. – Fan plus – Auto roast – Grill – Fan grill These cook and brown the food. Fan plus This system works by the circulation of heated air.
Operating modes Combination programmes Automatic programmes – Microwave + Fan plus – Defrosting – Microwave + Auto roast – Reheating – Microwave + Grill – Cooking – Microwave + Fan grill Food can be cooked, reheated or defrosted using microwave power or combination programmes. Automatic programmes are dependent on weight, i.e. after selecting the appropriate food group, you then enter the weight of the food and the microwave power setting and time will be calculated automatically.
Operating sequence Main menu The main menu will appear in the display after you have switched the appliance on with the ON/OFF switch. QUICK MW ALL FUNCTIONS . . . MICROWAVE AUTOMATIC . . . FAN PLUS USER PROGS . . . MICROWAVE+ . . . SETTINGS F. . . The main menu contains 8 sub-menus, which are also further sub-divided. The various functions can be selected by using just two controls. The first three functions in the main menu (Quick MW, Microwave, Fan plus) are suggestions only.
Operating sequence Microwave+... This programme combines microwave power with the following traditional oven functions: Auto Roast, Grill, Fan Plus and Fan Grill. The duration, delayed start time, microwave power level (max. 450 W) and the temperature for the traditional oven function can all be set. All functions The oven light and all functions, such as Auto Roast, Grill, Fan Plus, Microwave, Microwave+, Fan Grill and Quick MW can all be selected via this menu.
Operating sequence Press the ON/OFF switch to call up the main menu: QUICK MW ALL FUNCTIONS . . . MICROWAVE AUTOMATIC . . . FAN PLUS USER PROGS . . . MICROWAVE+ . . . SETTINGS F. . . ^ Turn the function selector to highlight the option you wish to select. Press the function selector to call up the sub-menu of the option you have highlighted (e.g.: MICROWAVE). MICROWAVE Min minder 1000 W 9:47 Duration The field selected shows a suggested power level of 1000 W.
Operating sequence If you over-run this time and the word "START" is no longer highlighted, you will have to press the function selector twice to start the programme. Whilst the programme is running the duration, power level and time of day will all show in the display. MICROWAVE Duration 2:20 min Min minder 1000 W 9:47 STOP Duration Save Once a programme has started it can be interrupted by pressing the function selector or cancelled by pressing the ON/OFF switch.
Programming cooking times The oven can be set up to switch off, or on and off automatically. As soon as a cooking function is selected, the word "Duration" will also appear in the display. FAN PLUS Min minder 160 °C 9:47 Duration Selecting "Duration" gives the following input options: Start time, Duration, Finish. FAN PLUS 160 °C 9:47 Rapid heat-up phase 31 °C Start time Duration Finish Back A Select Duration and enter the duration of a cooking programme.
Programming cooking times Using the residual heat, Energy-save function Shortly before the end of a programme using a traditional function the heating elements will be switched off automatically. The residual heat is sufficient to finish cooking. Using the residual heat in the oven saves energy. "Energy save phase" will appear in the display to show that the oven is in energy save mode. The actual temperature is no longer visible.
Automatic programmes Automatic programmes can be used for cooking, reheating and defrosting. The oven must be allowed to cool down to room temperature before starting an automatic programme. Cooking results will be affected if the oven is too hot when you start. Pay careful attention to what is shown in the display. For instance, you will be asked to enter the weight or number of items, or to add liquid. Automatic programmes can also be saved as "User Programmes" and be saved into the Main menu.
Automatic programmes Automatic cooking programmes Food is cooked using microwave power or a combination programme.
User programmes You can save settings you use frequently as user programmes. You can choose your own names for these programmes and then call them up whenever you want. You can also enter these programmes into the main menu. QUICK MW ALL FUNCTIONS . . . MICROWAVE AUTOMATIC . . . FAN PLUS USER PROGS . . . MICROWAVE+ . . . SETTINGS F. . . ^ Select "User Progs" from the main menu. USER back A PROGS. create H ^ Press the multi-function dial to confirm your selection.
User programmes FAN PLUS 150 °C 9:52 Duration 01:30 h Duration OK ^ Check the settings and confirm them with OK. The following sub-menus are now available: USER back A PROGS. FAN PLUS new STEP ... Change SHELF... H back This returns you to the beginning of the "User Programmes" menu. Fan Plus You can check your entries here and change them if you want to. new STEP... You can enter a further programme step, if, for example, you want to run another programme straight after the first one.
User programmes You can use the "delete" option to correct any wrong entries. The last entry will then disappear. Miele save as: 9:55 GRANNYS HOTPOT ABCDEFGHIJKLMNOPQRSTUVWXYZ_ 0123456789 delete OK A ^ Confirm the programme name with OK. START You can start the programme immediately from here. To call up user programmes ^ Select "User Progs" from the main menu. USER GRANNYS HOTPOT PROGS.
Settings Selecting "Settings J" in the main menu allows you to select or change the following options: Language J You can alter the language currently set. Once changed, all display text will appear in the new language. If you change to another language by mistake, a flag symbol next to the language makes it easy to locate quickly even if you do not understand the language.
Settings Fan run-on Display You can select either a temperature or a time controlled fan run-on. The fan will then switch off automatically if the temperature in the oven is 70 °C (temperature controlled) or after approx. 20 minutes (time controlled). The display can be switched on or off: If you select the setting "Display, on" then the time of day will show in the display even when the appliance is switched off. If you select "Display on for 60 seconds", then the display will go out after 60 seconds.
Settings Safety Units This menu option has three sub-options: System lock, In use and Solo programme. You can alter the units, namely the weight from kg to lbs and the temperature from °C to °F. System lock: You can prevent the appliance from being used. You can change from the default setting "Off" to "On". A lock symbol will then be visible in the middle of the bottom line of the display. The lock symbol will be open when the system is unlocked and closed when the system is locked.
Suitable containers for microwave ovens Microwaves When using microwave power you should always place the food / dish centrally on the glass tray and slide the tray into the first shelf level from the bottom. Placing the dish on the floor of the oven will give unsatisfactory and uneven results. Material and shape – are reflected by metal, The material and shape of containers used affect cooking results and times.
Suitable containers for microwave ovens Exceptions: Glassware – If recommended by the producer, pre-cooked meals in aluminium foil containers can be defrosted and reheated in the appliance using microwave power. Important: Remove the lid first. However, as food is only heated from the top it is better to remove the food from the aluminium foil container and transfer it to a dish suitable for a microwave oven. The heat distribution will be more even.
Suitable containers for microwave ovens Plastics Plastics must only be used with Microwave Solo. They must be heat-resistant to a minimum of 110 °C. Otherwise the plastic may melt and fuse with the food. Do not use metal clips, plastic clips containing metal parts or paper ties containing wire. There is a danger that they will ignite when heated. Wood Special plastic utensils designed for use in microwave ovens are available from good retail outlets.
Suitable containers for microwave ovens Testing dishes for their suitability If in doubt as to whether glass, earthenware or porcelain plates or dishes are suitable for use in a microwave oven, a simple test can be performed: ^ Place the empty container centrally on the glass tray and slide into the lowest shelf level. ^ Close the door. A microwave oven process cannot be started until the door is closed. ^ Press the ON/OFF switch to call up the main menu.
Suitable containers for microwave ovens A cover – prevents too much steam escaping, especially when cooking foods which need longer to cook, such as potatoes. Sealed glass containers, such as jars of baby food, must be opened before they are placed in the oven. Do not attempt to heat them up unopened. – speeds up the cooking process. – prevents food from drying out. – prevents any loss of aroma. – helps keep the oven interior clean. Do not use a cover if – food coated with breadcrumbs is being cooked.
Defrost The microwave function can be used to defrost food gently and quickly. Important when using an automatic programme for defrosting: The following settings are recommended as a general guide: When defrosting a large amount of food which has been wrapped in individual portions, enter a lower total weight than the actual total weight. This will give a more even result. Example: 1.
Defrost Chart for defrosting food Microwave power settings Quantity 150 W 80 W Standing time at room temperature 1) in min. Time in min. Time in min. 250 ml 250 g 250 g 500 ml 250 g – – – 14 – 16 10 – 12 13 – 17 8 – 10 6–8 – – 10 – 15 5 – 10 10 – 15 10 – 15 10 – 15 1 piece approx. 100 g 300 g 3 pieces approx. 300 g 3 pieces approx. 300 g 1 piece approx. 100 g 3 pieces approx. 300 g 4 pieces 1–2 4–6 6–8 5–7 – – 6–8 – – – – 1.5 4 – 4.
Reheat The microwave function is particularly suitable for reheating food. Select the following microwave power settings to reheat food drinks. . . . . . . . . . . . . . . . . . . . . 1000 W food . . . . . . . . . . . . . . . 850 W or 600 W baby food . . . . . . . . . . . . . . . . . . 450 W Food for babies and young children or the elderly must not be allowed to get too hot. We do not recommend heating or reheating foods or drinks for babies or young children in the microwave oven.
Reheat After reheating Be careful when removing a dish from the oven. It may be hot. Although heat is not normally produced in the container itself by the microwaves (apart from stoneware), heat transfer from the food to the container may be considerable, making the container itself hot. Allow food to stand for a few minutes at room temperature once a programme has ended to allow the heat to be distributed evenly.
Reheat Chart for reheating food Drinks ** Quantity Microwave power settings 1000 W 450 W Time in min.
Cooking Microwave, traditional and combination programmes are all suitable for cooking. Food taken straight from the refrigerator requires longer to reheat than food stored at room temperature. Microwave This method is suitable for cooking casseroles as well as dishes with pasta, rice and semolina etc. which need water to help them swell up. First select 850 W to bring the food up to a boil and then turn the power level down to 450 W to continue cooking or to 150 W for simmering.
Cooking Fan plus Combination programmes ^ Slide the glass tray with the combi rack into the first shelf level from the bottom. ^ Place the dish on the glass tray and slide into the lowest shelf level. The following containers are suitable: Ovenproof glass, china and earthenware pots with heat-resistant handles and knobs. Cover dishes which are to be cooked in their own juice and/or steam, e.g. potatoes or vegetables. This also prevents the food from drying out. Where a crisp finish is required e.g.
Cooking Cooking chart Microwave power settings Quantity 850 W + 450 W Time in min. Time in min. Standing time at room temperature *in min. - - - 2-3 2-3 approx. 1.
Cooking Chart for cooking, browning and crisping food Quantity Oven function Time in min. 1000 g 1000 g 1000 g approx. 1200 g 300 W + Fan plus 160 °C Fan plus 180 °C Fan plus 180 °C 300 W + Fan plus 180 °C approx. 65 approx. 70 approx. 120 approx. 40 1000 g approx. 1500 g approx. 1000 g 300 W + Fan plus 180 °C Fan plus 170 °C Fan plus 170 °C 35 - 45 approx. 120 approx. 100 4 pieces 8 - 10 pieces approx. 1000 g Grill Grill Fan plus 190 °C 5 - 9 3) 8 - 10 3) approx.
Defrosting and Reheating / Cooking For simultaneous defrosting and reheating or cooking the following functions are suitable: – Microwave – Microwave + Grill Microwave is suitable for defrosting and then reheating or cooking deep frozen ready made meals which you do not wish to brown. Microwave + Grill is suitable for ready made meals which also need to be browned. Microwave Deep frozen ready made meals can be defrosted and then reheated or cooked. Please follow instructions given on the packet.
Grilling This oven offers several grill settings: Grill, Fan Grill, Microwave + Grill and Microwave + Fan Grill. Grill is suitable for flat items such as cutlets, steak, burgers, toast etc. Fan grill is suitable for grilling thick cuts, e.g. rolled meat, poultry. In the Combination programmes microwave power output is limited to 450 W for the entire duration of the programme. Preparing food for grilling Rinse meat under cold running water and then pat dry.
Grilling Chart for grilling Pre-heat the grill for approx. 5 minutes. Flat items 1) Total grilling time in min. 2) Steak 25 – 30 Burgers 30 – 35 Sausages 20 – 25 Fish fillet 16 – 20 Toast 2–4 Toast with topping 5–9 Tomatoes 8 – 10 Peaches 7 – 10 1) Third shelf level 2) Turn half way through the grilling time. The information given in this chart is intended only as a guide.
Roasting The following settings are suitable for roasting: – Auto roast – Microwave + Auto roast Use Auto roast to give meat or poultry a crisp browned finish. Select the combination programme to cook in a shorter time. The combination programme is not usually suitable for cooking roast beef or fillet steak. The centre would be too well cooked before the exterior is browned. Put meat or poultry into the oven without pre-heating.
Roasting Microwave + Auto roast Useful hints Slide the glass tray with the rack into the first runner level from the bottom. Roasting in a covered pot Use only heat resistant pots, with no metal in the pot or lid. Microwaves cannot penetrate metal to reach the food in the pot. If using roasting foil – cut the foil approx. 40 cm longer than the piece of food – and tie carefully. Make sure the pot, foil and ties are suitable for microwave use.
Using the roast probe This appliance is supplied with a roast probe, which enables the roasting process to be monitored simply and reliably. The tip of the probe is pushed into the centre of the meat where it measures the core temperature continuously. When the pre-selected core temperature is reached, the oven heating is switched off automatically.
Using the roast probe ^ Place the food in the oven. The cooking duration is calculated automatically. Shortly before the end of the cooking duration, the oven heating switches off. The Energy-save function then comes into action. "Energy save phase" will appear in the display. If the oven temperature is altered or the core temperature increased, the oven heating will switch on again. ^ Insert the plug of the roast probe into the socket until you feel it engage. ^ Close the door.
Roasting Chart for roasting Auto roast Microwave + Auto roast Time in min. Core temperat ure °C 180 70 - 80 60 - 85 3) - - - 45 - 70 90 - 110 300 180 65 - 75 65 - 75 170 - 190 100 - 120 300 180 70 - 80 80 - 85 Ham joint (approx. 1 kg) 170 - 190 70 - 80 300 180 40 - 50 75 - 80 Meat loaf (approx. 1 kg) 170 - 190 50 - 60 300 180 35 - 40 75 - 80 Veal (approx. 1 kg) 180 - 200 90 - 110 300 180 70 - 80 75 - 80 Leg of lamb (approx. 2.
Baking The following settings are suitable for baking: not be as good as with dark non-reflective tins. – Fan plus Baking times should not be set too long. This can lead to the cake etc. drying out. – Microwave + Fan plus Fan plus is suitable for baking small cakes, swiss roll and pastries. Microwave + Fan plus Microwave + Fan plus is suitable for doughs which require longer baking, such as rubbed in and beaten mixtures, yeast recipes and cheesecake.
Baking Switch on the microwave setting for the total cooking time. The microwave setting should not be higher than 150 W. Tips on baking Temperature settings, times and microwave power settings in the Baking Chart are suggestions only. Select an average temperature and time for first attempts and adapt accordingly. Place cakes in rectangular tins with the longer side across the width of the oven for optimum heat distribution and even results.
Baking Baking chart Fan plus Microwave + Fan plus Microwave setting in W Temp. in °C Time in min. 160 - 60 - 70 - Temp. in °C Time in min.
Cleaning and care Oven interior and inside of the door The oven interior and the inside of the door are hot after use. Danger of burning. Wait until the interior, inside of the door and the door seal have cooled down before cleaning them. Clean the oven at regular intervals, perferably after each use. Waiting too long can make cleaning unnecessarily difficult and in some cases impossible. In certain circumstances, very heavy soiling can even damage the appliance.
Cleaning and care Oven interior roof If the oven interior roof is badly soiled, the grill element can be lowered to make cleaning easier. Wait until the grill element has cooled down before lowering it to avoid the danger of being burnt. Appliance front and control panel ^ All surfaces and controls should be cleaned using an E-Cloth or with warm water and a little washing up liquid applied with a soft sponge or cloth. ^ Wipe the surfaces dry using a soft cloth.
Cleaning and care Glass fronted appliances Avoid: The appliance front and controls are susceptible to scratches and abrasions. – cleaning agents containing soda, acids or chlorides, Avoid: – abrasive cleaning agents, e.g. powder cleaners and cream cleaners, – abrasive sponges, e.g. pot scourers or sponges which have been previously used with abrasive cleaning agents, – abrasive cleaning agents, e.g. powder cleaners and cream cleaners, – abrasive sponges, e.g.
Cleaning and care Avoid: Accessories supplied – cleaning agents containing soda, acids or chlorides, Combi rack – abrasive cleaning agents, e.g. powder cleaners and cream cleaners, – abrasive sponges, e.g. pot scourers, or sponges which have been previously used with abrasive cleaning agents. To help prevent re-soiling, a conditioning agent for stainless steel such as Neoblank (available from the Miele Spare Parts Department) can also be used.
Problem solving guide Installation work, maintenance and repairs may only be carried out by suitably qualified and competent persons in accordance with national and local safety regulations. Repairs and other work by unqualified persons could be dangerous and the manufacturer will not be held liable. Ensure current is not supplied to the appliance until after maintenance or repair work has been carried out. Some minor problems can be corrected without contacting the Miele Service Department.
Problem solving guide ^ Unscrew and remove the lamp cover. ^ Pull the halogen lamp out. ^ Fit a new halogen lamp. Specification: 12 V, 10 W, heat resistant to 300 °C, fitting W271, Osram, Type 64418 ^ Replace the cover and screw into place. ^ Reconnect the appliance to the mains supply. . . . the food is not sufficiently heated or is not cooked at the end of a set time . . . cakes or biscuits are not cooked after a recommended time ^ Check whether – the correct temperature was set.
Problem solving guide . . . food cools down too quickly after being reheated or cooked in microwave mode. When cooked by microwaves, food begins to cook from the outside first, the inside of the food relying on the slower conduction of heat. If food is cooked at a high power level it is possible that the heat may not have reached the centre of the food. Food may be warm in the middle but cool on the edge.
After sales service In the event of any faults which you cannot easily remedy, please contact – your Miele Dealer or – the Miele Service Department (see back cover for address). When contacting your Dealer or the Service Department, please quote the model and serial number of your appliance. These are given on the data plate which is located on the front of the oven cavity. Please note that calls may be monitored and recorded for training purposes.
Electrical connection IRL, U.K., ZA All electrical work should be carried out by a suitably qualified and competent Miele approved service technician in strict accordance with local and national safety regulations (BS 7671 in the UK). This appliance is supplied with a mains cable and plug for connection to a 230 - 240 V, 50 Hz single phase supply. The voltage and connected load are given on the data plate situated at the front of the oven interior. Please ensure that these match the household mains supply.
Electrical connection AUS, NZ All electrical work should be carried out by a competent person, in accordance with national and local safety regulations. WARNING THIS APPLIANCE MUST BE EARTHED This appliance is supplied with a mains cable and plug for connection to a 230 - 240 V, 50 Hz single phase supply. The voltage and connected load are given on the data plate situated at the front of the oven interior. Please ensure that these match the household mains supply.
Installation Building-in options Installation in a tall unit The appliance is suitable for installation: – in a tall unit in combination with an oven – in a tall unit on its own – in a base unit Building-in dimensions Installation in a tall unit in combination with an oven Installation in a base unit If fitted underneath a hob, the installation instructions for the hob must also be taken into account.
Installation Installation ^ Connect the appliance to the electricity supply. ^ Place the oven into the oven housing unit as far as the oven trim and align. ^ Open the oven door, and with two screws secure the oven to the side walls of the furniture unit through the holes in the oven trim. The oven must not be operated until it has been correctly installed in its housing unit.
Miele{home Before your appliance can be used with Miele|home you need to install a Miele|home communication module. Installing and logging onto Miele{home ^ Disconnect the appliance from the mains electricity supply. ^ Unscrew the screws used for securing the appliance into the sides of the housing unit. ^ Pull the appliance out of the housing unit until the shaft, in which the Miele|home communication module is fitted, is accessible. ^ Insert the Miele|home communication module.
Alteration rights reserved / 3306 H 4050 BM, H 4060 BM M.-Nr.