Operating and Installation instructions Ovens and cookers H 4120, H 4220, H 4130, H 4230, H 4140, H 4240, H 4150, H 4250, H 4160, H 4260 To avoid the risk of accidents or damage to the appliance, it is essential to read these instructions before it is installed and used for the first time. G M.-Nr.
Contents Description of the appliance . . . . . . . . . . . . . . . . . . . . . . . . . . . . . . . . . . . . . . . . . 4 Features . . . . . . . . . . . . . . . . . . . . . . . . . . . . . . . . . . . . . . . . . . . . . . . . . . . . . . . . . . 8 Accessories . . . . . . . . . . . . . . . . . . . . . . . . . . . . . . . . . . . . . . . . . . . . . . . . . . . . . . . 9 Baking tray, grill pan and rack . . . . . . . . . . . . . . . . . . . . . . . . . . . . . . . . . . . . . . 9 Roasting filter . . . . . . .
Contents Altering oven settings v . . . . . . . . . . . . . . . . . . . . . . . . . . . . . . . . . . . . . . . . . . 29 Time of day display (P I) . . . . . . . . . . . . . . . . . . . . . . . . . . . . . . . . . . . . . . . . . . . . 29 Buzzer (P 2). . . . . . . . . . . . . . . . . . . . . . . . . . . . . . . . . . . . . . . . . . . . . . . . . . . . . . 30 Baking . . . . . . . . . . . . . . . . . . . . . . . . . . . . . . . . . . . . . . . . . . . . . . . . . . . . . . . . . . 31 Baking chart . . . . . .
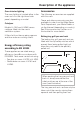
Description of the appliance H 4120 E, H 4220 E, H 4130 E, H 4230 E Control panel Oven interior a Controls for front left and back left cooking zones* b Function selector* c Temperature selector* d Temperature indicator light y e Indicator light for cooking zones z f Controls for front right and back right cooking zones* g Heating element for top heat and grilling with catalytic enamelled roof liner h Air inlet for fan i Catalytic enamelled back panel j Side runners with 4 shelf levels k Oven door * ret
Description of the appliance H 4120 B, H 4220 B, H 4130 B, H 4230 B Control panel Oven interior a Function selector * b Temperature selector * c Temperature indicator light y d Heating element for top heat and grilling with catalytic enamelled roof liner e Air inlet for fan f Catalytic enamelled back panel g Side runners with 4 shelf levels h Oven door * retractable at the 0 setting, depending on model 5
Description of the appliance H 4140 E, H 4240 E, H 4150 E, H 4250 E, H 4160 E KAT, H 4260 E KAT Control panel Oven interior a Controls for front left and back left cooking zones* b Indicator light for cooking zones z c Function selector * d Clock/timer with O, Q and P buttons e Temperature selector * f Temperature indicator light y g Controls for front right and back right cooking zones* h Heating element for top heat and grilling with catalytic enamelled roof liner i Air inlet for fan j Catalytic ename
Description of the appliance H 4140 B, H 4240 B, H 4150 B, H 4250 B, H 4160 B KAT, H 4260 B KAT Control panel Oven interior a Function selector * b Clock/timer with O, Q and P buttons c Temperature selector * d Temperature indicator light y e Heating element for top heat and grilling with catalytic enamelled roof liner f Air inlet for fan g Catalytic enamelled back panel h Side runners with 4 shelf levels i Oven door * retractable at the 0 setting, depending on model 7
Description of the appliance Features PerfectClean treated surfaces Oven controls The following surfaces are all treated with PerfectClean enamelling: In addition to operating the various cooking programmes to bake, roast and grill, the electronic controls on models with a clock/timer also offer the following features: – Clock display – Minute minder – Timer to automatically switch cooking programmes off, or on and off – Settings can be customised Cooling system As soon as the oven is switched on, a coo
Description of the appliance Oven interior lighting Accessories The oven lighting is located either in the oven roof or in the right-hand side panel, depending on model. The following accessories are supplied with this oven. Catalyser Models H 4160 and H 4260 have a catalyser fitted into the oven’s ventilation system. It filters fat from the escaping vapours and thus reduces cooking smells.
Description of the appliance Roasting filter The roasting filter must be fitted in front of the fan when cooking anything fatty, or where food is likely to splatter, e.g. when open roasting or grilling meat. or roasting. The juices from the food being cooked collect under the anti-splash tray. This prevents them from spitting and making the oven dirty. The juices can then be used for making gravy and sauces.
Caring for the environment Disposal of the packing material The transport and protective packing has been selected from materials which are environmentally friendly for disposal and can normally be recycled. Ensure that any plastic wrappings, bags etc. are disposed of safely and kept out of the reach of babies and young children.
Warning and Safety instructions This appliance complies with all relevant legal safety requirements. Improper use of the appliance can, however, present a risk of both personal injury and material damage. To avoid the risk of accidents and damage to the appliance, please read these operating instructions carefully before installation and before using it for the first time. They contain important notes on installation, safety, operation and care of the appliance.
Warning and Safety instructions Installation, maintenance and repair work may only be carried out by a suitably qualified and competent person in accordance with national and local safety regulations. Repairs and other work by unqualified persons could be dangerous. The manufacturer cannot be held liable for unauthorised work. If the supply cord is damaged, it must be replaced by a Miele approved service technician in order avoid a hazard.
Warning and Safety instructions Use oven gloves when placing food in the oven, turning or removing it and when adjusting oven shelves etc. in a hot oven. When working with "Conventional" heating or when grilling, the element in the roof of the oven and the roof liner become very hot, and there is a danger of being burnt. Do not use plastic containers. These melt at high temperatures and could damage the oven. Do not heat up unopened tins or jars of food in the oven.
Warning and Safety instructions Never add water to food on a hot baking tray or grill pan or directly onto food in a hot oven. The steam created could cause serious burns or scalding and the sudden change in temperature can damage the enamel. Never line the floor of the oven with aluminium foil when using Conventional heat A, Gentle bake x or Rapid heat up Ä. Do not place a dish, tin, baking tray or grill pan on the floor of the oven.
Warning and Safety instructions When using kitchen appliances connected to sockets near the oven, ensure that the cable cannot get trapped in a hot oven door, which could melt the cable insulation. Danger of electric shock. Never use a steam cleaner to clean the appliance. The steam could reach electrical components and cause a short circuit. If using alcohol in your recipes, high temperatures can cause the alcohol to vaporise and even to ignite on the hot heating elements.
Before using for the first time Depending on model, the oven is supplied with the controls pushed in. They have to be released before the oven can be used. Setting the time of day for the first time On models with a clock/timer you also have to set the time of day before the oven can be used. The time can only be entered when the function selector is at "0". In the display: – the clock symbol m (time of day) will light up, I2:00 m V ^ Use the P or O button to enter the hour first of all.
Before using for the first time Cleaning and heating up for the first time Before use, please remove - any stickers from the floor of the oven, baking trays, grill pan etc. - the protective cork discs from the sides of the oven. - any protective foil from the oven front. ^ Before heating it up it is a good idea to wipe the oven out with a damp cloth first. This way any dust or bits of packaging that may have accumulated in the oven cavity during storage and unpacking will be removed.
Description of the oven systems Fan plus Y Conventional A This system works by the circulation of heated air. With the conventional method of heating, radiant heat is directed onto the food from above and below. It is useful where a fairly long cooking time is required and a deep colour and good rise are needed. A fan situated on the back wall of the oven draws in the air, heats it over a ring element and blows the heated air through the carefully spaced openings in the rear panel of the oven.
Using the oven Controls The oven is operated with the function selector and the temperature selector. Do not attempt to turn it all the way round in either direction as this will damage the selector. Function selector – Light H/v For switching on the oven light independently. Depending on model, oven settings can also be changed when the function selector is at this position. See "Altering oven settings". – Conventional A For long, slow baking or traditional recipes, e.g. fruit cake, casseroles.
Using the oven Temperature selector element switches on again automatically. Using the oven ^ Place the food in the oven. ^ Turn the function selector to the required function. The oven interior light comes on. ^ Use the temperature selector to set the required temperature. The oven starts to heat up and the cooling fan switches on. ^ Take the food out of the oven when it is ready. Turn the function selector and the temperature selector back to the "0" position.
Using the oven Rapid heat-up To pre-heat the oven: Rapid heat-up Ä can be used to: ^ Select Rapid heat-up Ä. – pre-heat the oven, ^ Use the temperature selector to set the required temperature. – heat up ready-meals. The oven will start to heat up. Pre-heating the oven Most dishes can be placed in a cold oven. They will then make use of the heat produced during the heating-up phase. It is only necessary to pre-heat the oven in certain instances.
Clock/Timer Depending on model, your oven is fitted with a clock/timer. The clock/timer can: – show the time of day, – be used as a minute minder, – switch the oven off, or on and off automatically. Controls The clock/timer is operated via: – the Q, P and O buttons, and – the display. Q, P and O buttons The Q button is used to select the symbol for the clock/timer setting you wish to select or change.
Clock/Timer Whilst triangle V is flashing, use the O or P buttons immediately to make any changes to the setting selected: – The P button increases the value shown. – The O button reduces the value shown. Triangle V will flash for approx. 5 seconds. Settings can only be changed using the O or P buttons while it is flashing. If this period has elapsed you, will need to call up the required symbol again by pressing the Q button. Each press on the O or P button alters the time in one-minute steps.
Clock/Timer Minute minder At the end of the set time The minute minder can be used to time any activity in the kitchen, e.g. boiling eggs. – the l symbol flashes for approx. 1 minute. You can enter a time of up to a maximum of 12 hours. You can set the minute minder at the same time as another timed programme, e.g. as a reminder to stir a dish or add seasoning etc. To set the minute minder 0:00 l m V – "0:00" lights up for approx. 1 minute.
Clock/Timer Programming cooking durations Switching the cooking programme off automatically On appliances with a clock/timer you can programme cooking durations so that the oven switches off, or on and off automatically. You can enter a cooking duration of up to a maximum of 12 hours. You can set the timing for a cooking function, by selecting one of the symbols and entering a time. It is a good idea to set the oven to switch on and off automatically for roasting.
Clock/Timer Switching the oven on and off automatically To use the automatic switch-on and switch-off functions on the oven, both the cooking duration and the end time must be entered. For example: The time now is 10:45; you want a dish with a cooking duration of 90 minutes to be ready at 13:30. ^ Place the food in the oven. ^ Select your cooking function and set a temperature. The oven light will come on and the oven will heat up.
Clock/Timer The end of a cooking programme To check and change an entered time At the end of the cooking duration It is possible to check or change times entered for a cooking programme at any time by calling up the relevant symbol. – the oven heating switches off automatically. – the cooling fan will continue to run for a while. – the g symbol flashes. – a buzzer sounds five times, if it is switched on (see section "Altering oven settings v").
Altering oven settings v On appliances with a clock/timer, the following settings can be changed: – the time of day display – the buzzer. The altered settings are retained after a power cut. P I "P I" will appear in the display. ^ Press the Q button. Time of day display (P I) The time of day display can be switched on or off. When the time of day display is switched off and the function selector is turned to the "0" position, the display remains dark. The time of day continues to run in the background.
Altering oven settings v Buzzer (P 2) There is a choice of 3 tones or alternatively, the buzzer can be switched off. To alter the setting: ^ Turn the function selector to the "Light H / v" position, and press the Q button. "P I" will appear in the display. ^ Press the P or O button. P 2 "P 2" will appear in the display. ^ Press the Q button. 30 S 0 The following appears in the display: – "S 0", if the buzzer is switched off. – "S I", "S 2" or "S 3", if the buzzer is switched on.
Baking The following settings are recommended for baking: – Fan plus Y – Conventional A Bakeware For the best baking results make sure that you chose bakeware in a material suitable for the particular heating system. Fan plus Y Most types of heat-resistant tins or dishes are suitable. Conventional A The following baking tins give an even, brown result: Dark metal, aluminium or enamel tins with a matt finish. Heat resistant glass and ceramic dishes can also be used. Avoid bright, shiny metal tins.
Baking Conventional A Only use dark baking tins with a matt finish. Bright, shiny tins give an uneven or pale result, and in some cases the cakes might not cook properly. Place tins centrally on the rack on shelf level 1 or 2. Older recipes and cookery books New guidelines (German standard DIN 44547 has been replaced by European standard EN 60350) have led to slight adjustments in oven temperature settings.
Baking Frozen food When baking frozen products such as cakes, pizza and baguettes, use the lowest temperature quoted on the manufacturer’s packaging. Place such items on baking parchment directly on the rack or in the pizza pan (extra accessory). Placing them on the baking tray or in the grill pan can cause the metal to distort. This distortion would increase with subsequent use. Small items of frozen food such as oven chips or potato croquettes can be cooked on a baking tray or in the grill pan.
Baking chart Fan plus Y Temp. in °C Recommended shelf level 5) Time in mins.
Baking chart Conventional A Temp. in °C Recommended shelf level 5) Time in mins.
Roasting We recommend using Fan plus Y for roasting. Conventional A can also be used. Exception: Pre-heat at the temperature suggested when roasting beef. Shelf levels Fan plus Y: When roasting on the rack or in an open tin make sure the roasting filter is fitted in front of the fan in the back of the oven before starting. Use shelf level 1 for roasting. Exception: With Conventional A use shelf level 2 for - poultry up to 1 kg, - roast beef, - and fish.
Roasting Older recipes and cookery books Pot roasting New guidelines (German standard DIN 44547 has been replaced by European standard EN 60350) have led to slight adjustments in oven temperature settings. Season the meat and place in the pot. Add some knobs of butter or margarine or a little oil or cooking fat. Add about 1 /8 litre of water when roasting a large, lean joint of meat (2-3 kg) or roasting poultry with a high fat content.
Roasting chart Food Recommended shelf level6) Fan plus Y 1) Conventional A 1) 5) Temperature in °C 2) Time in mins. Temperature in °C 2) Time in mins. 100 - 120 Roast beef (approx. 1 kg) 1 170 - 190 100 - 120 190 - 210 Beef fillet, approx. 1 kg 3) 1 190 - 210 45 - 55 200 - 220 45 - 55 1 4) 180 - 200 90 - 120 190 - 210 90 - 120 Pork, joint (approx. 1 kg) 1 170 - 190 100 - 120 200 - 220 100 - 120 Pork, joint (approx.
Grilling Grilling on the rack Grill with the oven door closed. If you grill with the door open, hot air will escape from the oven instead of being cooled automatically by the cooling fan. Control elements on the oven could get hot. Danger of burning. Grill settings Grill n For grilling thin cuts and for browning food. Put the roasting filter in front of the fan in the back of the oven when grilling. Fan grill N For grilling larger items, e.g. rolled meat, poultry.
Grilling Temperature Tips on grilling For thin cuts of meat (e. g. chops or steak). . . maximum (n) It is best to grill food of a similar thickness at the same time so that the grilling time for each item does not vary too greatly. For grilling larger items, (e. g. rolled meat, poultry) . . . . . 240 °C See the grill chart for more information.
Grill chart Pre-heat the grill for at least 5 minutes with the door shut before grilling. Food to be grilled Grill n 1) Fan grill N 1) Recommended shelf level4) Temperature Total grilling time in mins. 2) Temp. in °C Total grilling time in mins.
Defrosting You can also use the oven for defrosting. To defrost select Fan plus Y with a maximum temperature of 50 °C. For defrosting meat and delicate foods, use the lowest possible temperature (30 °C). Please note: – Where possible remove the packaging and put the food to be defrosted on a baking tray or into a dish. – All meat and poultry should be fully defrosted before cooking. Do not use the liquids from defrosting.
Cooking We recommend using the following oven settings: – Fan plus Y – Conventional A Cooking containers made of ovenproof glass, porcelain, china, and earthenware are all suitable. They should have heat-resistant handles and knobs. Roasting bags can also be used. ^ Put the rack in on shelf level 1 and place the dish on the rack. ^ Select your cooking function and set a temperature. Fan plus Y . . . . . . . . . . . 170 - 190 °C Conventional A. . . . . . . . . 180 - 200 °C Cooking durations Casseroles . . .
Cooking Examples of ready-meals Food Temp. in °C* Recommended shelf Time level, from the bottom* in mins.
Cleaning and care In the UK, Miele branded cleaning and conditioning products as well as a microfibre E-cloth, which is suitable for cleaning surfaces such as stainless steel, glass, plastic and chrome without the use of chemicals, are available from the Miele Spare Parts Dept. or via the Internet (depending on country).
Cleaning and care The appliance front and controls are susceptible to scratches and abrasion. Avoid: Avoid: – cleaning agents containing soda, acids or chlorides, – cleaning agents containing soda, acids or chlorides, – abrasive cleaning agents, e.g. powder cleaners and cream cleaners, – abrasive cleaning agents, e.g. powder cleaners and cream cleaners, – abrasive sponges, e.g. pot scourers or sponges which have been previously used with abrasive cleaning agents. – abrasive sponges, e.g.
Cleaning and care Accessories Always remove all accessories, trays and racks which are not being used when using the oven to get the best results and to keep cleaning of the trays to a minimum. Baking tray, grill pan, anti-splash tray (if fitted), racks and runners The surfaces of these have been treated with PerfectClean enamel. Please refer to the section "PerfectClean" for information on cleaning and care.
Cleaning and care PerfectClean Before using for the first time remove any stickers from PerfectClean surfaces. The enamelled surfaces of the oven interior, baking tray, grill pan, anti-splash tray (if fitted), rack and side supports have been treated with a special type of enamelling called "PerfectClean". This surface has very good anti-stick properties which is much easier to keep clean than conventional oven enamel, if cleaned regularly.
Cleaning and care Remove the catalytic back panel, roof liner and side liners (if fitted) before using oven sprays. The chemicals used in oven sprays will damage catalytic enamel rendering it ineffective. Apply a spray oven cleaner to the soiled areas. Leave to take effect for a couple of minutes only! If necessary use a soft sponge, soft nylon brush or a scraper suitable for glass surfaces to loosen the soiling. Repeat the process if necessary.
Cleaning and care Catalytic enamel surfaces The back panel and the roof liner and side liners (if fitted) are coated with dark grey catalytic enamel. Soiling from oil and fat is burnt off these surfaces when very high temperatures are used in the oven. The higher the temperature, the more effective the process. The catalytic coating becomes ineffective through using – abrasive cleaning agents, – hard brushes or abrasive sponges, – oven sprays.
Cleaning and care To remove the oven door Please note: the oven door is heavy. It should be gripped firmly at the sides when being removed or refitted. Do not attempt to take the door off the hinge guides when it is in a horizontal position. The guides will close, and damage the appliance. Danger of injury. The oven door is connected to the oven by hinges. ^ Then lift the door upwards as far as it will go. Before removing the door, the locking clamps on both hinges have to be released.
Cleaning and care To dismantle the oven door The oven door has seals on all sides to protect it from moisture ingress. If, however, condensate has worked its way in between the glass panes, the door can be dismantled in order to clean in between the panes. Do not use scouring agents, hard sponges or brushes or sharp metal tools to clean glass as these can scratch the surface. Always remove the oven door before dismantling it. ^ Place the door on a protective surface (e.g.
Cleaning and care ^ Clean the glass panes and other parts and then put the oven door back together again. ^ Gently lift the inner pane up and out. ^ Push the middle pane into the frame almost to the end. The material (M-) number printed on the pane must be legible in the bottom right hand corner (see illustration). Fit the sealing strip into position, then push the pane in as far as it will go. ^ Pull the pane forwards to remove it.
Cleaning and care ^ Insert the inner pane with the printed text facing downwards. Be careful that the side seals do not slip and that the pane is pushed in as far as possible. ^ Put the guides back in position, then tighten the screws in the trim. To refit the door ^ Fit the trim with the seal in front of the glass panes. Make sure that the seal is sitting correctly to prevent any steam penetrating inside the door.
Cleaning and care To remove the runners Make sure that the door goes back on straight. ^ Open the door fully. ^ Flip both locking clamps back up as far as they will go into a horizontal position. Make sure that the notches on the locking clamps hook into the slots on the door as illustrated. It is essential that the locking clamps lock securely when the door is re-fitted after cleaning. Otherwise the door could work loose from the hinges, resulting in damage to the door.
Cleaning and care To remove the catalytic back panel, roof liner and side liners (if fitted) – Roof liner ^ Remove the runners. Make sure the oven heating elements are switched off and cool. Danger of burning. The catalytic panels and liners can be removed for cleaning if necessary. – Back panel ^ Unscrew the wing nut. Lower the top heating element carefully. Do not use force to pull it down as this can cause the element to break. ^ Take out the roof liner. ^ Remove the runners.
Cleaning and care When reassembling the catalytic side liners, ensure they sit correctly. ^ Ease the back lug into the opening in the rear wall panel. ^ Lift the front locating hole on to the guide pin behind the collar. ^ Put the runners back into place.
Problem solving guide Installation, maintenance and repairs may only be carried out by suitably qualified and competent persons in accordance with local and national safety regulations. Repairs and other work by unqualified persons could be dangerous, and the manufacturer will not be held liable for unauthorised work. Ensure current is not supplied to the appliance until after maintenance or repair work has been carried out. . . the heating works but not the oven lighting The lamp needs changing.
Problem solving guide Light in the side wall: ^ Remove the runners and side liners (if fitted). ^ Lift the lamp cover from its retainers. ^ Change the lamp. When purchasing a new lamp, take the old one with you to make sure you obtain the correct replacement (230 V, 25 W, E 14, heat resistant to 300 °C) ^ Push the lamp cover back into its retainers, and replace the runners and side liners (if fitted). Reassemble in the reverse order, carefully ensuring all parts are correctly in place. . . .
Problem solving guide . . . cakes or biscuits are unevenly browned . . . spots like rust appear on the catalytic surfaces There will always be a slight unevenness. When roasting on the rack, the circulating air sometimes picks up spices, which are then deposited on the oven interior walls. These residues are not removed by catalytic cleaning, and should be removed while fresh with a mild solution of hot water and washing up liquid applied with a soft brush.
After sales service In the event of any faults which you cannot remedy yourself, please contact – your Miele Dealer or – the Miele Service Department (see back cover for contact details). When contacting your Dealer or the Service Department, please quote the model and serial number of your appliance. These are shown on the data plate, visible below the oven interior, with the door fully open. For appliances with hob controls, please also quote the model and serial number of your hob.
Extra accessories The following accessories may come are standard with some models. They are available at extra cost from your Miele Dealer, the Miele Spare Parts Department or via the Internet (depending on country). Pizza pan Telescopic baking carriage This circular pan is suitable for cooking pizzas, flat cakes made with yeast or whisked mixtures, sweet and savoury tarts, baked desserts, and can also be used for deep frozen cakes and pizzas.
Extra accessories Gourmet oven dish The gourmet oven dish can be placed in the oven directly on the runners. It has non-tip safety notches like the oven tray to prevent it being pulled out too far. The dish has a special protective anti-stick coating. It is available in two sizes: HUB 61-22, 8 - 10 servings, W x D x H: 38 x 22 x 8.6 cm HUB 61-35, 16 - 20 servings, W x D x H: 38 x 35 x 8.6 cm A lid is available separately.
Electrical connection UK, IRL, ZA All electrical work should be undertaken by a suitably qualified and competent person in strict accordance with current national and local safety regulations (BS 7671 in the UK). Installation, repairs and other work by unqualified persons could be dangerous. The manufacturer cannot be held liable for unauthorised work. Ensure power is not supplied to the appliance until after installation or repair work has been carried out.
Electrical connection UK, IRL, ZA Cooker with integrated hob controls "E" model This is not available in all countries. For some countries the version of the cooker with integral hob controls is supplied for connection to a 3N ~ 400 V power supply. Any adaptations must only be carried out in consultation with the relevant Miele Service Dept. Possible combinations: Miele built-in cookers may only be combined with hobs and their respective control units as specified by Miele for use with that cooker.
Electrical connection UK, IRL, ZA IRL ZA The voltage and rated load are given on the data plate, visible when the oven door is open. Please ensure that these match the household mains supply. Data relating to electrical connection will be found on the data plate, visible when the oven door is open. Make sure that these figures comply with the main voltage. Connection should be made via a suitable isolator which complies with national and local regulations.
Electrical connection AUS, NZ Connection diagram All electrical work should be undertaken by a competent person in strict accordance with national and local safety regulations. The voltage and rated load are given on the data plate, visible when the oven door is open. Please ensure that these match the household mains supply. Please quote these data, and the model and serial number when contacting the Miele Service dept.
Electrical connection AUS, NZ AUS: NZ: Underbench oven Underbench oven The underbench oven is suitable for connection to an a.c. single phase 240 V, 50 Hz electricity supply. The underbench oven is suitable for connection to an a.c. single phase 230 V, 50 Hz electricity supply. The minimum fuse rating according to "maximum demand" is 32 amps with hob. The minimum fuse rating according to "maximum demand" is 32 amps with hob.
Installing the cooker The appliance must not be operated until it has been correctly installed in its housing unit. Otherwise it poses an electric shock hazard. Before connecting the appliance to the mains you must disconnect the power supply to the cooker point. Follow the connection diagram supplied with the cooker. Important: Do not fit insulation material inside housing unit. This would hinder the intake of air to the appliance. ^ Connect the cooker cable to the isolator.
Installing the oven The appliance must not be operated until it has been correctly installed in its housing unit. Otherwise it poses an electric shock hazard. Important: Do not fit insulation material inside housing unit. This would hinder the intake of air to the appliance. Turn off the mains electricity supply to the isolator. ^ Connect the mains cable to the isolator. ^ Push the appliance into the oven housing unit and align it.
M.-Nr.