Operating and Installation instructions Pyrolytic ovens H 4331, H 4431 To avoid the risk of accidents or damage to the appliance, it is essential to read these instructions before it is installed and used for the first time. G M.-Nr.
Contents Description of the appliance . . . . . . . . . . . . . . . . . . . . . . . . . . . . . . . . . . . . . . . . . 5 Features . . . . . . . . . . . . . . . . . . . . . . . . . . . . . . . . . . . . . . . . . . . . . . . . . . . . . . . . . . 6 Accessories . . . . . . . . . . . . . . . . . . . . . . . . . . . . . . . . . . . . . . . . . . . . . . . . . . . . . . . 8 Baking tray, grill pan and rack . . . . . . . . . . . . . . . . . . . . . . . . . . . . . . . . . . . . . . 8 Roasting filter . . . . . . .
Contents Switching off automatically . . . . . . . . . . . . . . . . . . . . . . . . . . . . . . . . . . . . . . . . . . 35 Switching on and off automatically . . . . . . . . . . . . . . . . . . . . . . . . . . . . . . . . . . . . 36 To check and change an entered time . . . . . . . . . . . . . . . . . . . . . . . . . . . . . . . . . 37 To delete a set time . . . . . . . . . . . . . . . . . . . . . . . . . . . . . . . . . . . . . . . . . . . . . . . . 37 System lock . . . . . . . . . . . . . . . . . . . . .
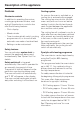
Description of the appliance Control panel * Oven interior a Programme selector, display b Multi-function selector with turn and press mechanism, Display c Door contact switch, Door lock for pyrolytic operation d Heating element for top heat and grilling with roof liner e Air inlet for fan f Side runners with 4 shelf levels g Oven door * style will depend on model 5
Description of the appliance Features Electronic controls In addition to operating the various cooking programmes to bake, roast and grill the electronic controls also offer the following features: – Clock display – Minute minder – Timer to automatically switch cooking programmes off, or on and off with automatic use made of residual heat – Settings can be customised. Safety features You can activate a system lock, to prevent the appliance being used unintentionally. See "System lock" for details.
Description of the appliance PerfectClean treated surfaces Vented oven door The following surfaces are all treated with PerfectClean enamelling: – Runners – Baking tray – Grill pan – Rack PerfectClean enamelled surfaces have very good anti-stick properties and are much easier to keep clean than conventional enamel, if cleaned regularly. See "Cleaning and care" for more information. The oven door is made up of a total of four panels. There is an opening at the top and bottom of these.
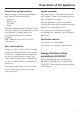
Description of the appliance Accessories Roasting filter The following accessories are supplied with this oven. These and other accessories are also available to order from the Miele Spare Parts Department, your Miele Dealer or via the Internet (depending on country). See "Extra accessories" further on in this booklet for more details.
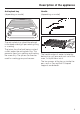
Description of the appliance Anti-splash tray Handle (depending on model) (depending on model) The anti-splash tray should be placed in the deep-sided grill pan when grilling or roasting. The juices from the food being cooked collect under the anti-splash tray. This prevents them from spitting and making the oven dirty. The juices can then be used for making gravy and sauces. The handle makes it easier to take the baking tray, grill pan and rack out of the oven, or to put them into it.
Caring for the environment Disposal of the packing material The transport and protective packing has been selected from materials which are environmentally friendly for disposal and can normally be recycled. Ensure that any plastic wrappings, bags etc. are disposed of safely and kept out of the reach of babies and young children.
Warning and Safety instructions This appliance complies with all relevant legal safety requirements. Improper use of the appliance can, however, present a risk of both personal injury and material damage. To avoid the risk of accidents and damage to the appliance, please read these operating instructions carefully before installation and before using it for the first time. They contain important notes on installation, safety, operation and care of the appliance.
Warning and Safety instructions Installation, maintenance and repair work may only be carried out by a suitably qualified and competent person in accordance with national and local safety regulations. Repairs and other work by unqualified persons could be dangerous. The manufacturer cannot be held liable for unauthorised work. If the supply cord is damaged, it must be replaced by a Miele approved service technician in order avoid a hazard.
Warning and Safety instructions Use oven gloves when placing food in the oven, turning or removing it and when adjusting shelves etc in a hot oven. When using "Conventional" heating or when grilling the element in the roof of the oven and the roof liner become very hot. The oven door gets much hotter during pyrolytic operation than during normal use. Make sure children cannot touch the oven whilst a pyrolytic programme is running. Danger of burning.
Warning and Safety instructions Bake larger frozen products, such as pizzas, on baking paper on the rack itself or in the pizza pan (see "Extra accessories"). Placing them on the baking tray or in the grill pan can cause the metal to distort, and this distortion will increase with each subsequent use. Frozen food such as oven chips or croquette potatoes can, however, be cooked on the baking tray or in the grill pan.
Warning and Safety instructions When using kitchen appliances connected to sockets near the oven, ensure that the cable cannot get trapped in a hot oven door, which could melt the cable insulation. Danger of electric shock. Never use a steam cleaner to clean the appliance. The steam could reach electrical components and cause a short circuit. If using alcohol in your recipes, high temperatures can cause the alcohol to vaporise and even to ignite on the hot heating elements.
Safety feature Door lock for pyrolytic mode For safety reasons the door is automatically locked at the beginning of the pyrolytic programme. At the end of the programme it will not be unlocked until the temperature inside the oven has dropped to below 280 °C. If the Pyrolytic . cleaning programme has been started by mistake or if the process is interrupted, the door lock will be released: – immediately if the temperature is below 280 °C. The door can then be opened about 30 seconds later.
Before using for the first time The oven is supplied with the controls pushed in. They have to be released before the oven can be used. After installation and before using the oven for the first time the clock has to be set. When the oven is first switched on the clock will show 12:00 until you have set the correct time. The display will go dark about 30 seconds after entering the time of day. The time will continue to run in the background. The time can also be set to show constantly in the display.
Before using for the first time Cleaning and heating up for the first time Before use, please remove - any stickers from the floor of the oven, baking trays, grill pan etc. - the protective cork discs from the sides of the oven. - any protective foil from the oven front. See "Cleaning and care" for more information. Before using the oven for the first time – take all accessories out of the oven and wash them. – then heat the oven up once with nothing in it.
Controls The oven controls consist of: – the Programme selector, for selecting oven functions with, e.g. Lighting H/v, Fan plus Y, Auto roast E, ... – the Multi-function selector with press and turn mechanism for selecting oven functions which require input e.g. the time of day m, cooking durations g, ... – the Display, where all changes and settings are visible. Display U V l m f g)a The bottom line shows the Symbols of functions where data can be changed.
Controls Multi-function selector with turn and press mechanism Whilst triangle V is flashing, use the multi-function selector to make any changes: – Turning it clockwise, increases the value shown or engages the function, – Turning it anti-clockwise, reduces the value or switches the function off. To select a function, turn the multi-function selector until triangle V is underneath the required symbol in the display of the function you wish to make changes to.
Functions and symbols in the display Different functions can be called up depending on the position of the programme selector. This chart gives an overview of these settings.
Operating sequence ^ Whilst the triangle V is flashing, use the multi-function selector immediately to make any changes. The triangle V will flash for appox. 5 seconds. If this input period has elapsed you will have to re-select the function. ^ Press the multi-function selector gently. Temperatures, times and other functions are controlled using two rotary dials: This confirms your selection or any changes you have made. Entries made are shown in the display.
Changing the time of day In the following example the time of day is changed from 12:05 to 14:37. ^ Turn the function selector to "0". l m V ^ Turn the multi-function selector (right hand dial) until triangle V is underneath the m symbol in the display. m V ^ Turn the multi-function selector until "37" shows in the display. ^ Press the multi-function selector gently. This confirms the minutes. ^ Press the multi-function selector gently. The symbols go out in a couple of seconds.
To set the minute minder The minute minder can be used to time any activity in the kitchen, e.g. boiling eggs. You can enter a time of up to a maximum of 12 hours. You can set the minute minder at the same time as another timed programme, e.g. as a reminder to stir a dish or add seasoning etc. At the end of the time set for the minute minder – a buzzer will sound fives times in succession. The standard default setting can be changed if you wish. See "Altering oven settings v – P 2 and P 3".
Description of the oven systems Fan plus Y Auto roast E This system works by the circulation of heated air. The oven heats initially to a high temperature (230 °C) which seals the meat to keep it succulent and tasty. As soon as this temperature has been reached, the oven temperature automatically drops back down to the pre-selected setting.
Description of the oven systems Gentle bake ö Gentle bake uses the fan heat element and the fan. It is suitable for bakes and gratins where a crispy finish is required. wall of the oven. This enables a lower temperature to be selected than for conventional grilling. Grill with the oven door closed. Pyrolytic cleaning . Grill m In this mode the oven cleans itself. Pre-heat the grill for at least 5 minutes with the oven door closed before grilling. The oven is heated up to approx.
Using the oven A function must first be selected using the programme selector and then, if necessary, the temperature changed. The functions on this oven have pre-set recommended temperatures to simplify operation. Programme selector – Intensive bake F For recipes which require a moist topping and a crisp base, e. g. cheese cake, pizza, Quiche Lorraine and German style open fruit cakes. It is not suitable for roasting or shallow baking because the base will brown too much.
Using the oven Selecting a temperature U V As soon as a cooking function is selected, a recommended temperature will appear in the display. If you are happy with the recommended pre-set temperature, the display will change a few seconds later to show this as the target temperature. The oven will then start heating up. The display will then change to show the actual temperature in the oven, and depending on which function is being used the symbol p or U will also show.
Using the oven Using the oven Below is an example of setting a simple programme. To bake a cake using Fan plus Y, 150 °C. ^ Place the cake in the oven and close the door. ^ Turn the programme selector to the Fan plus Y position. U V Once this setting has been accepted – the actual temperature in the oven will be displayed, – the oven heating will switch on, – and the cooling fan will switch on. U V Take the cake out of the oven when it is ready. ^ Turn the programme selector to "0".
Using the oven Fan run-on Rapid heat-up The cooling fan will continue to run for a while after the oven has been switched off to prevent any humidity building up in the oven, on the control panel or on the oven housing unit. The appliance is supplied with the Rapid heat-up function activated as standard (factory default setting). The cooling fan is set up on temperature control as standard. It switches off automatically once the oven temperature has dropped to about 70 °C.
Using the oven To switch "Rapid heat-up" off Pre-heating the oven Rapid heat-up should not be used for some items such as biscuits and small cakes because they will brown too quickly from the top. Most dishes can be placed in a cold oven. They will then make use of the heat produced during the heating-up phase. To switch it off: It is only necessary to pre-heat the oven in certain instances. ^ Call up the U symbol. ^ Reduce the temperature to 100 °C.
Entering a cooking duration You can programme cooking durations in this oven. Cooking processes are then controlled so that the oven will switch off, or on and off automatically. You can set the timing for a cooking function, by selecting one of the symbols and entering a time. Duration g U l m f g) V Select the g symbol to enter the duration of a cooking programme. Once the time set has elapsed, the oven will switch itself off automatically. The maximum length of time which can be set is 12 hours.
Entering a cooking duration Symbols in the display In addition to the m and p symbols the symbols representing the duration, start and finish time are also displayed constantly if times have been entered for a cooking programme. If you have only entered the duration (e. g. 1 h. 30 min.) the display will show: U l m g V – the actual temperature – the p, m and g symbols. The triangle V underneath the g symbol indicates that a programme duration is being displayed. The time will count down in the display.
Entering a cooking duration Whilst a programme is running the following show in the display U m g) V The oven heating will switch on again if: – the required temperature is altered. – the cooking duration is lengthened significantly. – the actual temperature At the end of the cooking duration – Duration or Finish time – the oven heating switches off automatically.
Entering a cooking duration Switching off automatically To switch a programme off automatically a duration has to be entered. The following example shows the programming for a cake using Fan plus Y at 160 °C for 45 minutes. ^ Place the cake in the oven and close the door. ^ Select the Fan plus and set the temperature.
Entering a cooking duration Switching on and off automatically Then set the end time: It is a good idea to set the oven to switch on and off automatically when roasting. When baking, the oven should not be set to start a long time off. Otherwise the batter or dough will dry out, and the raising agents will lose their effectiveness. An example is used here to explain the procedure: The time is 9:05. A roast needs 1 h 20 min using Auto roast E at 160 °C and needs to be ready at 13:20.
Entering a cooking duration To check and change an entered time p m f g) V The Start time (13:20 - 1:20 = 12:00 h) will show in the display, when you call up the f symbol. The oven will start heating up at this time and the duration will then be displayed. It is possible to check or change times entered for a cooking programme at any time by calling up the relevant symbol. To delete a set time ^ Turn the programme selector to "0". If there is a power cut, all data entered will be deleted.
System lock This oven is equipped with a System lock. This prevents the oven being switched on unintentionally, by children for example. To activate the system lock The system lock cannot be activated until you have activated P 4. See "Altering oven settings v" . If activated the a symbol will show in the display when the multi-function selector is turned. ^ Turn the programme selector to "0". ^ Turn the multi-function selector until triangle V is underneath the a symbol in the display.
Safety lock This oven is also equipped with a Safety lock. Activating this lock prevents settings being changed during a programme. U l m f g)a V To activate the safety lock The safety lock cannot be activated until you have activated P 4. See "Altering oven settings v" . If activated the a symbol will show in the display when the multi-function selector is turned. ^ Select the programme and set a temperature. If necessary set the cooking duration. Four horizontal bars will appear in the display.
Safety lock The cooking programme will stop, if De-activating the safety lock – the programme selector is not turned back to the original programme setting within 10 seconds. Temperatures and times cannot be changed during a programme if the safety lock has been activated. – the programme selector is turned to "0". To switch it off: Turning the programme selector to the "0" position at the end of a locked programme, or after interrupting a programme will not release the safety lock.
Altering oven settings v Some of the standard oven settings (which are set at the factory) have an alternative which you can select if required. See the chart over for a list of these settings. The factory default settings are indicated by a star *. Proceed as follows: ^ Turn the programme selector to the Light H/v position. ^ Press the multi-function selector gently. "P I" will appear in the display. You can make changes to settings ("P I" to "P II").
Altering oven settings v Oven setting Settings available (* factory default) P I S 0* The clock display is switched off. The time of day display is switched off when the programme selector is turned to the "0" position. The time of day continues to run in the background. It reappears when the programme selector is turned to one of the functions. S I The clock display has been activated. The time is always visible, even when the programme selector is at "0".
Altering oven settings v Oven setting Settings available (* factory default) P 5 Catalyser (depending on model) S 0 The catalyser is switched off, cooking odours are not dissipated. S I The catalyser is switched on for all cooking functions, cooking odours are dissipated. S 2* The catalyser is engaged for all functions except for Gentle bake. S 0 Rapid heat-up is switched off. The symbol p appears in the display. S I* Rapid heat-up is switched on.
Altering oven settings v Oven setting Settings available (* factory default) P 8 Fan run-on S 0 * The cooling fan run-on time is temperature controlled and will not switch off until the oven interior temperature is below 70 °C. S I The cooling fan run-on time is time controlled to switch off after 25 min. Do not leave food in the oven to keep it warm if you have set the cooling fan to timed operation.
Baking We recommend the following settings for baking: 1 tray = 1st shelf level from the bottom – Fan plus Y 2 trays = 1st and 3rd shelf levels from the bottom – Intensive bake F – Conventional CB Bakeware For the best baking results make sure that you chose bakeware in a material suitable for the particular oven function you choose. Fan plus Y, Intensive bake F Most types of heat-resistant tins or dishes are suitable.
Baking Conventional CB Only use dark baking tins with a matt finish. Bright, shiny tins will give an uneven or pale result, and in some cases the cakes might not cook properly. Place tins centrally on the rack on shelf level 1 or 2. Older recipes and cookery books New guidelines (German standard DIN 44547 has been replaced by European standard EN 60350) have led to slight adjustments in oven temperature settings.
Baking Frozen food When baking frozen products such as cakes, pizza and baguettes, use the lowest temperature quoted on the manufacturer’s packaging. Place such items on baking parchment directly on the rack or in the pizza pan (extra accessory). Placing them on the baking tray or in the grill pan can cause the metal to distort. This distortion would increase with subsequent use. Small items of frozen food such as oven chips or potato croquettes can be cooked on a baking tray or in the grill pan.
Baking chart Creamed mixture Sponge cake Ring cake Foam cake (tray) 1) Marble, nut cake (tin) Fresh fruit cake, with filling (tray) Fresh fruit cake (tray) Fresh fruit cake (tin) Flan base 1) 3) Small cakes 1) 3) (tray) Sponge mix 1) 3) Sponge cake (3 to 6 eggs) 1) 3) Sponge cake (2 eggs) 1) 3) Swiss roll 1) 3) Rubbed in mixture Tart / flan base Streusel cake Small cakes1) 3) (tray) Cheesecake Apple pie 1) Apricot tart, with filling1) Swiss apple pie 2) Yeast mixtures and quark dough To prove dough Guglhup
Baking chart Temp. in °C Conventional Recommended shelf level 5) Time in mins. Temp. in °C Intensive bake Recommended shelf level 6) Time in mins.
Roasting We recommend using Auto roast E for roasting. Conventional CB can also be used. When roasting on the rack or in an open tin make sure the roasting filter is fitted in front of the fan in the back of the oven before starting. Shelf levels Use shelf level 1 for roasting. Exception: With Conventional CB use shelf runner 2 for - poultry up to 1 kg, - roast beef, - and fish. Temperature Please refer to the Roasting chart for suggested temperatures. Do not select a higher temperature than that advised.
Roasting Older recipes and cookery books Pot roasting New guidelines (German standard DIN 44547 has been replaced by European standard EN 60350) have led to slight adjustments in oven temperature settings. Season the meat and place in the pot. Add some knobs of butter or margarine or a little oil or cooking fat. Add about 1 /8 litre of water when roasting a large, lean joint of meat (2 - 3 kg) or roasting poultry with a high fat content.
Roasting chart Food Recommended shelf level6) Auto roast1) Conventional1) 5) Temperature in °C 2) Time in mins. Temperature in °C 2) Time in mins. 100 - 120 Roast beef (approx. 1 kg) 1 190 - 210 100 - 120 190 - 210 Beef fillet, approx. 1 kg 3) 1 4) 190 - 210 45 - 55 200 - 220 45 - 55 Venison (approx. 1 kg) 1 4) 180 - 200 90 - 120 190 - 210 90 - 120 Pork, joint (approx. 1 kg) 1 170 - 190 100 - 120 200 - 220 100 - 120 Pork, joint (approx.
Grilling Grill - full n Grill with the oven door closed. If you grill with the door open, hot air will escape from the oven instead of being cooled automatically by the cooling fan. Oven controls could get hot. Danger of burning! Always use the roasting filter when grilling. Grill settings Grill m For grilling large quantities of thin cuts and for browning food in large dishes. The whole of the grill element gets hot. Fan grill N For grilling larger items, e.g. rolled meat, poultry.
Grilling Grilling on the rack temperature, continue grilling at a lower temperature setting to allow the food to cook through to the centre. Grilling times – Flat pieces of fish and meat usually need 6 – 8 minutes per side depending on their texture. – Thicker pieces take a little longer. ^ Assemble the rack on the grill pan and use the anti-splash tray as illustrated. ^ Place the food on the rack. – With rolled meats allow approx. 10 minutes per cm diameter. Tips on grilling ^ Set a temperature.
Grill chart Pre-heat the grill for at least 5 minutes with the door shut before grilling. Food to be grilled Recommended shelf level 4) Grill / Grill - full 1) Fan grill 1) Temp. in °C Total grilling time in mins. 2) Temp. in °C Total grilling time in mins.
Defrosting You can also use the oven for defrosting. To defrost select Fan plus Y with a maximum temperature of 50 °C. For defrosting meat and delicate foods, use the lowest possible temperature (30 °C). Please note: – Where possible remove the packaging and put the food to be defrosted on a baking tray or into a dish. – All meat and poultry should be fully defrosted before cooking. Do not use the liquids from defrosting.
Cooking We recommend using the following oven settings: – Fan plus – Conventional Cooking containers made of ovenproof glass, porcelain, china, and earthenware are all suitable. They should have heat-resistant handles and knobs. Roasting bags can also be used. ^ Put the rack in on shelf level 1 and place the dish on the rack. ^ Select the cooking function you want and set a temperature. Fan plus . . . . . . . . . . . . . . 170 – 190 °C Conventional . . . . . . . . . . .
Cleaning and care In the UK, Miele branded cleaning and conditioning products as well as a microfibre E-cloth, which is suitable for cleaning surfaces such as stainless steel, glass, plastic and chrome without the use of chemicals, are available from the Miele Spare Parts Dept. or via the Internet (depending on country). Appliance front and control panel Do not use scouring agents, hard sponges or brushes or sharp metal tools to clean glass as these can scratch the surface.
Cleaning and care Aluminium fronted appliances Aluminium is affected by the way that light falls on it, by the surrounding environment and by the angle you observe it from. Aluminium surfaces and controls may suffer discolouration or damage if soiling, acids or alkaline substances are left on them for too long. Remove these straight away. The appliance front and controls are susceptible to scratches and abrasions. Avoid: – cleaning agents containing soda, acids or chlorides, – abrasive cleaning agents, e.g.
Cleaning and care Stainless steel coloured controls The controls may suffer discolouration or damage if soiling is left on them for too long. Remove soiling straight away. Avoid: – cleaning agents containing soda, acids or chlorides, – abrasive cleaning agents, e.g. powder cleaners and cream cleaners, – abrasive sponges, e.g. pot scourers or sponges which have been previously used with abrasive cleaning agents, – stainless steel cleaning agents, – oven sprays.
Cleaning and care PerfectClean Before using for the first time remove any stickers from PerfectClean surfaces. The enamelled surfaces of the baking tray, grill pan, anti-splash tray (if fitted), rack and runners have been treated with a special type of enamelling called "PerfectClean". This surface has very good anti-stick properties which is much easier to keep clean than conventional oven enamel, if cleaned regularly.
Cleaning and care Apply a spray oven cleaner to the soiled areas. Leave to take effect for a couple of minutes only! If necessary use a soft sponge, soft nylon brush or a scraper suitable for glass surfaces to loosen the soiling. Repeat the process if necessary. After cleaning rinse thoroughly with clean water and then dry thoroughly. Important For optimum performance of the PerfectClean enamel it is important to clean the oven and accessories after each use.
Cleaning and care Oven interior Pyrolytic cleaning of the oven interior The oven interior and roof liner are coated with dark pyrolytic enamel which facilitates cleaning. Before starting a pyrolytic cleaning process please note the following advice: This is a particularly hard enamel with an extremely smooth surface. Because of its anti-stick properties most debris can be easily removed with warm water and a little washing-up liquid applied with a soft cloth. This should be done after each use.
Cleaning and care During the pyrolytic process the oven is heated to approx. 460 °C . Any residual soiling is burnt off by the high temperatures. The oven door is automatically locked shortly after the pyrolytic cleaning process starts. Depending on soiling levels you can choose between three cleaning programmes: – PY 1 lasting approx. 2 hours 15 mins – PY 2 lasting approx. 2 hours 35 mins – PY 3 lasting approx. 2 hours 55 mins The door cannot be opened until this duration has been completed.
Cleaning and care After the pyrolytic process any debris (e.g, ash), can easily be wiped away. Remember to wait until the oven has cooled down before doing so! Danger of burning! Try not to wipe over the fibre-glass seal when cleaning the oven cavity. It is particularly sensitive and should not be cleaned unless absolutely necessary. Rubbing it can damage it. Most residues are easily wiped away with a damp cloth.
Cleaning and care To remove the oven door Please note: the oven door is heavy and should be gripped firmly at both sides when being removed or refitted. ^ Then lift the door upwards as far as it will go. Do not attempt to take the door off the hinge guides when it is in a horizontal position. The guides will close, and damage the appliance. Danger of injury. The oven door is connected to the oven by hinges. Before removing the door, the locking clamps on both hinges have to be released.
Cleaning and care To dismantle the oven door In the rare event that condensate has worked its way in between the glass panes, the door can be dismantled in order to clean in between the panes. Do not use scouring agents, hard sponges or brushes or sharp metal tools to clean glass as these can scratch the surface. Do not use an oven spray. This would damage the surface of the aluminium surrounds. ^ Always remove the oven door before dismantling it. ^ Place the door on a protective surface (e.g.
Cleaning and care ^ Then carefully lift the middle panes up and out. ^ The individual panes can then be cleaned. Handle them very carefully to avoid the risk of breakage. ^ Replace the first of the middle panes. Make sure the cut-off corner is positioned at the top right hand side. When putting the door back together again replace the middle panes first. These panes are identical and both have a corner missing.
Cleaning and care To refit the door ^ Finally replace the black printed inner pane. The print should face the middle pane. ^ Hold the door securely at both sides and carefully fit it back onto the hinge guides. Make sure that the door goes back on straight. ^ Lift the upper of the two middle panes up a little and refit the spacers to the panes. Then re-position them back next to the hinge guides.
Cleaning and care ^ Open the door fully. To remove the runners Make sure the oven heating elements are switched off and cool. Danger of burning. ^ Flip both locking clamps back up to lock them. Turn them as far as they will go into a horizontal position. Make sure that the notches on the locking clamps hook into the slots on the door as illustrated. ^ Pull on the fixing knob to release it. It is essential that the locking clamps lock securely when the door is re-fitted after cleaning.
Problem solving guide Installation, maintenance and repairs may only be carried out by suitably qualified and competent persons in accordance with local and national safety regulations. Repairs and other work by unqualified persons could be dangerous, and the manufacturer will not be held liable for unauthorised work. . . . the heating works, but not the oven lighting. The halogen lamp needs replacing. To change the lamp: ^ Disconnect the appliance from the electricity supply.
Problem solving guide The glass cover is held in position by two metal brackets which are secured to the reflector. Do not push the metal brackets to the sides, as this would damage both the brackets and the reflector. It might also make it difficult to push the glass cover back into its frame again. Do not touch the surface directly when changing the lamp as grease particles from your fingers will adhere to the surface and damage the lamp. Please follow the manufacturer’s instructions.
Problem solving guide . . . a noise can be heard after a cooking process This is not a fault. The cooling fan continues to run for a while after the oven has been switched off to prevent any humidity building up in the oven, on the control panel or on the oven housing unit. When the temperature has fallen sufficiently, the fan switches off automatically. The temperature will fall faster with the oven door open. ^ Push the glass cover into its frame at the front. . . .
Problem solving guide . . . cakes or biscuits are unevenly browned There will always be a slight unevenness. If browning is very uneven, check when baking with Fan plus Y: – whether the temperature was set too high, – whether the roasting filter was in place, – whether the correct shelf level was used. when baking with Conventional CB: – the colour and material of the baking tins being used. Light coloured, shiny, or thin walled tins are less suitable, – whether the correct shelf level was used. . . .
After sales service In the event of any faults which you cannot remedy yourself, please contact – your Miele Dealer or – the Miele Service Department (see back cover for contact details). When contacting your Dealer or the Service Department, please quote the model and serial number of your appliance. These are shown on the data plate, visible below the oven interior, with the door fully open. Please note that telephone calls may be monitored and recorded for training purposes.
Extra accessories The following accessories may come are standard with some models. They following accessories are available at extra cost from your Miele Dealer, the Miele Spare Parts Department or via the Internet (depending on country). Telescopic runners Telescopic baking carriage The telescopic runners provide three shelf levels, Each shelf level can be drawn right out of the oven individually to give a good overview of cooking in progress.
Extra accessories Pizza pan Gourmet oven dish This circular pan is suitable for cooking pizzas, flat cakes made with yeast or whisked mixtures, sweet and savoury tarts, baked desserts, and can also be used for deep frozen cakes and pizzas. The gourmet oven dish can be placed in the oven directly on the runners. It has non-tip safety notches like the oven tray to prevent it being pulled out too far. The dish has a special protective anti-stick coating.
Electrical connection UK, IRL, ZA All electrical work should be undertaken by a suitably qualified and competent person in strict accordance with current national and local safety regulations (BS 7671 in the UK). Installation, repairs and other work by unqualified persons could be dangerous. The manufacturer cannot be held liable for unauthorised work. Ensure power is not supplied to the appliance until after installation or repair work has been carried out.
Electrical connection UK, IRL, ZA IRL ZA The voltage and rated load are given on the data plate, visible when the oven door is open. Please ensure that these match the household mains supply. Data relating to electrical connection will be found on the data plate, visible when the oven door is open. Make sure that these figures comply with the main voltage. Connection should be made via a suitable isolator which complies with national and local regulations.
Electrical connection AUS, NZ AUS: All electrical work should be undertaken by a competent person in strict accordance with national and local safety regulations. The wall oven is suitable for connection to an a.c. single phase 240 V, 50 Hz electricity supply. The fuse rating is 16 A. The voltage and rated load are given on the data plate, visible when the oven door is open. Please ensure that these match the household mains supply.
Installing the oven To ensure adequate ventilation to the oven once installed: - provide a ventilation cut-out in the housing unit as illustrated. - do not fit a rear panel into the housing unit. - do not fit insulation material inside the housing unit. Turn off the mains electricity supply to the isolator. ^ Connect the mains cable from the oven to the isolator. ^ Push the oven into the furniture housing unit as far as the oven trim, and align it.
Alteration rights reserved / 22 / 1607 (H 4331, H 4431) M.-Nr.