
Operating instructions/Installation instructions

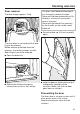
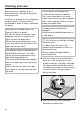

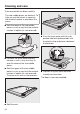
Table Of Contents
- Contents
- Warning and safety instructions
- Caring for the environment
- Guide to the appliance
- Controls
- Using the appliance
- Features
- Data plate
- Scope of delivery
- Accessories supplied and available to order
- Side runners
- Baking tray, universal tray and rack with non-tip notches
- FlexiClip runners HFC 70-C
- Fitting the FlexiClip runners
- Removing the FlexiClip runners
- Round baking trays
- Grilling and roasting insert HGBB 71
- Perforated gourmet baking tray HBBL 71
- Baking stone HBS 70
- HUB gourmet oven dishes HBD gourmet oven dish lids
- Food probe
- Handle HEG
- Accessories for cleaning and care
- Safety features
- PerfectClean treated surfaces
- Before using for the first time
- Settings
- Min. minder
- Main and sub-menus
- Energy saving tips
- Operation
- Automatic programmes
- Further applications
- Baking
- Roasting
- Grilling
- Cleaning and care
- Unsuitable cleaning agents
- Removing normal soiling
- Removing stubborn soiling (excluding the runners)
- Stubborn soiling on the FlexiClip runners
- Pyrolytic cleaning of the oven compartment
- Door removal
- Dismantling the door
- Fitting the door
- Removing the side runners with FlexiClip runners
- Lowering the top heat/grill element
- Problem solving guide
- Service
- Installation
- Cooking charts
- Notes for test institutes

Cleaning and care
63
Preparing for pyrolytic cleaning
Accessories will be damaged by the
high temperatures in pyrolytic cleaning.
Remove all accessories from the
oven before starting the pyrolytic
cleaning programme. This also
applies to the side runners and any
optional accessories.
Coarse soiling in the oven can cause
thick smoke to develop.
Burnt-on residues can cause lasting
discolouration or dull spots on
enamelled surfaces.
Before starting the pyrolytic cleaning
programme, remove coarse soiling
from the oven and scrape any burnt-
on residues off enamelled surfaces
with a glass scraper.
Remove any accessories from the oven
compartment, including the side runners.
Starting pyrolytic cleaning
Risk of injury caused by hot
surfaces.
The oven gets much hotter during
pyrolytic cleaning than during normal
use.
Do not let children touch the oven
during pyrolytic cleaning.
Select Pyrolytic.
Select the level required according to
the amount of soiling.
Confirm withOK.
Follow the instructions in the display.
Confirm withOK.
You can start the pyrolytic cleaning
programme straight away or delay the
start time.
Starting pyrolytic cleaning straight
away
To start the pyrolytic cleaning
programme straight away, select Start
now.
Confirm withOK.
The pyrolytic cleaning programme will
start.
The door will lock automatically. The
oven heating and the cooling fan will
then switch on automatically.
The oven interior lighting will not come
on during the pyrolytic cleaning
programme.
The time remaining for the pyrolytic
cleaning programme will start counting
down in the display. You cannot alter
the duration.
You can use the minute minder at the
same time as running the cleaning
programme. At the end of the minute
minder time the buzzer will sound,
will start flashing and the time can be
viewed counting up in the display. To
switch of the visual and acoustic
signals, touch the sensor control.
Starting pyrolytic cleaning at a later
time
To start the pyrolytic cleaning
programme later, select Start at.
Confirm withOK.
Set the time when you want the
pyrolytic cleaning programme to start.
Confirm withOK.
The door will lock automatically. Start at
and the start time set will appear in the
display.
The sensor control lights up
orange.