
Operating instructions/Installation instructions

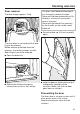

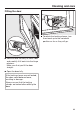
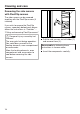
Table Of Contents
- Contents
- Warning and safety instructions
- Caring for the environment
- Guide to the appliance
- Controls
- Using the appliance
- Features
- Data plate
- Scope of delivery
- Accessories supplied and available to order
- Side runners
- Baking tray, universal tray and rack with non-tip notches
- FlexiClip runners HFC 70-C
- Fitting the FlexiClip runners
- Removing the FlexiClip runners
- Round baking trays
- Grilling and roasting insert HGBB 71
- Perforated gourmet baking tray HBBL 71
- Baking stone HBS 70
- HUB gourmet oven dishes HBD gourmet oven dish lids
- Food probe
- Handle HEG
- Accessories for cleaning and care
- Safety features
- PerfectClean treated surfaces
- Before using for the first time
- Settings
- Min. minder
- Main and sub-menus
- Energy saving tips
- Operation
- Automatic programmes
- Further applications
- Baking
- Roasting
- Grilling
- Cleaning and care
- Unsuitable cleaning agents
- Removing normal soiling
- Removing stubborn soiling (excluding the runners)
- Stubborn soiling on the FlexiClip runners
- Pyrolytic cleaning of the oven compartment
- Door removal
- Dismantling the door
- Fitting the door
- Removing the side runners with FlexiClip runners
- Lowering the top heat/grill element
- Problem solving guide
- Service
- Installation
- Cooking charts
- Notes for test institutes

Cleaning and care
69
Fitting the door
Hold the door securely on both sides
and carefully fit it back into the hinge
retainers.
Make sure that you fit the door
straight.
Open the door fully.
If the locking clamps are not locked,
the door could become loose,
resulting in damage.
Always ensure that the locking
clamps are locked after refitting the
door.
To relock the locking clamps, turn
them back up to the horizontal
position as far as they will go.