
Operating instructions/Installation instructions
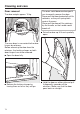
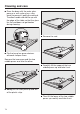
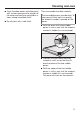
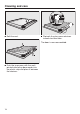

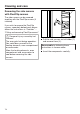
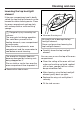
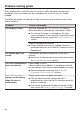
Table Of Contents
- Contents
- Warning and safety instructions
- Caring for the environment
- Guide to the appliance
- Controls
- Using the appliance
- Features
- Data plate
- Scope of delivery
- Accessories supplied and available to order
- Side runners
- Baking tray, universal tray and rack with non-tip notches
- FlexiClip runners HFC 70-C
- Fitting the FlexiClip runners
- Removing the FlexiClip runners
- Grilling and roasting insert HGBB 71
- Perforated gourmet baking tray HBBL 71
- Round baking trays
- Baking stone HBS 70
- HUB gourmet oven dishes HBD gourmet oven dish lids
- Handle HEG
- Accessories for cleaning and care
- Safety features
- PerfectClean treated surfaces
- Before using for the first time
- Settings
- Min. minder
- Main and sub-menus
- Energy saving tips
- Operation
- Moisture plus
- Automatic programmes
- Further applications
- Baking
- Roasting
- Grilling
- Cleaning and care
- Unsuitable cleaning agents
- Removing normal soiling
- Removing stubborn soiling (excluding the runners)
- Stubborn soiling on the FlexiClip runners
- Pyrolytic cleaning of the oven compartment
- Descale
- Door removal
- Dismantling the door
- Fitting the door
- Removing the side runners with FlexiClip runners
- Lowering the top heat/grill element
- Problem solving guide
- Service
- Installation
- Cooking charts
- Notes for test institutes
- Conformity declaration
- Copyrights and licences

Cleaning and care
71
Replace the container in the oven
compartment and secure the plastic
tube in the container.
Confirm with OK.
The intake process for the first rinse
will start.
The water is fed through the steam
injection system and is collected in the
universal tray.
Instructions for preparing the second
rinse will appear.
Take the universal tray with the
collected rinse water out of the oven
and empty it. Place the tray back in
the oven again on the top shelf level.
Remove the plastic tube from the
container and fill it with approx. 1litre
of fresh tap water.
Replace the container in the oven
compartment and secure the plastic
tube in the container.
Confirm with OK.
Proceed in exactly the same way for
the third rinse.
Leave the universal tray with the
collected rinse water from the third
rinse in the oven compartment during
residual moisture evaporation.
Evaporating residual moisture
After the third rinse residual moisture
evaporation will commence.
Remove the container and tube from
the oven compartment.
Close the door.
Confirm with OK.
Danger of injury caused by
steam.
Steam can cause severe scalding.
Do not open the door while the
residual water is being evaporated.
The oven heating will switch on and the
duration of residual moisture
evaporation will appear.
The duration is amended automatically
depending on the actual amount of
residual moisture.
Finalising the descaling process
At the end of residual water
evaporation, an information window
appears with tips on cleaning after the
descaling process.
Confirm with OK.
A buzzer sounds and Finished appears.
Switch the oven off with the On/
Off sensor control.
Risk of injury caused by hot
surfaces.
The oven gets hot during operation.
You could burn yourself on the
heater elements, oven compartment
or accessories.
Allow the heater elements, oven
compartment and accessories to
cool before manual cleaning.
Remove the universal tray with the
collected fluid and empty it.
When the oven compartment has
cooled down, clean away any
condensation and descaling agent
residues.
Leave the oven door open until the
oven compartment is completely dry.