Operating and installation instructions Oven To avoid the risk of accidents or damage to the appliance it is essential to read these instructions before it is installed and used for the first time. en-GB M.-Nr.
Contents Warning and safety instructions ...................................................................... Caring for the environment .............................................................................. Guide to the appliance ...................................................................................... Controls.............................................................................................................. On/Off sensor control............................................
Contents Software version.................................................................................................. Showroom programme........................................................................................ Factory default..................................................................................................... Min. minder ........................................................................................................ Main and sub-menus ............................
Contents Stubborn soiling on the FlexiClip runners ........................................................... Pyrolytic cleaning of the oven compartment....................................................... Descale................................................................................................................ Door removal ....................................................................................................... Dismantling the door .............................................
Warning and safety instructions This oven complies with all current local and national safety requirements. However, inappropriate use can lead to personal injury and damage to property. Read the operating and installation instructions carefully before using the oven. They contain important information on safety, installation, use and maintenance. This prevents both personal injury and damage to the oven.
Warning and safety instructions Safety with children Children under 8 years of age must be kept away from the oven unless they are constantly supervised. Children aged 8 and older may only use the oven without supervision if they have been shown how to use it in a safe manner. Children must be able to understand and recognise the possible dangers caused by incorrect operation. Children must not be allowed to clean or maintain the oven unsupervised.
Warning and safety instructions Damage to the oven can compromise your safety. Check the oven for visible signs of damage. Do not use a damaged oven. Reliable and safe operation of this oven can only be assured if it has been connected to the mains electricity supply. The electrical safety of this oven can only be guaranteed when correctly earthed. It is most important that this basic safety requirement is fulfilled.
Warning and safety instructions If the connection cable is damaged, it must be replaced with a special connection cable by a Miele authorised service technician (see “Installation”, “Electrical connection”). During installation, maintenance and repair work, e.g. if the oven interior lighting is faulty (see “Problem solving guide”), the oven must be completely disconnected from the household electricity supply.
Warning and safety instructions Oils and fats can ignite if allowed to overheat. Never leave the oven unattended when cooking with oil or fats. Never attempt to put out oil or fat fires with water. Switch the oven off and extinguish the flames by leaving the door closed. Grilling food for excessively long cooking durations can cause it to dry out with the risk of catching fire. Do not exceed the recommended cooking durations.
Warning and safety instructions The oven compartment floor can become damaged by items being pushed around on it. When placing pots, pans or crockery on the oven compartment floor, ensure that you avoid pushing them around. Risk of injury caused by steam. Pouring a cold liquid onto a hot surface creates steam, which can cause severe scalding. The sudden temperature change can also cause damage to hot enamelled surfaces. Never pour cold liquids directly onto hot enamelled surfaces.
Warning and safety instructions Cleaning and care Risk of injury due to electric shock. The steam from a steam cleaning appliance could reach live electrical components and cause a short circuit. Do not use a steam cleaner to clean the appliance. Scratches on the door glass can cause the glass to break. Do not use abrasive cleaners, hard sponges, brushes or sharp metal tools to clean the door glass.
Caring for the environment Disposal of the packing material Disposing of your old appliance The packaging is designed to protect the appliance from damage during transportation. The packaging materials used are selected from materials which are environmentally friendly for disposal and should be recycled. Electrical and electronic appliances often contain valuable materials. They also contain specific materials, compounds and components, which were essential for their correct function and safety.
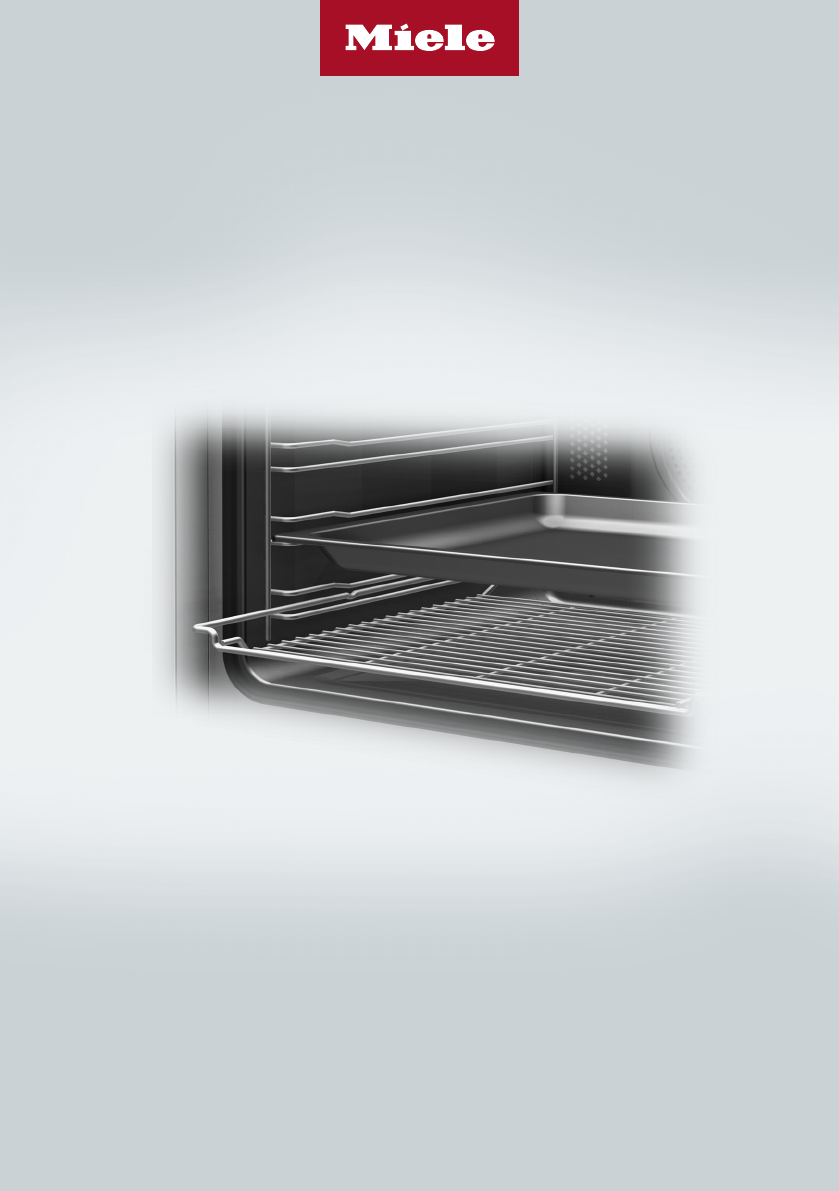
Guide to the appliance Oven a Control elements b Door lock c Top heat/grill element d Steam inlet openings e Water intake pipe for the steam injection system f Air inlet for the fan with ring heating element behind it g Side runners with 5 shelf levels h Oven floor with bottom heat element underneath it i Front frame with data plate j Door 13
Controls a Recessed On/Off sensor control For switching the oven on and off b Optical interface (For Miele Service only) g Navigation area with and arrow buttons For scrolling through lists and for changing values c sensor control For controlling the oven via your mobile device h OK sensor control For selecting functions and saving settings d sensor control For steam injection i sensor control For setting a minute minder, the cooking duration or the start or end time for the cooking progra
Controls On/Off sensor control Sensor controls The On/Off sensor control is recessed and reacts to touch. The sensor controls react to touch. Every touch of a sensor is confirmed with an audible keypad tone. You can turn this keypad tone off using Further | Settings | Volume | Keypad tone. Use this sensor control to switch the oven on and off. Display The display is used for showing the time of day or information about functions, temperatures, cooking durations, automatic programmes and settings.
Controls Sensor controls under the display Sensor control Function If you want to control the oven from your mobile device, you must have the Miele@home system, switch on the Remote control setting and touch this sensor control. The sensor control then lights up and the MobileStart function is available. As long as this sensor control is lit, you can control the oven via your mobile device (see “Settings – Miele@home”).
Controls Sensor control OK Function As soon as you reach a confirmable value, message or setting, the OK sensor control will light up orange. By selecting this sensor control you can access functions such as the minute minder, save changes to values or settings or confirm instructions. If no cooking programme is in progress, you can use this sensor control to set a minute minder (e.g. when boiling eggs) at any point.
Using the appliance Use the and arrow buttons or the area between them in the navigation area to use the oven. As soon as you reach a confirmable value, message or setting, the OK sensor control will light up orange. Selecting a menu option Touch the or arrow buttons or swipe to the right or left in the area until you reach the desired menu option. Tip: If you press and hold an arrow button, the list continues scrolling automatically until you release the arrow button.
Using the appliance Selecting a function or operating mode The sensor controls for the functions and operating modes (e.g. Further ) are located above the display (see “Controls” and “Settings”). Touch the sensor control for the desired function. The sensor control on the fascia panel lights up orange. For functions and operating modes: set values such as the temperature. Entering numbers Numbers that can be changed are highlighted.
Features A list of the models described in these operating and installation instructions can be found on the back page of this booklet. Data plate The data plate is located on the front frame, visible when the door is open. The data plate states the model number, the serial number as well as connection data (voltage, frequency and maximum rated load). Please have this information to hand, should you need to contact Miele regarding any questions or problems.
Features Baking tray, universal tray and rack with non-tip notches FlexiClip runners HFC 70-C Baking tray HBB 71: Universal tray HUBB 71: FlexiClip runners can only be fitted on levels 1, 2 and 3. Rack HBBR 71: These accessories are inserted into the oven between the two rails of a shelf in the side runner. The FlexiClip runners can be drawn right out of the oven individually to give a good overview of cooking in progress.
Features You can use more than one baking tray, universal tray or rack at a time. Place the baking tray, universal tray or rack on the FlexiClip runners. To prevent the risk of accessories sliding off the runners: - Make sure that they are sitting securely on their runners in between the stoppers at either end of each runner. Leave at least one shelf level free between the FlexiClip runner and any baking tray, universal tray or rack above it.
Features Fitting the FlexiClip runners Risk of injury caused by hot surfaces. The oven gets hot during operation. You could burn yourself on the heating elements, oven compartment or accessories. Allow the heating elements, oven compartment and the accessories to cool before fitting or removing the FlexiClip runners. Then hold the FlexiClip runner at an angle towards the middle of the oven compartment (2.). Preferably fit the FlexiClip runners onto level 1.
Features Removing the FlexiClip runners FlexiClip runners HFC 71 Risk of injury caused by hot surfaces. The oven gets hot during operation. You could burn yourself on the heating elements, oven compartment or accessories. Allow the heating elements, oven compartment and the accessories to cool before fitting or removing the FlexiClip runners. Push the FlexiClip runner in all the way. You can use the FlexiClip runners on shelf levels 1–4.
Features Fitting and removing FlexiClip runners Danger of injury caused by hot surfaces. The oven gets hot during operation. You could burn yourself on the heating elements, oven compartment or accessories. Allow the heating elements, oven compartment and the accessories to cool before fitting or removing the FlexiClip runners. The FlexiClip runners are fitted in between the two rails that make up a shelf level. The FlexiClip runner with the Miele logo should be fitted on the right.
Features Grilling and roasting insert HGBB 71 Round baking trays The grilling and roasting insert fits in the universal tray. The juices from the food being grilled or roasted collect under the insert, preventing them from burning on. The juices can then be used for making gravy and sauces.
Features HUB gourmet oven dishes HBD gourmet oven dish lids Unlike other oven dishes, Miele gourmet oven dishes can be placed in the oven directly on the shelf runners. They have non-tip safety notches like the rack to prevent them from being pulled out too far. The surface of the oven dish has a nonstick coating. Gourmet oven dishes are available in different depths. The width and the height are the same. Suitable lids are available separately. Please quote the model number when ordering.
Features Safety features PerfectClean treated surfaces - System lock (see “Settings – Safety”) PerfectClean surfaces have very good non-stick properties and are exceptionally easy to clean. Food can be easily removed from these surfaces. Soiling from baking and roasting can be easily removed from these surfaces. Food can be sliced or cut up on PerfectClean surfaces.
Before using for the first time Miele@home Your oven is equipped with an integrated WiFi module. In order to use it, you will need: - A WiFi network - The Miele@mobile app - A Miele user account The user account can be created via the Miele@mobile app. The Miele@mobile app will guide you as you connect your oven to your home WiFi network.
Before using for the first time Basic settings Setting up Miele@home The following settings must be made before starting up for the first time. You can change these settings again at a later time (see “Settings”). Set up Miele@home Risk of injury caused by hot surfaces. The oven gets hot during operation. For safety reasons, the oven may only be used when it has been fully installed. The oven will switch on automatically when it is connected to the electricity supply.
Before using for the first time Heating up the oven for the first time and rinsing the steam injection system Select Automatic burst of steam. When the oven is heated up for the first time it may give off an unpleasant odour. This can be eliminated by heating the empty oven for at least an hour. It is a good idea to rinse out the steam injection system at the same time. Fill a suitable container with the required amount of mains water. The prompt to draw in water then appears. Open the door.
Before using for the first time The sound of the pump running can be heard again briefly. Residual water in the water intake pipe is being drawn into the oven. The oven heating, lighting and cooling fan will switch on. After a short time, a burst of steam will be released automatically. Risk of injury caused by steam. The steam escaping is very hot. Do not open the door when the burst of steam is being released. Heat the oven for at least an hour.
Settings Settings overview Menu option Language Available settings ... | deutsch | english | ... Time Display Location On* | Off | Night dimming Clock format 12 h | 24 h* Set Lighting On “On” for 15 seconds* Off Display Brightness QuickTouch On Volume | Off* Buzzer tones Melodies* Solo tone Keypad tone Welcome melody On* Units °C* Booster | Off Temperature | °F On* Off Recommended temps.
Settings Menu option Available settings Safety Sensor lock On | Off* System lock On Miele@home Activate | Off* | Deactivate Connection status Set up again Reset Set up Remote control On* Off RemoteUpdate On* Off Software version Showroom programme Demo mode Factory default Appliance settings On | Off* Recommended temps.
Settings Opening the “Settings” menu In the Further | Settings menu, you can personalise your oven by adapting the factory default settings to suit your requirements. Select Further . Select Settings . Select the desired setting. You can check settings or change them. Settings cannot be changed while a cooking programme is in progress. Language You can set your language and location. After selecting and confirming your choice, the language you have selected will appear in the display.
Settings Display Melodies Brightness At the end of a process, a melody will sound several times in intervals. The display brightness is represented by a bar with seven segments. - Maximum brightness - Minimum brightness QuickTouch Select how the sensor controls should respond when the oven is switched off: - On If you have also selected the Time | Display | On or Night dimming setting, the sensor controls will also respond when the oven is switched off.
Settings Units Pyrolytic reminder Temperature You can set whether you want a reminder to run the pyrolytic cleaning programme to come on (On) or not (Off). You can set the temperature in degrees Celsius (°C) or degrees Fahrenheit (°F). Booster The Booster function is used to quickly pre-heat the oven compartment. - On The Booster function is automatically switched on during the heating-up phase of a cooking programme.
Settings Safety Sensor lock The sensor lock prevents the cooking programme being switched off by mistake or settings being changed. Apart from the On/Off sensor control, the activated sensor lock prevents the sensor controls and fields in the display from working a few seconds after a programme has been started. - On The sensor lock is activated. Touch the OK sensor control for at least 6 seconds to deactivate the sensor lock for a short period of time. - Off The sensor lock is deactivated.
Settings Miele@home. The network settings should be reset whenever an oven is being disposed of or sold, or if a used oven is being put into operation. This is the only way to ensure that all personal data has been removed and the previous owner will no longer be able to access the oven. - Set up This setting is only visible if no WiFi connection has been set up yet. You must set up a new WiFi connection to be able to use Miele@home.
Settings Deactivate RemoteUpdate if you do not want any updates to be downloaded automatically. Running a RemoteUpdate Information about the content and scope of an update will be provided in the Miele@mobile app. A message will appear in your oven display if a software update is available. You can install the update immediately or postpone this until later. When the oven is switched on again, you will be reminded about the update. Deactivate RemoteUpdate if you do not want to install the update.
Min. minder Using the Min. minder function The minute minder can be used to time other activities in the kitchen, e.g. boiling eggs. The minute minder can also be used at the same time as a cooking programme for which the cooking duration start and finish times have been set (e.g. as a reminder to stir the food or add seasoning, etc.). The maximum minute minder time that can be set is 59 minutes and 59 seconds.
Main and sub-menus Menu Recommen ded value Range 160 °C 30–250 °C 180 °C 30–280 °C 160 °C 100–230 °C 170 °C 50–250 °C Oven functions Fan plus Conventional heat Auto roast Intensive bake Full grill 240 °C 200–300 °C Fan grill 200 °C 100–260 °C 160 °C 130–250 °C Bottom heat 190 °C 100–280 °C Eco Fan heat 190 °C 100–250 °C 25 °C 25–50 °C Moisture plus Pyrolytic Automatic programmes Further Defrost Descale Settings 42
Energy saving tips Cooking programmes - If possible, use the automatic programmes for cooking food. - Remove all accessories from the oven compartment that are not required for cooking. - In general, if a range of temperatures is given in a recipe or chart, it is best to select the lower temperature and to check the food after the shortest duration. - The Fan plus function can be used for cooking many types of food.
Energy saving tips Residual heat utilisation Customising settings - In cooking programmes using temperatures greater than 140 °C and with cooking durations longer than 30 minutes, the temperature can be turned down to the lowest possible level about 5 minutes before the end of the cooking programme. The residual heat in the oven is sufficient for cooking the food until it is done. However, never switch the oven off (see “Warning and safety instructions”).
Operation Switch the oven on. The main menu will appear. Place the food in the oven. Select the desired function. The function will appear first, followed by the recommended temperature. Change the recommended temperature if necessary. The recommended temperature will be accepted within a few seconds. You can change the temperature subsequently via the arrow buttons. Confirm with OK. The actual temperature will appear and the heating-up phase will commence. You will see the temperature increasing.
Operation Setting cooking durations Cooking results can be impaired if there is a long delay between the food being placed in the oven and the start of cooking. Fresh food can change colour and even deteriorate. When baking, the cake mixture or dough can dry out, and the raising agents can lose their effectiveness. Select as short as possible a time until the cooking programme starts. Select the sensor control. Set the desired times. Confirm with OK.
Operation Cancelling a cooking programme Touch the sensor control for the selected function or the sensor control. When Cancel process appears in the display, confirm with OK. The oven compartment heating and lighting will then switch off. Any cooking durations set will be deleted. The main menu will appear. Pre-heating the oven The Booster is used in conjunction with certain functions to quickly pre-heat the oven. It is only necessary to pre-heat the oven in a few instances.
Moisture plus Your oven is equipped with a steam injection system for cooking with added moisture. Baking, roasting and cooking with the Moisture plus function guarantees optimum steam and air flow for even cooking and browning results. First select the Moisture plus function. After selecting the function, set the temperature and the type and number of bursts of steam (Automatic burst of steam, 1 burst of steam, 2 bursts of steam or 3 bursts of steam).
Moisture plus Setting the temperature Change the recommended temperature if necessary. Confirm with OK. The steam injection option will appear. Selecting steam injection Select Automatic burst of steam if you want the oven to release a burst of steam automatically at the end of the heating-up phase. Preparing and starting the water intake process Fill a suitable container with the required amount of fresh tap water. Open the door.
Moisture plus The sound of the pump running can be heard. Residual water in the water intake pipe is being drawn into the oven. The oven heating and cooling fan will switch on. The required and actual temperatures will appear. You will see the temperature increasing. A buzzer will sound when the set temperature is reached for the first time. Releasing bursts of steam Danger of injury caused by steam. Steam can cause severe scalding.
Moisture plus Evaporate res. moisture When cooking using the addition of moisture, the water will be equally distributed between the bursts of steam and used up as long as the programme is not interrupted. However, if a programme using the addition of moisture is manually interrupted before all the bursts of steam have been released or if there is a power cut, the water for these unused bursts of steam will remain in the steam injection system.
Moisture plus To skip residual water evaporation Skipping the residual water evaporation process can, in certain cases, cause water to overflow into the oven compartment. It is best not to cancel the evaporation process. Select a function or an automatic programme that uses moisture. Evaporate res. moisture appears. Select Skip. You can now select a function to start a cooking process or run an automatic programme with added moisture.
Automatic programmes The wide range of automatic programmes enables you to achieve excellent results with ease. Categories The automatic programmes are sorted into categories to provide a better overview. Simply select the appropriate programme for the type of food you are cooking and follow the instructions in the display. Using automatic programmes Select Automatic programmes . A list will appear in the display. Select the desired food category.
Further applications This section provides information on the following applications: - Defrost - Low temperature cooking - Frozen food/ready meals Defrost Gentle defrosting of frozen goods means that the vitamins and minerals are generally retained. Select Further . Select Defrost. Alter the recommended temperature if necessary. Air is circulated throughout the oven compartment to gently defrost the frozen goods. Risk of infection from bacteria.
Further applications Low temperature cooking Low temperature cooking is ideal for cooking delicate cuts of beef, pork, veal or lamb when a tender result is desired. First sear the meat all over at a high temperature on the hob in order to seal it. Then place the meat in the pre-heated oven compartment where the low temperature and long cooking duration will cook it to perfection and ensure it is very tender. The meat will relax.
Further applications Frozen food/Ready meals Tips for cakes, pizza and baguettes - Bake cakes, pizza and baguettes on baking paper on the rack. Do not use the baking tray or the universal tray for frozen foods with a large surface area. The tray could become warped and difficult, or even impossible, to remove from the oven compartment when hot. Additional use will make the warping worse. - Use the lowest temperature recommended on the packaging.
Baking Handling food carefully will help protect your health. Cakes, pizzas and french fries should be cooked until golden, not dark brown. Tips on baking - Set a cooking duration. If used for baking, do not delay the start for too long. Cake mixture or dough will dry out, and the raising agents will lose their effectiveness. - Generally speaking, you can use racks, baking trays, universal trays and any type of baking tray made of heat-resistant material. Using baking parchment Miele accessories, e.g.
Baking Selecting the cooking duration Unless otherwise stated, the cooking durations given in the cooking charts are for an oven compartment which has not been pre-heated. With a pre-heated oven compartment, shorten times by around 10 minutes. As a general rule, check the food after the shortest duration. Stick a wooden skewer into the food. If it comes out clean without any batter/ dough on it, the food is done. - For moist biscuits and cakes, bake on a maximum of 2 shelf levels at once.
Roasting Tips for roasting - You can use all crockery made from temperature-resistant materials, e.g. roasting dishes, roasting pans with lid, ovenproof glass dishes, roasting bags, dishes made from earthenware or cast iron, the universal tray, rack and/or anti-splash insert (if available) on top of the universal tray. - Pre-heating the oven compartment is only required when roasting beef sirloin joints and fillet. Pre-heating is generally not necessary.
Roasting Selecting the cooking duration Using Fan plus or Auto roast Unless otherwise stated, the durations given in the cooking chart are for an oven compartment which has not been pre-heated. The traditional British method for calculating the roasting time is to allow 15 to 20 minutes per lb/450 grammes, according to type of meat, plus approx. 20 minutes, adjusting the length of time as roasting proceeds to obtain the required result.
Grilling Risk of injury caused by hot surfaces. If you grill with the door open, hot air will escape from the oven instead of being cooled by the cooling fan. The control elements will get hot. Grill with the oven door closed. Tips for grilling - Pre-heating is necessary when grilling. Pre-heat the top heat/grill element for approx. 5 minutes with the door closed. - Trim the meat if necessary. Do not season the meat with salt before grilling as this draws the juices out.
Grilling Selecting the cooking duration Notes on the functions Grill thinner cuts of meat/slices of fish for approx. 6–8 minutes per side. It is best to grill food of a similar thickness at the same time so that the cooking durations do not vary too much. You can find an overview of all the functions with their recommended values in “Main and sub-menus”. As a general rule, check whether the food is cooked after the shortest duration. To test the food, press down on the meat with a spoon.
Cleaning and care Danger of injury caused by hot Unsuitable cleaning agents surfaces. The oven gets hot during operation. You could burn yourself on the heating elements, oven compartment or accessories. Allow the heating elements, oven compartment and the accessories to cool before manual cleaning. To avoid damaging the surfaces, do not use: Risk of injury due to electric shock. The steam from a steam cleaning appliance could reach live electrical components and cause a short circuit.
Cleaning and care The accessories are not dishwasher-safe. Tip: Soiling caused by spilt fruit juices and cake mixtures is best removed while the oven compartment is still warm. To make it easier to clean the oven: Remove the door. Take out the side runners with FlexiClip runners (if fitted). Lower the top heat/grill element. Removing normal soiling There is a delicate fibreglass seal around the oven compartment to seal the glass in the oven door. This can be damaged by rubbing or scouring.
Cleaning and care Using oven cleaners Very stubborn soiling on PerfectClean surfaces can be cleaned using the Miele oven cleaner, which must only be applied to cold surfaces. If the oven spray gets into gaps and openings, a strong odour is generated during subsequent cooking programmes. Do not spray the oven cleaner onto the roof of the oven compartment. Do not spray the oven cleaner into the gaps and openings of the oven compartment walls and rear wall. Follow the instructions on the packaging.
Cleaning and care Pyrolytic cleaning of the oven compartment Instead of cleaning the oven compartment manually you can run the Pyrolytic function. During pyrolytic cleaning the oven compartment reaches temperatures in excess of 400 °C. Any residual soiling is burnt off and turned to ash by the high temperatures.
Cleaning and care Starting pyrolytic cleaning Risk of injury caused by hot surfaces. The oven gets much hotter during pyrolytic cleaning than during normal use. Do not let children touch the oven during pyrolytic cleaning. You can use the minute minder at the same time as running the cleaning programme. At the end of the minute minder time the buzzer will sound, will start flashing and the time can be viewed counting up in the display.
Cleaning and care Finishing off the pyrolytic cleaning process When the time remaining has counted down to 0:00 h, a message will appear in the display to tell you that the door is unlocking. will appear in the display and a buzzer will sound as soon as the door has been unlocked. Process finished Switch the oven off. The visual and acoustic signals will switch off. Risk of injury caused by hot surfaces. At the end of the pyrolytic cleaning programme, the oven will still be very hot.
Cleaning and care Descale The frequency of descaling will depend on the water hardness level in your area. Descaling process sequence Once the descaling process has been started it must be completed through to the end. It cannot be cancelled. The descaling process can be run at any time. Descaling takes approx.
Cleaning and care Other descaling agents, which contain other acids besides citric acid and/or other undesirable substances, such as chlorides for example, could cause damage. Moreover, the descaling result required could not be guaranteed if the descaling solution was not of the appropriate concentration. Fill the container with approx. 600 ml of cold tap water and thoroughly dissolve one descaling tablet in it. Carrying out the descaling process Select Further . Select Descale.
Cleaning and care The interior lighting and cooling fan remain switched on for the whole duration of the process. At the end of the activation phase a buzzer will sound. Rinsing the steam injection system after the activation phase After the activation phase the steam injection system must be rinsed out to remove residues of descaling solution. To do this approx. 1 litre of fresh tap water is pumped through the steam injection system three times and is collected in the universal tray.
Cleaning and care Evaporating residual moisture Finalising the descaling process After the third rinse residual moisture evaporation will commence. At the end of residual water evaporation, an information window appears with tips on cleaning after the descaling process. Remove the container and tube from the oven compartment. Close the door. Confirm with OK. Danger of injury caused by steam. Steam can cause severe scalding. Do not open the door while the residual water is being evaporated.
Cleaning and care Door removal The door weighs approx. 10 kg. The oven could become damaged if you incorrectly remove the door. Never pull the door horizontally off its retainers, as they will spring back against the oven. Never pull the door off the retainers by the handle, as the handle could break off. Raise the door up till it rests partially open. The oven door is connected to the door hinges by retainers.
Cleaning and care Dismantling the door The oven door is an open system with 4 glass panes which have a heatreflective coating on some of their surfaces. When the oven is operating, air is directed through the door to keep the outer pane cool. If soiling has worked its way in between the glass panes, the door can be dismantled in order to clean in between the panes. Scratches on the door glass can cause the glass to break.
Cleaning and care Risk of injury caused by door slamming shut. The door may slam shut if you attempt to disassemble it when it is fitted to the oven. Always remove the door before disassembling it. Place the door with the outer glass pane on a soft surface (e.g. a tea towel) to prevent it getting scratched. The door handle should line up with the edge of the table so that the glass lies flat and does not get broken during cleaning. Flip the two glass pane retainers outwards to open them.
Cleaning and care Carefully lift the top of the two middle panes up and take it out. Flip both the glass pane retainers inwards in such a way that they fit over the lower of the two middle panes. Refit the upper of the two middle panes in such a way that the material number is legible (i.e. not reversed). The pane must rest on the retainers. Then lift the bottom of the two middle panes up carefully and take it out.
Cleaning and care Fitting the door Refit the seal. Push the inner pane with the matt printed side facing downwards into the plastic strip and place it between the retainers. Hold the door securely on both sides and carefully fit it back into the hinge retainers. Make sure that you fit the door straight. Flip both the glass pane retainers inwards to close them. The door is now reassembled.
Cleaning and care Open the door fully. If the locking clamps are not locked, the door could become loose, resulting in damage. Always ensure that the locking clamps are locked after refitting the door. Removing the side runners with FlexiClip runners The side runners can be removed together with the FlexiClip runners (if inserted). If you wish to remove the FlexiClip runners separately beforehand, please follow the instructions in “Features” – “Fitting and removing FlexiClip runners”.
Cleaning and care Lowering the top heat/grill element If the oven compartment roof is badly soiled, the top heat/grill element can be lowered to make cleaning easier. Clean the oven compartment roof regularly with a damp cloth or a dishwashing sponge. Danger of injury caused by hot surfaces. The oven gets hot during operation. You could burn yourself on the heating elements, oven compartment or accessories. Allow the heating elements, oven compartment and the accessories to cool before manual cleaning.
Problem solving guide Many malfunctions and faults that can occur in daily operation can be easily remedied. Time and money will be saved because a service call will not be needed. The following guide may help you to find the reason for a malfunction or a fault, and to correct it. Problem Cause and remedy The display is dark. You have selected the Time | Display | Off setting. When the oven is switched off, the display is dark. As soon as the oven is switched on, the main menu will appear.
Problem solving guide Problem Cause and remedy The sensor controls do not respond. You have selected the Display | QuickTouch | Off setting. When the oven is switched off, the sensor controls do not respond. As soon as the oven is switched on, the sensor controls will respond. If you want the sensor controls to respond even when the oven is switched off, select the Display | QuickTouch | On setting. The oven is not connected to the power supply.
Problem solving guide Problem Cause and remedy Fault and a fault code not listed here appears in the display. A fault has occurred that you cannot resolve. Call the Miele Customer Service Department. This function is not available The steam injection system is faulty. Call the Miele Customer Service Department. appears in the display after selecting the Descale function. at the moment Programmes that use added moisture are not taking in water. Demo mode is active.
Problem solving guide Problem Cause and remedy The browning of the The wrong temperature or shelf level was selected. baked goods is uneven. There will always be a slight unevenness in browning. If browning is very uneven, check whether the correct temperature and shelf level were selected. The material or colour of the bakeware is not suitable for the oven function selected. When using the Conventional heat function, light coloured, shiny tins will not produce as desirable results.
Problem solving guide Problem Cause and remedy The oven interior lighting is off. You have selected the Lighting | Off setting. Press the sensor control to switch on the oven interior lighting for 15 seconds. If required, select the Lighting | On or “On” for 15 seconds setting. The oven interior lighting does not switch on. The halogen lamp is faulty. Risk of injury caused by hot surfaces. The oven gets hot during operation.
Service Contact in the event of a fault Warranty In the event of any faults which you cannot remedy yourself, please contact your Miele dealer or the Miele Customer Service Department. For information on the appliance warranty specific to your country please contact Miele. See back cover for address. You can book a Miele Customer Service Department call-out online at www.miele.com/service. Contact information for the Miele Customer Service Department can be found at the end of this document.
*INSTALLATION* Installation Installation dimensions Dimensions are given in mm. Installation in a tall or base unit When building the oven into a base unit underneath a hob, please also observe the installation instructions for the hob as well as the building-in depth required for the hob.
*INSTALLATION* Installation Side view A H 71xx: 43 mm H 72xx: 47 mm 87
*INSTALLATION* Installation Connections and ventilation a Front view b Mains connection cable, length = 1500 mm c No connections permitted in this area d Ventilation cut-out, min.
*INSTALLATION* Installation Installing the oven For safety reasons, the oven may only be used when it has been fully installed. The oven requires a sufficient supply of cool air for efficient operation. The required supply of cool air must not be excessively heated by other heat sources (e.g. solid fuel stoves). The following must be observed when installing the appliance: Make sure that the shelf that the oven sits on does not touch the wall.
*INSTALLATION* Installation Electrical connection Danger of injury! Installation, repairs and other work by unqualified persons could be dangerous. Miele cannot be held liable for unauthorised work. Connection to the electrical supply must be carried out by a suitably qualified and competent person in accordance with local and national safety regulations. Ensure power is not supplied to the appliance until after installation or repair work has been carried out.
*INSTALLATION* Installation Electrical connection: Other countries All electrical work should be carried out by a suitably qualified and competent Miele approved service technician in strict accordance with local and national safety regulations. Connection should be made via a fused connection unit or a suitable isolator, which complies with national and local safety regulations, and the on/off switch should be easily accessible after the appliance has been installed.
Cooking charts Batter Cakes/biscuits (accessories) Muffins (1 tray) Muffins (2 trays) Small cakes (1 tray)* Small cakes (2 trays)* Madeira cake (loaf tin, 30 cm) Marble, nut cake (loaf tin, 30 cm) Marble, nut cake (ring tin/Bundt cake tin, 26 cm) Fresh fruit cake (tray) Fresh fruit cake (springform cake tin, 26 cm) Flan base (flan base tin, 28 cm) [°C] 150–160 150–160 – – 2 1+3 2 150 – 2 1 – 3 160 1 150 150–160 155–1651 150–160 150–160 150–160 150–160 1
Cooking charts Rubbed in mixture Cakes/biscuits (accessories) Biscuits (1 tray) Biscuits (2 trays) Drop cookies (1 tray)* [°C] 140–150 150–160 140–150 140 – 2 160 140 150–160 1 – 3 – – – 2 2 1+3 2 2 170–1801 Cheesecake (springform cake tin, 26 cm) 170–180 150–160 Apple pie, single crust (springform cake tin, 160 20 cm)* 180 – – – – – – 1+3 2 2 2 2 – 1 – – – – – – – 1 2 2 2 2 2 2 1 1 Drop cookies (2 trays)* Flan base (flan base tin, 28 cm) Appl
Cooking charts Yeast dough [°C] 150–160 160–170 150–160 160–170 160–170 170–180 160–170 170–180 160–170 160–170 White bread (loaf tin, 30 cm) 190–200 190–200 180–190 – 2 2 2 2 Wholegrain bread (loaf tin, 30 cm) 190–2001 190–2001 2 2 Proving yeast dough 200–2101 30–35 – – Cakes/biscuits (accessories) Bundt cake (Bundt cake tin, 24 cm) Stollen Streusel cake with/without fruit (tray) Fresh fruit cake (tray) Apple turnovers/raisin whirls (1 tra
Cooking charts Quark dough Cakes/biscuits (accessories) Fresh fruit cake (tray) Apple turnovers/raisin whirls (1 tray) Apple turnovers/raisin whirls (2 trays) [°C] 160–170 170–180 160–170 150–160 – 2 3 3 1+3 [min] 40–50 50–60 25–35 1 25–35 Function, Temperature, Booster, Shelf level, Cooking duration, Fan plus, Conventional heat, On, – Off 1 Take the trays out of the oven early if the food is sufficiently browned before the specified cooking duration has ela
Cooking charts Sponge mixture Cakes/biscuits (accessories) Sponge cake base (2 eggs, springform cake tin, 26 cm) Sponge cake base (4–6 eggs, springform cake tin, 26 cm) Whisked sponge (springform cake tin, 26 cm)* Swiss roll sponge (baking tray) [min] 160–1701 – 2 15–25 150–1601 – 2 30–40 – 2 2 25–35 2 25–45 [°C] 180 150–1701 180–1901 – – 2 2 10–20 Function, Temperature, Booster, Shelf level, Cooking duration, Fan plus, Conventional heat, O
Cooking charts Choux pastry, puff pastry, meringue Cakes/biscuits (accessories) Choux buns (1 tray) Pastry puffs (1 tray) Pastry puffs (2 trays) Macaroons (1 tray) Macaroons (2 trays) Meringues/pavlovas (1 tray of 6, each 6 cm) Meringues/pavlovas (2 trays of 6, each 6 cm) [°C] 160–170 180–190 180–190 120–130 120–130 80–100 – 80–100 – – – – – – 2 2 1+3 2 1+3 2 [min] 1 30–40 20–30 2 20–30 25–50 2 25–50 120–150 1+3 150–180 Function, Temperature, Booster,
Cooking charts Savoury dishes Food (accessories) Savoury Swiss apple pie (tray) [°C] 220–2302 180–190 180–1902 170–180 170–180 210–2202 170–180 190–2002 200–210 300 3 275 – – – – – – 1 1 2 2 2 2 2 2 2 3 3 [min] 35–45 30–40 25–35 30–40 25–35 20–30 25–35 25–35 20–25 5–8 3–6 3 – 4 5–10 3 – – 3 2 5–10 40–60 Onion tart (tray) Pizza, yeast dough (tray) Pizza, quark-oil dough (tray) Frozen pizza, pre-cooked (rack) Toast* (rack) 1 Baked dishes/gratins (e.g.
Cooking charts Beef [°C] [min] 2 3 6 150–160 2 120–130 2 3 6 170–180 2 120–130 2 2 160–1807 180–190 – Food (accessories) Braised beef, approx. 1 kg (oven dish with lid) Fillet of beef, approx. 1 kg (universal tray) 1 Fillet of beef, “rare”, approx. 1 kg Fillet of beef, “medium”, 1 approx. 1 kg Fillet of beef, “well done”, 1 approx. 1 kg Sirloin joint, approx. 1 kg (universal tray) 1 Sirloin joint, “rare”, approx.
Cooking charts Veal [°C] [min] 2 3 5 160–170 2 120–130 2 3 5 170–180 2 120–130 Food (accessories) Braised veal, approx. 1.5 kg (oven dish with lid) Fillet of veal, approx. 1 kg (universal tray) 1 Fillet of veal, “rare”, approx. 1 kg 2 3 2 1 2 30–60 45–75 4 – 2 50–60 45–48 4 – 2 80–90 54–57 – 2 90–100 63–66 4 – 2 80–90 45–48 4 – 2 100–130 54–57 – 2 130–140 63–66 80–85 2 Fillet of veal, “medium”, approx.
Cooking charts Pork Food (accessories) Pork joint/pork neck roast, approx. 1 kg (oven dish with lid) Pork joint with crackling, approx. 2 kg (oven dish) [°C] 160–170 2 [min] 5 130–140 [°C] 80–90 170–180 130–140 5 80–90 6.7 80–90 7 80–90 180–190 190–200 1 Fillet of pork, approx. 350 g Ham roast, approx. 1.5 kg (oven dish with lid) Gammon joint, approx. 1 kg (universal tray) 1 Gammon joint, approx. 1 kg Meat loaf, approx.
Cooking charts Lamb, game Food (accessories) Leg of lamb, on the bone, approx. 1.5 kg (oven dish with lid) Saddle of lamb, off the bone (universal tray) Saddle of lamb, off the bone (rack and universal tray) Saddle of venison, off the bone (universal tray) Roebuck saddle, off the bone (universal tray) Leg of wild boar, off the bone, approx.
Cooking charts Poultry, fish Food (accessories) Poultry, 0.8–1.5 kg (universal tray) Chicken, approx. 1.2 kg (rack on top of universal tray) Poultry, approx. 2 kg (oven dish) Poultry, approx. 4 kg (oven dish) Fish, 200–300 g (e.g. trout) (universal tray) Fish, 1–1.5 kg (e.g.
Notes for test institutes Test food acc.
Notes for test institutes Energy efficiency class according to EN 60350-1 The energy efficiency class is determined in accordance with EN 60350-1. Energy efficiency class: A+ Please observe the following when conducting testing: - Testing is undertaken using the Eco Fan heat function. - Select the Lighting | “On” for 15 seconds setting (see “Settings – “Lighting”). - Only accessories that are required for testing should be in the oven compartment during tests.
Conformity declaration Miele hereby declares that this oven complies with Directive 2014/53/EU. The complete text of the EU declaration of conformity is available from one of the following internet addresses: - Products, Download from www.miele.co.uk - For service, information, operating instructions etc: go to www.miele.co.uk/domestic/ customer-information-385.htm and enter the name of the product or the serial number Frequency band of the WiFi module 2.4000 GHz – 2.
United Kingdom Miele Co. Ltd., Fairacres, Marcham Road, Abingdon, Oxon, OX14 1TW Tel: 0330 160 6600, Internet: www.miele.co.uk/service, E-mail: info@miele.co.uk Australia Miele Australia Pty. Ltd. ACN 005 635 398 ABN 96 005 635 398 1 Gilbert Park Drive Knoxfield, VIC 3180 Tel: 1300 464 353 Internet: www.miele.com.au China Mainland Miele Electrical Appliances Co., Ltd. 1-3 Floor, No. 82 Shi Men Yi Road Jing' an District 200040 Shanghai, PRC Tel: +86 21 6157 3500 Fax: +86 21 6157 3511 E-mail: info@miele.
H 7164 BP, H 7264 BP en-GB M.-Nr.