
Operating and Installation instructions


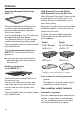

Table Of Contents
- Contents
- IMPORTANT SAFETY INSTRUCTIONS
- Guide to the range
- Controls for the range
- Features
- Data plate
- Scope of delivery
- Standard and optional accessories
- Side racks
- Universal tray and Wire Rack with anti-tip safety notches
- FlexiClips with Wire Rack HFCBBR 30-3
- Installing and removing the FlexiClips with Wire Rack
- Temperature selector with °C scale
- Replacing the temperature selector
- Round baking pans
- Perforated Gourmet Baking Tray HBBL 71
- Broiling and roasting insert HGBB 30-1
- HUB Gourmet Casserole Dishes HBD Gourmet Casserole Dish lids
- Accessories for cleaning and care
- Gas cooktop safety features
- Oven safety features
- PerfectClean treated surfaces
- Self-Clean-ready accessories
- Before first use
- Using the gas cooktop
- Using the oven
- Overview of operating modes
- Energy-saving tips
- Simple operation
- Preheating
- Operating the clock/timer
- Switching cooking programs on and off automatically
- Setting the cooking duration
- Setting a cooking duration and a finish time
- First set the cooking duration:
- Then set the finish time:
- At the end of the cooking duration:
- Changing the cooking duration
- Deleting a cooking duration
- Deleting a finish time
- Changing the time of day
- Changing factory default settings
- Settings overview
- Switching the system lock on and off
- Activating the system lock
- Deactivating the system lock for a cooking process
- Deactivating the system lock
- Using the timer
- Setting the timer
- Changing the timer
- Deleting the timer
- Baking
- Roasting
- Broiling
- Further applications
- Gas cooktop cleaning and care
- Cleaning and care of the oven
- Frequently Asked Questions
- Customer Service
- Caring for the environment

Controls for the range
Controls for the gas cooktop
a
Control knob
Rear left burner
b
Control knob
Front left burner
c
Control knob
Front right burner
d
Control knob
Rear right burner
The control knob for each burner is used to ignite the burner and regulate the
strength of the flame. The burners can be variably adjusted between the lowest
and highest flame settings.
Control knobs for normal and power burners
Label Description
Off Gas supply off: burner off
High Strongest flame setting:
Maximum power of upper and lower flame rings
Simmer Weakest flame setting:
Upper flame ring off
Minimum power of lower flame ring
21