
Operating and Installation instructions
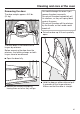
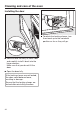
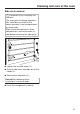
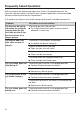
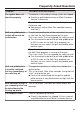
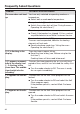
Table Of Contents
- Contents
- IMPORTANT SAFETY INSTRUCTIONS
- Guide to the range
- Controls for the range
- Features
- Data plate
- Scope of delivery
- Standard and optional accessories
- Side racks
- Universal tray and Wire Rack with anti-tip safety notches
- FlexiClips with Wire Rack HFCBBR 36-3
- Installing and removing the FlexiClips with Wire Rack
- Temperature selector with °C scale
- Replacing the temperature selector
- Round baking pans
- Perforated Gourmet Baking Tray HBBL 71
- Broiling and roasting insert HGBB 30-1
- HUB Gourmet Casserole Dishes HBD Gourmet Casserole Dish lids
- Accessories for cleaning and care
- Gas cooktop safety features
- Oven safety features
- PerfectClean treated surfaces
- Self-Clean-ready accessories
- Before first use
- Using the gas cooktop
- Using the oven
- Overview of operating modes
- Energy-saving tips
- Simple operation
- Preheating
- Operating the clock/timer
- Switching cooking programs on and off automatically
- Setting the cooking duration
- Setting a cooking duration and a finish time
- First set the cooking duration:
- Then set the finish time:
- At the end of the cooking duration:
- Changing the cooking duration
- Deleting a cooking duration
- Deleting a finish time
- Changing the time of day
- Changing factory default settings
- Settings overview
- Switching the system lock on and off
- Activating the system lock
- Deactivating the system lock for a cooking process
- Deactivating the system lock
- Using the timer
- Setting the timer
- Changing the timer
- Deleting the timer
- Baking
- Roasting
- Broiling
- Further applications
- Gas cooktop cleaning and care
- Cleaning and care of the oven
- Frequently Asked Questions
- Customer Service
- Caring for the environment

Frequently Asked Questions
With the help of the following guide minor faults in the performance of the
machine, some of which may result from incorrect operation, can be remedied
without contacting the Service Department.
This guide may help you to find the reason for the fault, and how to correct it.
Problem Possible cause and solution
The burners do not ig-
nite when the cooktop
is being used for the
first time or after it has
been out of use for a
longer period.
There may be air in the gas line.
Try to light the burner again, making several
attempts if necessary.
The burner does not
light after several at-
tempts.
The burner is not properly assembled.
Assemble the burner correctly.
The gas shutoff valve is closed.
Open the gas shut-off valve.
The burner is wet and/or dirty.
Clean and dry the burner.
The flame holes are clogged and/or wet.
Clean and dry the flame holes.
The gas flame goes out
after being lit.
The burner parts are not in the proper position.
Position the burner parts correctly.
The ignitor is dirty.
Remove any dirt or grime.
The shape/color of the
gas flame changes.
The burner parts are not in the proper position.
Position the burner parts correctly.
The burner cap itself or the holes in the burner cap
are dirty.
Remove any dirt or grime.
The gas flame goes out
during use.
The burner parts are not in the proper position.
Position the burner parts correctly.
84