
Operating and Installation instructions
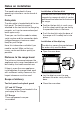
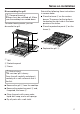
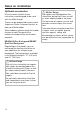
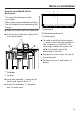

Table Of Contents
- Contents
- IMPORTANT SAFETY INSTRUCTIONS
- Notes on installation
- All Gas Range dimensions
- All Electric Range dimensions
- Dual Fuel Range dimensions
- HR 1724-3 DF
- Detailed views of HR 1724-3 DF
- HR 1924-3 DF
- Detailed views of HR 1924-3 DF
- HR 1934-3 DF, HR 1935-3 DF, HR 1936-3 DF
- Detailed views of HR 1934-3 DF
- Detailed views of HR 1935-3 DF
- Detailed views of HR 1936-3 DF
- HR 1954-3 DF, HR 1955-3 DF, HR 1956-3 DF
- Detailed views of HR 1954-3 DF
- Detailed views of HR 1955-3 DF
- Detailed views of HR 1956-3 DF
- Anti-tip device
- Plumbed water connection
- Electrical connection
- Gas connection
- Burner ratings
- Burner ratings HR 1124-3 AG
- Burner ratings HR 1134-3 AG
- Burner ratings HR 1135-3 AG
- Burner ratings HR 1136-3 AG
- Burner ratings HR 1724-3 DF
- Burner ratings HR 1924-3 DF
- Burner ratings HR 1934-3 DF
- Burner ratings HR 1935-3 DF
- Burner ratings HR 1936-3 DF
- Burner ratings HR 1954-3 DF
- Burner ratings HR 1955-3 DF
- Burner ratings HR 1956-3 DF
- Customer Service
- Caring for the environment
- Copyrights and licenses

Notes on installation
*INSTALLATION*
17
Disassembling the grill
Danger of burning!
Burners must be switched off. Make
sure the cooktop has cooled down.
To make cleaning easier, you can
dismantle the grill.
a
Grill
b
Protective panel
c
Frame
Risk of injury!
The cast-iron grill is heavy.
Carry the grill carefully and place it
securely on a soft surface so that it
lies flat.
Remove the grill from the cooktop.
Remove the protective panel and,
if required, the frame .
Clean the parts with warm water,
liquid dish soap, and a soft sponge.
Dry all parts with a soft cloth.
Reinstall by following these instructions
in reverse order.
Place the frame on the surface
burner. The recess for the igniter is
located on the right side in the lower
quarter of the frame.
Place the protective panel on the
frame .
Replace the grill .