
Operation Manual
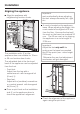
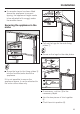
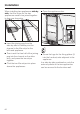
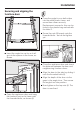

Table Of Contents
- Contents
- Description of the appliance 5
- Caring for the environment 7
- Warning and Safety instructions 8
- How to save energy 16
- Switching on and off 18
- The correct temperature 22
- Temperature and door alarm 25
- Super cool 27
- Storing food in the refrigerator section 28
- Storing food in the MasterFresh zone 31
- Arranging the interior fittings 34
- Automatic defrost 37
- Cleaning and care 38
- Problem solving guide 41
- Noises 44
- After Sales / Guarantee 45
- Note for test institutes 46
- Electrical connection 47
- Installation advice 48
- Building-in dimensions 54
- Installation 56
- Tools and accessories required 56
- Weight of the door front 57
- Building into a peninsular run 57
- Building-in at the end of a run of units 57
- Aligning the building-in niche 58
- Checking the building-in niche 58
- Before installation 58
- Preparing the niche 59
- Placing the appliance in the niche 63
- Aligning the appliance 64
- Securing the appliance in the niche 65
- Preparing the furniture front 67
- Securing and aligning the furniture door 69
- Securing the covers 70
- Fitting the plinth facing 71
- Fitting the air separator 72
- Addresses 75

^ Mark gap X on the inside of the
furniture front.
^ Similarly, locate and mark the
midpoint Y on the furniture front.
^ Remove the fixing frame from the
appliance door and position it
corresponding to the markings on the
furniture front.
^
Pre-drill the holes.
^
Screw the fixing frame to the furniture
front, using at least one screw for
each fixing point.
^
Secure the fixing frame to the top of
the furniture front, using at least 10
screws:
–
The fixing frame has several different
types of holes to take account of a
variety of furniture fronts.
–
When securing the frame, always
screw into the strongest part of the
furniture door.
–
To do this, select screws which are
slightly shorter than the thickness of
the furniture door.
^
Screw the appliance handle to the
furniture door from the inside.
Installation
68