
Operating and Installation Instructions
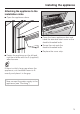
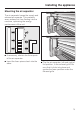
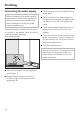

Table Of Contents
- Contents
- IMPORTANT SAFETY INSTRUCTIONS 4
- Guide to the Fridge-Freezer combination 8
- Before use 10
- Settings 11
- Temperature and door alarm 14
- Setting the temperature 15
- SmartFresh drawers 17
- Using the refrigerator efficiently 20
- Using the freezer efficiently 21
- SuperCool 23
- Ice cube maker 24
- Automatic defrost 25
- Adjusting the interior fittings 26
- Cleaning and care 30
- Water filter 36
- Lead free certificate 41
- Frequently asked questions 42
- Causes of noises 49
- After sales service 50
- Caring for the environment 53
- Installation 54
- Dimensions 60
- Installing the appliance 63
- Plumbing 76
- Electrical connection 79
- RemoteVision (optional accessory) 80
- Contact details 83
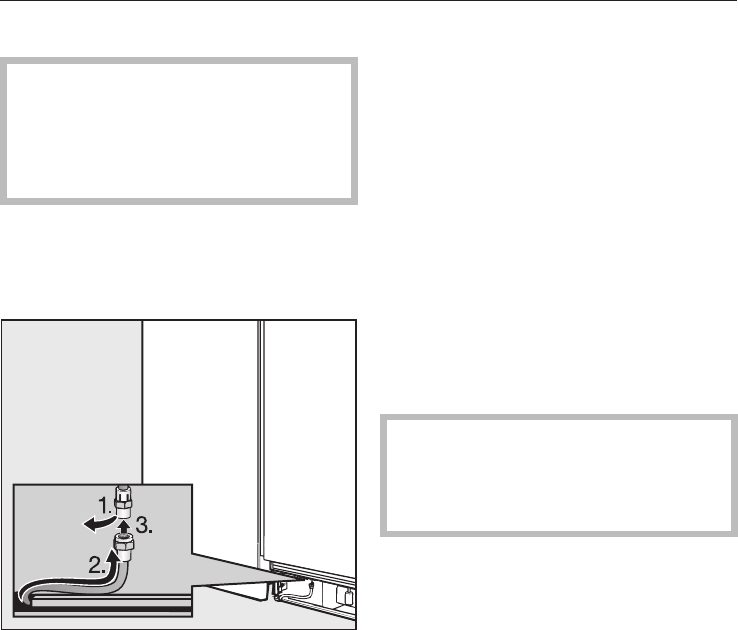
Connecting the water supply
When connecting the water pipe to
the solenoid valve of the appliance,
follow the instructions supplied by
the manufacturer of the ice cube
maker installation kit.
When bending the water pipe, be sure
not to kink it, otherwise there is a risk of
leaks and water damage.
Use bending aids.
^ Remove the cap from the appliance
connection, 1.
^ Bend the water pipe to suit the
location of the connection on the
appliance, 2.
^ Push the union nut and seal onto the
water pipe.
^ Push the end of the water pipe into
the appliance connection and screw
on the union nut, 3. First tighten by
hand.
^ Then use an open-ended wrench to
tighten the union nut. Do not over
tighten.
^ Open the shut-off valve and the main
water connection. Check for leaks at
the connection for the shut-off valve
and to the appliance.
^ Turn the appliance on.
After a maximum of 10 hours the first
ice cubes will drop out of the ice
cube maker and collect in the ice
cube container.
Plumbing
78