
Operating and Installation Instructions
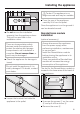
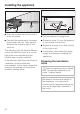
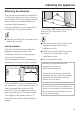
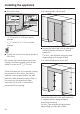
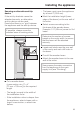
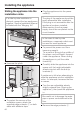
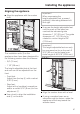
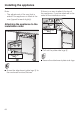
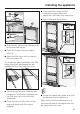
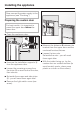
Table Of Contents
- Contents
- IMPORTANT SAFETY INSTRUCTIONS 4
- Guide to the Fridge-Freezer combination 7
- Before use 9
- Settings 10
- Temperature and door alarm 13
- Setting the temperature 14
- SmartFresh drawers 16
- Using the refrigerator efficiently 18
- Using the freezer efficiently 19
- SuperCool 21
- Ice cube maker 22
- Automatic defrost 23
- Adjusting the interior fittings 24
- Cleaning and care 28
- Water filter 33
- Lead free certificate 38
- Frequently asked questions 39
- After sales service 47
- Caring for the environment 50
- Installation 51
- Dimensions 56
- Installing the appliance 59
- Plumbing 77
- Electrical connection 80
- RemoteVision (optional accessory) 81

^
Do not remove the installation
supports from the appliance doors.
They will be used later in the
installation niche.
There are transportation safety
devices inside the appliance to
protect the shelves and storage
compartments until installation is
complete. Do not remove them,or
parts may be damaged.
^ Check the appliance for damage in
transit.
Do not install the appliance if it is
visibly damaged. If in doubt, contact
your dealer.
^
Loosen the bracket that holds the
appliance to the pallet.
,
Caution! The appliance is no
longer secured and may be unstable.
^
From the rear of the appliance
carefully lift it from the pallet.
Once the appliance is on the ground it
can be wheeled around.
RemoteVision module
installation
(optional accessory)
Always disconnect the appliance
from the power supply when
performing installation, maintenance
or service work.
Install the RemoteVision module
before placing the appliance in its
installation niche.
Once connected the RemoteVision
module will increase the energy
consumption of the appliance.
The slot for the RemoteVision module is
located in the lower area of the back of
your appliance.
^
Unscrew the screws a on the cover
b and pull off the sticker c.
^
Remove the cover b.
Installing the appliance
61