
Operating and Installation Instructions
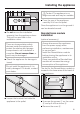
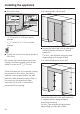
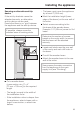
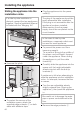
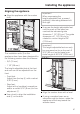
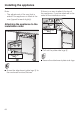
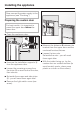
Table Of Contents
- Contents
- IMPORTANT SAFETY INSTRUCTIONS 4
- Guide to the Fridge-Freezer combination 7
- Before use 9
- Settings 10
- Temperature and door alarm 13
- Setting the temperature 14
- SmartFresh drawers 16
- Using the refrigerator efficiently 18
- Using the freezer efficiently 19
- SuperCool 21
- Ice cube maker 22
- Automatic defrost 23
- Adjusting the interior fittings 24
- Cleaning and care 28
- Water filter 33
- Lead free certificate 38
- Frequently asked questions 39
- After sales service 47
- Caring for the environment 50
- Installation 51
- Dimensions 56
- Installing the appliance 59
- Plumbing 77
- Electrical connection 80
- RemoteVision (optional accessory) 81

Sliding the appliance into the
installation niche
If a side-by-side installation is
desired, connect the two appliances
together. See the Installation Manual
included with the "Merging Kit".
^ Unscrew the plinth.
^
To protect the corners of the
installation space, attach the
supplied edge protector a on both
sides with adhesive tape.
^
Plug the appliance into the power
outlet b.
The plug of the appliance should be
easily accessible after installation.
If the plug is not accessible after the
appliance has been installed,
disconnection from the power
supply should be completed via the
circuit breaker.
In the case of side-by-side
installations, a separate outlet must
be used for each appliance.
^ To prevent the power cord from
becoming caught:
Tie a piece of string to the middle of
the power cord and feed it forward
under the appliance. When sliding
the appliance in, pull the cable
forward c.
^ Carefully slide the appliance into the
space until the height-adjustable
wheels interlock with the anti-tip
brackets d.
If resistance is felt when attempting to
slide the appliance into the installation
niche - for example, because the floor
is uneven,
^
Turn the rear adjustable wheels
slightly outward (see "Aligning the
appliance"), then push the appliance
in.
Be careful not to damage the water
pipe or power cord attached to the
floor.
^
Remove the edge protector a.
Installing the appliance
66