
Operating and Installation Instructions
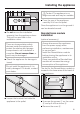
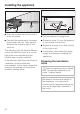
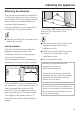
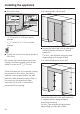
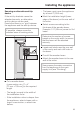
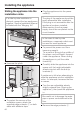
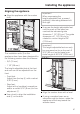
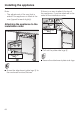
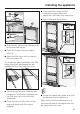
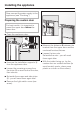
Table Of Contents
- Contents
- IMPORTANT SAFETY INSTRUCTIONS 4
- Guide to the Fridge-Freezer combination 7
- Before use 9
- Settings 10
- Temperature and door alarm 13
- Setting the temperature 14
- SmartFresh drawers 16
- Using the refrigerator efficiently 18
- Using the freezer efficiently 19
- SuperCool 21
- Ice cube maker 22
- Automatic defrost 23
- Adjusting the interior fittings 24
- Cleaning and care 28
- Water filter 33
- Lead free certificate 38
- Frequently asked questions 39
- After sales service 47
- Caring for the environment 50
- Installation 51
- Dimensions 56
- Installing the appliance 59
- Plumbing 77
- Electrical connection 80
- RemoteVision (optional accessory) 81

Aligning the appliance
^
Align the appliance with the custom
front.
The installation aids e on the
appliance door have been designed for
the following custom door thicknesses:
– 3/4" (19 mm)
– 1 1/2" (38 mm).
The height-adjustable feet at the front
and rear can all be adjusted from the
front:
–
Front feet:
Adjust from the top f, with a rachet
5/16" (8 mm).
–
Rear feet:
Adjust with a (cordless) screwdriver
and/or a rachet 5/16" (8 mm) for fine
adjustment g.
^
Use a level to align the installation
aids e on the door.
Important!
When unscrewing the
height-adjustable feet, proceed
gradually, alternating between left
and right.
^
Unscrew the height-adjustable feet
until the mark on the base has
reached the indicated guide
dimension 1 1/4" (32 mm). The guide
dimension of 1 1/4" (32 mm) is
related to a niche height of 84"
(2134 mm).
Important!
The height-adjustable feet can only
be unscrewed as far as the mark 2
3/16" (62 mm) on the base (max.
niche height of 85 3/16" (2164 mm).
^
Align the custom doors with a level.
^
If using a wooden beam as an
alternative anti-tip device, rotate the
appliance all the way toward the
wooden beam.
Installing the appliance
67