Operating and installation instructions Fridge freezer combination with dynamic cooling KF 7544 SND ed-3 To avoid the risk of accidents or damage to the appliance it is essential to read these operating instructions before it is installed or used for the first time. G M.-Nr.
Contents Description of the appliance . . . . . . . . . . . . . . . . . . . . . . . . . . . . . . . . . . . . . . . . . 4 Caring for the environment . . . . . . . . . . . . . . . . . . . . . . . . . . . . . . . . . . . . . . . . . . 6 Warning and Safety instructions . . . . . . . . . . . . . . . . . . . . . . . . . . . . . . . . . . . . . 7 Switching on and off . . . . . . . . . . . . . . . . . . . . . . . . . . . . . . . . . . . . . . . . . . . . . . 11 To switch the refrigerator section off separately . .
Contents Freezing and storing food . . . . . . . . . . . . . . . . . . . . . . . . . . . . . . . . . . . . . . . . . . 22 Maximum freezing capacity. . . . . . . . . . . . . . . . . . . . . . . . . . . . . . . . . . . . . . . . . . 22 Storing frozen food. . . . . . . . . . . . . . . . . . . . . . . . . . . . . . . . . . . . . . . . . . . . . . . . . 22 Home freezing . . . . . . . . . . . . . . . . . . . . . . . . . . . . . . . . . . . . . . . . . . . . . . . . . . . . 22 Hints on home freezing. . . . . . . .
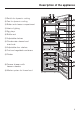
Description of the appliance a Super cool button and indicator light f Freezer section temperature display b On button to switch on the whole appliance or On/Off button for independently switching the refrigerator section on and off.
Description of the appliance k Switch for dynamic cooling l Fan for dynamic cooling m Butter and cheese compartment n Interior lighting o Egg trays p Bottle rack q Adjustable shelves r Condensate channel and drain hole s Adjustable door shelves t Fruit and vegetable containers u Divider v Freezer drawers with freezer calendar w Marker system for frozen food 5
Caring for the environment Disposal of the packing material The transport and protective packing has been selected from materials which are environmentally friendly for disposal and can normally be recycled. Rather than just throwing these materials away, please ensure they are offered for recycling. Ensure that any plastic wrappings, bags etc. are disposed of safely and kept out of the reach of babies and young children.
Warning and Safety instructions Technical safety This appliance complies with all relevant legal safety requirements. Inappropriate use can however lead to personal injury and damage to property. Read the operating instructions carefully before starting to use this appliance. They contain important notes on installation, safety, operation and care of the appliance. This way you will avoid the risk of accidents and damage to the appliance.
Warning and Safety instructions Before connecting the appliance to the mains supply make sure that the rating on the data plate corresponds to the voltage and frequency of the household supply. This data must correspond in order to avoid risk of damage to the appliance. Consult a qualified electrician if in doubt.
Warning and Safety instructions Do not refreeze thawed or partially thawed food. Defrosted food should be used up as quickly as possible as food soon loses its nutritional value and goes off. Defrosted food may only be re-frozen after it has been cooked. Do not store explosive materials in the appliance or any products containing propellants (e.g. spray cans). Switching on thermostats may produce sparks which could present a fire hazard.
Warning and Safety instructions The appliance is designed for a use within certain climate ranges (ambient temperatures). It must not be used in ranges for which it is not designed. The climate range for your appliance is stated on the data plate inside the appliance. Installing it in a room with too low an ambient temperature will lead to the appliance switching off for longer periods so that it cannot maintain the required temperature.
Switching on and off Before using for the first time Switching off The stainless steel surface has a protective cover to prevent scratching during transportation. ^ Press the main switch. ^ Do not remove this cover until the appliance has been installed or built in. Start at one of the upper corners. ^ Clean the inside of the appliance and the accessories with warm water and a little washing up liquid and then dry with a soft cloth.
Switching on and off To switch the refrigerator section back on again ^ Press the On/Off button again. Bars will appear in the temperature display for the refrigerator section. The refrigerator section starts cooling. The interior light will come on when the door is opened. Switching off the alarm Engaging the safety lock ^ Press and hold the alarm button. ^ Then press the Super freeze button as well and keep both buttons pressed in for approx.
The correct temperature It is very important to set the correct temperature for storing food in the appliance. Micro organisms will cause food which is not stored at the correct temperature to deteriorate rapidly. Temperature influences the growth rate of these micro organisms. Reducing the temperature reduces their growth rate. . . . in the freezer – if too much food is stored in it at once, For freezing fresh food and storing frozen food for a long time a temperature of at least -18 °C is needed.
The correct temperature When pressing the buttons the following are shown in the display: – When first pressed: The last temperature selected flashes. – Each subsequent press of the button: adjusts the temperature shown in 1 °C steps. – Keeping the button pressed in: adjusts the temperature continually. Approx. 5 seconds after letting go of the button the current actual temperature of the refrigerator or freezer is automatically shown. If you have adjusted the temperature, wait for approx.
The correct temperature The temperature displays flash, if Temperature display brightness – a different temperature is being set, The appliance is supplied with the brightness of the temperature display set as low as possible. However, if the door is opened, a setting changed or if the alarm is sounding, the temperature display will appear much brighter for approx. 1 minute. – the temperature in the appliance has risen by several degrees, indicating that the appliance is warming up too much.
Alarm Your appliance has been fitted with a warning system which ensures that the temperature in the freezer cannot rise unnoticed and to avoid energy being wasted if the door is left open. The alarm system is always active. You cannot disable it. Temperature alarm If the temperature in the freezer gets too warm an alarm will sound and the temperature display will flash. The temperature the appliance is set at determines the temperature the appliance recognises as being too warm.
Super cool, super freeze and dynamic cooling Super cool Freezing fresh food The super cool function can be used to rapidly reduce the temperature in the refrigerator section to its lowest setting. Fresh food should be frozen as quickly as possible. This way the nutritional value of the food, its vitamin content, appearance and taste are not impaired. Switching on super cool Super cool is particularly recommended for faster chilling of large amounts of fresh food or drink.
Super cool, super freeze and dynamic cooling Super freeze Dynamic cooling Switch the super freeze function on before putting fresh food into the freezer. With dynamic cooling the temperature inside the refrigerator section is distributed to all areas more evenly. All food stored in the refrigerator section will be chilled to about the same degree. The temperature is controlled as normal with the temperature buttons. Exceptions: – when putting in frozen food. – when freezing up to 2 kg fresh food daily.
Using the refrigerator section efficiently Different storage zones Natural air circulation gives rise to different temperature zones inside the refrigerator section. Cold, heavy air sinks to the lowest section of the appliance. Make use of the different zones when placing food in the appliance. Coldest zone The coldest zone in the refrigerator section is directly above the vegetable containers. Use this for all delicate and highly perishable food, e.g.
Using the refrigerator section efficiently Storing food correctly Energy saving tips Store food covered or packaged. This will prevent food smells or tastes from affecting other foods and prevent food from drying out. The growth of bacteria, such as salmonella, can be avoided by setting the correct temperature and maintaining good standards of hygiene. – Frequently opening the door or keeping it open for too long will cause the temperature in the appliance to rise.
Adjusting the interior fittings Moving the shelves Adjusting the door shelves The shelves can be adjusted according to the height of the food. ^ Push the door shelf upwards then remove it by pulling it forwards. ^ Pull the shelves forward as far as they will go then lift them upwards to remove them. ^ Replace the door shelf at the required position. Ensure that it is securely pushed back into position. ^ With the rear barrier facing upwards place the shelf at the required position.
Freezing and storing food Maximum freezing capacity Home freezing To ensure that fresh food placed in the freezer freezes through to the core as quickly as possible, the maximum freezing capacity must not be exceeded. The maximum freezing capacity for freezing within a 24 hour period is given on the data plate “Freezing capacity ....kg/24 hrs”. Only freeze fresh food which is in a good condition.
Freezing and storing food – Do not season fresh foods or blanched vegetables before freezing. Only season cooked food lightly before freezing but care should be taken as the taste of some spices alters when frozen. – Do not place hot foods or drinks in the freezer. This causes already frozen food to thaw and increases the energy consumption considerably. Allow hot foods and drinks to cool down before placing them in the freezer. Packing ^ Freeze food in portions.
Freezing and storing food Freezer calendar The freezer calendar on the freezer drawer gives the length of time which various foods can be stored for effectively. Where the storage time given on the packaging differs, follow the advice on the packaging. ^ Press down on the hook a underneath the rear of the separator plate and pull the plate forwards and out b. To put the separator plate back in push it back into place making sure it audibly clicks into position.
Freezing and storing food Defrosting Ice cubes Frozen food can be defrosted in different ways: – in the microwave oven, – in the oven using the “Fan” or “Defrost” setting, – at room temperature, – in the fridge. Poultry It is particularly important to observe food hygiene rules when defrosting poultry. Do not use the liquid from defrosted poultry. Pour it away and wash the container it was in, the sink and your hands. Fruit should be defrosted at room temperature in its packing or in a covered bowl.
Freezing and storing food Freezer tray Cool pack The freezer tray is useful for freezing small items such as berries and vegetables. They can be frozen individually and therefore maintain their shape when defrosted. The cool pack prevents the temperature in the freezer rising too quickly in the event of a power cut. Place the cool pack in the upper drawer directly on top of food or to save space on the freezer tray. The cool pack will be at its most effective after it has been in the freezer for approx.
Defrosting Refrigerator section Freezer section Condensate and frost can build up on the back wall of the refrigerator section whilst it is in use. These are automatically removed and defrosted by the appliance. This freezer is equipped with a "No-frost" system. The freezer section defrosts automatically. The condensate is drained away via a channel and drain hole into an evaporation system at the back of the appliance.
Cleaning and care Never use cleaning agents containing abrasive substances such as sand, soda, acids or chemical solvents. "Non-abrasive" cleaning agents are also unsuitable as they can cause matt areas to appear. For stainless steel surfaces, use a proprietary stainless steel cleaning agent. Make sure that no water can penetrate into the electronic unit or into the light. Do not let water get into the drainage channel and drain hole when cleaning.
Cleaning and care Ventilation gaps After cleaning ^ The ventilation gaps should be cleaned on a regular basis with a brush or vacuum cleaner. A build up of dust will increase the appliances energy consumption. ^ Replace all shelves and accessories in the refrigerator section. Door seals Do not use any grease or oil on the door seals as these will cause the seals to deteriorate and become porous over time.
Problem solving guide Repairs to electrical appliances should only be carried out by a suitably qualified and competent person in accordance with local and national safety regulations. Repairs and other work by unqualified persons could be dangerous. The manufacturer cannot be held responsible for unauthorised work. The following faults can be corrected without contacting the Miele Service Department: What to do if ... . . .
Problem solving guide . . . the appliance is switching in too frequently and for too long. . . . a bar is lit up or flashing in the temperature displays. ^ Check whether ventilation gaps have been covered over or become too dusty. Check the temperature displays about 6 hours after switching on the appliance. The display will not show a temperature until the temperature in the appliance has reached a certain level.
Problem solving guide . . . the super freeze or super cool indicator light is not lit up although the appliance is working. The indicator light is defective. Call the Miele Service Department. ^ Unscrew the bulb and replace it with a new one. Bulb specification: 220 – 240 V, max. 25 W, E 14 fitting . . . the appliance will not switch off or the temperature cannot be adjusted. The safety lock has been activated. . . . the interior light in the refrigerator section is not working.
After Sales Service In the event of a fault which you cannot correct yourself, or if the appliance is under guarantee please contact: – Your Miele Dealer or – The Miele Service Department (see back cover for address). When contacting the Service Department, please quote the model and serial number of your appliance, both of which are shown on the data plate. Please note that telephone calls may be monitored and recorded to improve our service.
Electrical connection Electrical connection U.K. Important The appliance is supplied with a mains cable and moulded plug ready for connection to an a.c. single phase 220 – 240 V 50 Hz supply. The fuse rating is 13 amps. The wires in the mains lead are coloured in accordance with the following code: All electrical work should be carried out by a suitably qualified and competent person in accordance with local and national safety regulations.
Electrical connection Non-rewireable plugs (BS 1363) If this machine is fitted with a non-rewireable plug, the following information applies: If the socket outlets are not suitable for the plug supplied with this product, it must be cut off and an appropriate plug fitted. The fuse carrier and the fuse should be removed from the old plug and disposed of. The old plug should then be disposed of and on no account be inserted into any socket elsewhere in the house (electric shock hazard).
Installation Appliances without side wall heating must not be installed "side-by-side" next to another refrigerator or freezer. off for too long causing the internal temperature in the appliance to rise with the risk of food deteriorating and going off. Ventilation Location It should not be installed where it is exposed to direct sunlight or directly adjacent to a heat-producing appliance such as an oven or a radiator. The appliance should be installed in a dry well ventilated room.
Installation Installation Aligning the appliance ^ Remove any cable clips from the rear of the appliance. ^ Check that all parts at the rear of the appliance are unhindered. Remove any hindrance. ^ Carefully push the appliance into position. The rear of the appliance can be placed directly against a wall. ^ To align the appliance adjust the feet using the spanner supplied.
Changing the door hinging The appliance is supplied right hand hinged. If left hand door hinging is required follow the instructions below. Re-fit all parts on the opposite side ^ Open the lower appliance door. ^ Remove the cover plate a. ^ Use a screwdriver to lever the plinth fascia a out, then pull it forwards and off. ^ Use a screwdriver to remove cover b, then close the door. ^ Remove screw c completely.
Changing the door hinging ^ Pull bearing bush d downwards out of hinge bracket e and refit it from above into the hinge bracket. ^ Use a screwdriver to remove spacer g and refit it on the opposite side. Changing over the door handle: ^ Remove covers m at the front and slide off to the side. ^ Unscrew handle k. Refit handle and stoppers l on the opposite side. ^ Slide covers m into position making sure they engage correctly.
Building in the appliance The air inlet and outlet must not be covered or blocked in any way. They should be dusted on a regular basis. When built into a kitchen run (max. depth 580 mm) the appliance can be installed directly next to a kitchen furniture housing unit. The appliance door b will protrude in front of furniture fronts at the sides by 34 mm and by 51 mm in the middle of the door. This enables the doors to be opened and shut without being obstructed.
Änderungen vorbehalten / 0903 M.-Nr. 05 910 950 / V01 KF 7544 SND ed-3 Dieses Papier besteht aus 100 % chlorfrei gebleichtem Zellstoff und ist somit umweltschonend.