Operating and installation instructions Fridge-freezer with PerfectFresh zone and Dynamic cooling KF 9757 iD To avoid the risk of accidents or damage to the appliance, it is essential to read these instructions before it is installed and used for the first time. en - GB M.-Nr.
Contents Guide to the appliance . . . . . . . . . . . . . . . . . . . . . . . . . . . . . . . . . . . . . . . . . . . . . 5 Caring for the environment . . . . . . . . . . . . . . . . . . . . . . . . . . . . . . . . . . . . . . . . . . 7 Warning and Safety instructions . . . . . . . . . . . . . . . . . . . . . . . . . . . . . . . . . . . . . 8 How to save energy . . . . . . . . . . . . . . . . . . . . . . . . . . . . . . . . . . . . . . . . . . . . . . . 13 Switching on and off . . . . . . . . . . . . . . .
Contents Adjusting the interior fittings . . . . . . . . . . . . . . . . . . . . . . . . . . . . . . . . . . . . . . . 28 Moving the shelves . . . . . . . . . . . . . . . . . . . . . . . . . . . . . . . . . . . . . . . . . . . . . . . . 28 Split shelf . . . . . . . . . . . . . . . . . . . . . . . . . . . . . . . . . . . . . . . . . . . . . . . . . . . . . . . . 28 Adjusting the condiment tray/bottle shelf . . . . . . . . . . . . . . . . . . . . . . . . . . . . . . . 29 Universal container . . . . . . . . .
Contents Installation . . . . . . . . . . . . . . . . . . . . . . . . . . . . . . . . . . . . . . . . . . . . . . . . . . . . . . 46 Location . . . . . . . . . . . . . . . . . . . . . . . . . . . . . . . . . . . . . . . . . . . . . . . . . . . . . . . . . 46 Climate range . . . . . . . . . . . . . . . . . . . . . . . . . . . . . . . . . . . . . . . . . . . . . . . . . . 46 Ventilation . . . . . . . . . . . . . . . . . . . . . . . . . . . . . . . . . . . . . . . . . . . . . . . . . . . . . . .
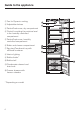
Guide to the appliance a On/Off button for switching the refrigerator section / PerfectFresh zone on and off separately.
Guide to the appliance a Fan for Dynamic cooling b Adjustable shelves c PerfectFresh zone, dry compartment d Control for setting the moisture level in the humidity controlled compartment e PerfectFresh zone, humidity controlled compartment f Butter and cheese compartment g Egg tray/Condiment tray with universal container h Interior lighting i Bottle divider* j Bottle shelf k Condensate channel and drain hole l Freezer drawers with freezer calendar * Depending on model 6
Caring for the environment Disposal of the packing material The transport and protective packing has been selected from materials which are environmentally friendly for disposal, and should be recycled. Ensure that any plastic wrappings, bags etc. are disposed of safely and kept out of the reach of babies and young children.
Warning and Safety instructions This appliance complies with all relevant legal safety requirements. Improper use of the appliance can, however, present a risk of both personal injury and material damage. To avoid the risk of accidents and damage to the appliance, please read these instructions carefully before installation and before using it for the first time. They contain important notes on the installation, safety, operation and care of the appliance.
Warning and Safety instructions Technical safety ~ Before setting up the appliance, check it for any externally visible damage. Do not install and use a damaged appliance. ~ This appliance contains the coolant Isobutane (R600a), a natural gas which is environmentally friendly. Although it is flammable, it does not damage the ozone layer and does not increase the greenhouse effect. The use of this environmentally friendly coolant has, however, led to a slight increase in the noise level of the appliance.
Warning and Safety instructions ~ Safe operation of the appliance is only assured if it has been installed and connected in accordance with these operating and installation instructions. ~ This equipment may only be used in mobile installations such as ships, caravans, aircraft etc. if a risk assessment of the installation has been carried out by a suitably qualified engineer.
Warning and Safety instructions ~ Do not store explosive materials in the appliance or any products containing propellants (e.g. spray cans). Thermostats switching on may produce sparks which could present a fire hazard. Flammable compounds could explode. ~ Do not operate any electrical equipment (e.g. an electric ice-cream maker) inside the appliance. Danger of sparking and explosion. ~ If storing alcohol with a high percentage proof, make sure it is tightly closed and stored upright. Danger of explosion.
Warning and Safety instructions ~ The appliance is designed for use within certain climate ranges (ambient temperatures), and should not be used outside this range. The climate range for your appliance is stated on the data plate inside the appliance. Installing it in a room with too low an ambient temperature, e.g. a garage, can lead to the appliance switching off for longer periods so that it cannot maintain the required temperature.
How to save energy Normal energy consumption Increased energy consumption In a ventilated room. In an enclosed, unventilated room. Protected from direct sunlight. In direct sunlight. Not situated near to a heat source (radiator, oven). Situated near to a heat source (radiator, oven). Where the ideal ambient room temperature is approx. 20°C. Where there is a high ambient room temperature. Temperature setting with a thermostat which is approximate (set in stages). With a medium setting of 2 to 3.
Switching on and off Before using for the first time Switching on The stainless steel trim to the interior shelves and the door shelves has a layer of protective foil to prevent scratching during transportation. The refrigerator section/PerfectFresh zone and freezer section are switched on together by pressing the master switch on the right hand side of the control panel. ^ Do not remove this foil until the appliance has been built in.
Switching on and off Switching off Safety lock ^ Press the master switch on the right hand side of the control panel until both temperature displays go out. The safety lock can be activated to prevent the appliance being switched off inadvertently. The cooling system is switched off. If this does not happen, then the safety lock has been activated.
Switching on and off ^ Press the master switch on the right hand side of the control panel to come out of the setting mode. If you do not do this, the electronics will switch over to normal operation automatically after a couple of minutes. Switching off for longer periods of time If the appliance is not going to be used for a longer period of time, e.g.
The correct temperature It is very important to set the correct temperature for storing food in the appliance. Micro-organisms will cause food which is not stored at the correct temperature to deteriorate rapidly. Temperature influences the growth rate of these micro-organisms. Reducing the temperature reduces their growth rate. Dynamic cooling The temperature in the appliance will rise: . . .
The correct temperature Setting the temperature in the refrigerator section / freezer section Use the two buttons underneath the respective temperature displays to set the temperature for the refrigerator and freezer sections. Press the display, as it will take this long for the display to give an accurate reading. If, after this time, the temperature is still too high or too low, you will need to adjust it again.
The correct temperature Temperature display ^ Press one of the temperature selector buttons repeatedly until a = appears in the display. Then press the Super freeze button again. = lights up in the display. ^ You can now adjust the temperature in the PerfectFresh zone by pressing the temperature selector buttons. You can choose from settings 1 to 9: 1: lowest temperature, 9: highest temperature. = 5 is the default setting for the PerfectFresh zone.
The correct temperature Temperature display brightness The appliance is supplied with the brightness of the temperature display set as low as possible. However, if the door is opened, a setting changed or if the alarm is sounding, the temperature display will appear much brighter for approx. 1 minute. The level of brightness can be adjusted: ^ Press and hold the Super freeze button for approx. 5 seconds. The Super freeze indicator light flashes and a ; flashes in the temperature display.
Alarm Your appliance has been fitted with a warning system which ensures that the temperature in the freezer section cannot rise unnoticed. An alarm will sound and at the same time the temperature display for the freezer section will flash if the temperature becomes too warm. The temperature the appliance is set at determines the temperature the appliance recognises as being too warm.
Super cool and Super freeze Super cool Super freeze The Super cool function can be used to rapidly reduce the temperature in the refrigerator section to its lowest setting (depending on the room temperature). Switch the Super freeze function on before putting fresh food into the freezer. Switching on Super cool Super cool is particularly recommended for the faster chilling of large amounts of fresh food or drink.
Super cool and Super freeze Switching off Super freeze Depending on the amount of food placed in the freezer section, the Super freeze function will switch off automatically after approx. 30 to 60 hours. The Super freeze indicator light will go out and the appliance will continue running at normal power. To save energy, the Super freeze function can be switched off once a constant temperature of -18 °C or colder has been reached in the freezer section. ^ Press the Super freeze button.
Using the refrigerator efficiently Different storage zones Due to the natural circulation of the air in the appliance, there are different temperature zones in the refrigerator. Cold, heavy air sinks to the lowest section of the appliance. Make use of the different zones when placing food in the appliance. This appliance has automatic dynamic cooling, which helps to keep an even temperature when the fan is running. For this reason, the difference between the various zones is less pronounced.
Using the refrigerator efficiently Food which should not be stored in a refrigerator Not all food is suitable for refrigeration. This includes: – Fruit and vegetables which are sensitive to cold, such as bananas, avocado, papaya, passion fruit, aubergines, peppers, tomatoes and cucumbers – Fruit which is not yet ripe – Potatoes – Some hard cheeses, e.g.
Using the PerfectFresh zone For every type of food, there are ideal storage conditions to ensure it stays fresh as long as possible, retaining both flavour and vitamins. The important factors for this are the storage temperature and the humidity. What are the advantages of the PerfectFresh zone? The correct combination of temperature and humidity is a unique feature of the PerfectFresh zone. Food can be stored for up to three times longer in the PerfectFresh zone than in a standard refrigerator.
Using the PerfectFresh zone Always keep these foods covered or wrapped. Exception: Meat. The surface of the meat dries out slightly, helping to prevent the growth of bacteria, which results in the meat lasting longer. To prevent the risk of bacterial cross-contamination and meat deteriorating, do not let one type of meat come into direct contact with another type. Humidity-controlled compartment The humidity-controlled compartment has a regulator which is used to adjust the relative humidity.
Adjusting the interior fittings Moving the shelves To move the split shelf: The shelves can be adjusted according to the height of the food. ^ Take both halves of the split glass shelf out, ^ Raise the shelf, and pull it forwards slightly until the notch at the side is in line with the shelf support. It can then be raised or lowered to the required level. The raised edge at the back must face upwards to prevent food from touching the back of the appliance and freezing to it.
Adjusting the interior fittings ^ Carefully pull out the lid between the compartments slightly, and lift it down and out. ^ To replace it, insert the compartment lid from beneath into the holders, and push it back into place. To replace the compartment, Universal container The universal container can be used both to store and serve food. It consists of a deep tray and a shallow tray. Both trays fit the stainless steel frame.
Freezing and storing food Maximum freezing capacity Storing frozen food To ensure that fresh food placed in the freezer freezes through to the core as quickly as possible, the maximum freezing capacity must not be exceeded. The maximum freezing capacity for freezing within a 24-hour period is given on the data plate: "Freezing capacity ....kg/24 hrs".
Freezing and storing food Home freezing Only freeze fresh food which is in a good condition. Hints on home freezing – The following types of food are suitable for freezing: Fresh meat, poultry, game, fish, vegetables, herbs, fresh fruit, dairy products, pastry, leftovers, egg yolks, egg whites and a range of pre-cooked meals. – The following types of food are not suitable for freezing: Grapes, lettuce, radishes, sour cream, mayonnaise, eggs in their shells, onions, whole raw apples and pears.
Freezing and storing food Before placing food in the freezer section ^ When freezing more than 2 kg of fresh food, switch on the Super freeze function for some time before placing the food in the freezer (see "Super freeze"). This also helps to prevent food that is already in the freezer from starting to defrost. Placing food in the freezer Freezing large items If you wish to freeze large items such as a turkey or game, the glass cold plate between the drawers can be removed.
Freezing and storing food Defrosting Ice cubes Frozen food can be defrosted in different ways: – in a microwave oven, – in an oven using the "Fan" or "Defrost" setting, – at room temperature, – in the refrigerator (the cold given off by the frozen food helps to keep the other food cold), – in a steam oven. ^ Fill the ice tray three quarters full with water and place it on the bottom of one of the freezer drawers.
Freezing and storing food Freezer tray Cool pack The freezer tray is useful for freezing small items such as berries, herbs and vegetables. They can be frozen individually and therefore maintain their shape when defrosted. The cool pack prevents the temperature in the freezer rising too quickly in the event of a power cut. ^ Space the food out loosely on the tray. Place the cool pack in the top drawer of the freezer section, directly on top of the food.
Defrosting the appliance Refrigerator and PerfectFresh zone only very little food or no food at all is left in the freezer. The refrigerator and the PerfectFresh zone defrost automatically. Before defrosting Condensate and frost can build up on the back wall of the refrigerator section and the PerfectFresh zone whilst in use. You do not need to remove this, as it will defrost and evaporate automatically with the warmth generated by the refrigerator.
Defrosting the appliance To speed up defrosting, two bowls of hot water (not boiling) with plates underneath them can be placed in the appliance. Closing the door in this instance will help retain warmth and speed up the defrosting process. We do not recommend the use of hot air blowers such as hairdryers for defrosting your freezer. Never place electric heaters or candles in the appliance to defrost it. These can damage the plastic parts.
Cleaning and care Never use cleaning agents containing abrasive substances such as sand, soda, acids chlorides or chemical solvents. "Non-abrasive" cleaning agents are also unsuitable as they can cause matt areas to appear. ^ Take any food out of the appliance and store it in a cool place. ^ Defrost the freezer. ^ Take out any removable parts, e.g. shelves, for cleaning.
Cleaning and care ^ Clean stainless steel surfaces with a suitable, non-abrasive, proprietary stainless steel cleaning agent, following the manufacturer’s instructions on the packaging. ^ After cleaning, stainless steel surfaces should always be treated with a conditioning agent for stainless steel. It is important to do this every time the stainless steel surfaces are cleaned, as the stainless steel conditioner protects the surfaces and helps prevent re-soiling.
Problem solving guide Repairs to electrical appliances should only be carried out by a suitably qualified and competent person in strict accordance with current local and national safety regulations. Repairs and other work by unqualified persons could be dangerous. The manufacturer cannot be held liable for unauthorised work. Ensure that current is not supplied to the appliance until after maintenance or repair work has been carried out. . . .
Problem solving guide . . . the compressor is switching in too frequently and for too long. ^ Check whether the ventilation gaps in the plinth and in the housing unit at the top have been covered over or become too dusty. ^ The doors have been opened too frequently, or a large amount of fresh food has been put in at once for freezing. ^ Check that the doors have been closed properly. ^ Check to see whether a thick layer of ice has built up in the freezer.
Problem solving guide . . . bars light up or flash in the temperature displays. . . . "nA" appears in the freezer section temperature display. Check the temperature displays about 6 hours after switching on the appliance. Only temperatures within the range the appliance can display will be shown. The freezer section temperature has risen too high at some point during the last couple of days because of a power cut. . . . "F0" to "F5" in one of the temperature displays appears. There is a fault.
Problem solving guide . . . the interior lighting in the refrigerator section is not working. Has the refrigerator door been left open for too long? The lighting switches itself off automatically after approx. 15 minutes. If it also does not come on when the door is opened briefly, but the temperature display is working, then the lighting is defective. ^ Call the Service Department. The LED lighting may only be repaired or changed by a service technician. Danger of injury and damage.
Noises Normal noises What causes them Brrrrr... Humming noise made by the motor (compressor). This noise can get louder for brief periods when the motor is switching on. Blubb, blubb.... A gurgling noise can be heard when coolant is circulating through the pipes. Click.... Clicking sounds are made when the thermostat switches the motor on and off. Sssrrrrr.... On multi-zone and frost-free appliances you can sometimes just hear the movement of air circulating inside the appliance. Creak ...
After Sales / Guarantee In the event of a fault which you cannot correct yourself, or if the appliance is under guarantee, please contact: – your Miele Dealer or – Miele (see back cover for contact details). When contacting your Dealer or Miele, please quote the model and serial number of your appliance. This information is given on the data plate inside your appliance. Please note that telephone calls may be monitored and recorded for training purposes. N.B.
Electrical connection Electrical connection U.K. Non-rewireable plugs (BS 1363) All electrical work should be carried out by a suitably qualified and competent person in strict accordance with current local and national safety regulations (BS 7671 in the UK). The fuse cover must be re-fitted when changing the fuse, and if the fuse cover is lost, the plug must not be used until a suitable replacement is obtained.
Installation Climate range To avoid a hazard due to instability of the appliance, it must be installed in accordance with these instructions. Location The appliance should be installed in a dry, well ventilated room. The room temperature should not go above or below the climate range for which the appliance is designed. The higher the ambient temperature of the room, the more energy the appliance requires to operate.
Installation Ventilation Air at the back of the appliance gets warm. The appliance housing unit must be constructed to allow sufficient space for ventilation. A ventilation gap of at least 38 mm depth must be allowed for behind the appliance for air to circulate.The air inlet to the appliance is via the plinth in the housing unit. The cross-section of the air inlet and outlet must be at least 200 cm2 to ensure that air can circulate without hindrance.
Building-in dimensions KF 9757 iD 48 Freezer section height Niche height A B 549 1772 - 1788
Adjusting the door hinges The door hinges are set ex-works to enable the doors to be opened wide. However, if the opening angle of the doors needs to be limited for any reason, the hinges can be adjusted to accommodate this. – If you would like the appliance doors to be cushioned so that they open more softly, the spring tension on the doors can be adjusted. To do this, use the allen key supplied to adjust the door hinges.
Changing the door hinging Before building the appliance in, you will need to decide on which side the door is to be hinged. If left hand door hinging is required, follow the instructions below. To change the door hinging you will need the following tools: ^ Unscrew fixing screws e completely, and loosely screw them in at the top, middle and bottom on the opposite side of the appliance.
Changing the door hinging ^ Undo ball joint d using a spanner and remove it. ^ Stand the appliance doors up one by one, and slacken the hinges at the front (the hinges remain open). ^ Replace caps a in the vacant holes on the opposite side. To secure the soft-close mechanism ^ Place the two doors with the outer side downwards on a stable surface. ^ Screw ball joint d of soft-close mechanism c into the new fixing holes. ^ Push tension spring a inwards again.
Changing the door hinging ^ Hang the doors onto the pre-fitted screws, and push the doors inwards. ^ Tighten the screws at the top, middle and bottom securely. ^ Replace covers a, b and c. ^ Then replace caps d in the vacant holes. ^ Replace the locking pins into the top of the hinges to prevent the doors opening too far.
Building in the appliance Building into a peninsular run All fitting instructions given are for a right hand hinged appliance. If you have converted the appliance to left hand hinging you will need to adapt these instructions accordingly. When built into a peninsular run, the rear of the building-in niche must be fitted with a kitchen furniture panel.
Building in the appliance Preparing the appliance ^ Push the appliance two-thirds of the way into its niche. When doing this, make sure that the mains cable does not get trapped. With 16 mm thick unit walls: ^ Slide cover strip a into the holder as shown, with the bumps facing downwards. The bumps will fit into keyhole slots b. ^ Position the mains electricity cable so that the appliance can be connected easily once installed. ^ Clip spacers e onto the top hinges and spacers f onto the bottom hinges.
Building in the appliance ^ Open both appliance doors. ^ Fit cover k onto fixing bracket l. ^ Secure fixing bracket l to the bottom of the appliance with screws m (M5 x 15). ^ Using a screwdriver, remove cover g from the top corner of the appliance. ^ Fit cover h onto fixing bracket i. ^ Secure fixing bracket i to the top of the appliance with screws j (M5 x 15). ^ Carefully remove the protective foil from sealing strip n.
Building in the appliance Building in the appliance On furniture with door fittings (e.g. stubs, seals etc) the dimension of these must be taken into account when making sure there is a gap all round of 42 mm. ^ Pull the appliance forwards by the dimension of the door fitting to keep the gap at 42 mm all round. The hinges and the covers will now protrude by the dimension of the door fitting. Tip: Remove the door fittings.
Building in the appliance Securing the appliance in the niche ^ Press the appliance against the housing unit on the hinge side. ^ To fix the appliance to the housing unit at the top and bottom, screw the long 4 x 20 mm chip board screws a into the hinges at the top and bottom. ^ Loosen screws b on the top and bottom fixing brackets c. ^ Press fixing bracket c against the side wall and tighten screws b. ^ Attach fixing bracket c to the housing unit side wall with screws d.
Building in the appliance ^ Break off the protruding end of bottom cover e. It is no longer required. ^ Fit angled cover g onto bottom fixing bracket c. ^ Close the appliance doors. Fitting the furniture doors ^ Using a pencil, lightly mark a line down the centre of the inside of the furniture door. ^ Hang fixing bracket d with the fitting aids onto the inside of the furniture door. Align the fixing bracket centrally.
Building in the appliance Securing the appliance doors to the furniture doors: ^ Hang the furniture door onto adjusting bolts h. ^ Loosely attach nuts c on the adjusting bolts. ^ Close the door and check the distance between the door and neighbouring furniture doors. ^ Align to match neigbouring doors if necessary: Side adjustments X are made by sliding the furniture door, and height adjustments Y by turning adjusting bolts h with a screwdriver. ^ Tighten nuts c.
Building in the appliance ^ Replace top cover i, and snap it into place. ^ Close both of the doors, and align them with the neighbouring furniture doors. ^ Whilst counterholding adjusting bolts g with a screwdriver, tighten nuts a on the appliance doors with ring spanner f. ^ Cover strip h must be completely hidden in the niche, and must not protrude. ^ Tighten all screws again. 60 ^ Replace side covers j, making sure they snap into place. ^ Replace side covers k, making sure they snap into place.
Building in the appliance To make sure the appliance is correctly fitted: – The doors must close properly. – The doors must not touch the housing unit. – The seals at the top edge of the handle side must fit properly. ^ To double check place a torch in the appliance and close the doors. Turn the lights out in the room. If you can see any light shining out from the sides double check the installation.
Alteration rights reserved / 2610 KF 9757 iD M.-Nr.