
Operating instructions/Installation instructions


Installation
*INSTALLATION*
101
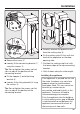
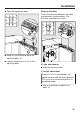
Remove the cover.
Loosely fit the connecting bracket
using the screws.
Tip: Do not tighten the screws so that
you can adjust the position of the
connecting bracket.
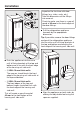
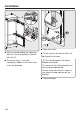
Fit the stopper onto the fixing
bracket.
Loosely fit the fixing bracket using
the screws.
Tip: Do not tighten the screws so that
you can adjust the position of the
connecting bracket.
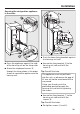
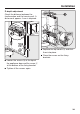
Carefully remove the protective foil
from the sealing strip.
Fix the sealing strip flush with the
front of the appliance on the door
opening side.
1. Position the sealing strip flush with
the lower edge of the top connecting
bracket.
2. Stick it down along its entire length.
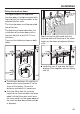
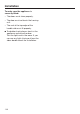
Installing the appliance
If the appliance is pushed too far into
the niche, the doors may not close
properly once the furniture doors
have been fitted. This can cause ice
to build up, condensate to
accumulate and lead to faults in the
appliance. These can all lead to
increased energy consumption.
Push the appliance into the building-
in niche making sure a gap of 42mm
is maintained all round between the
appliance carcase and the front of
the housing unit side walls.