
Operating and Installation Guide
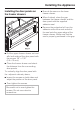

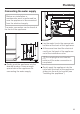
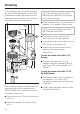


Table Of Contents
- Contents
- IMPORTANT SAFETY INSTRUCTIONS 5
- Guide to the Appliance 11
- How to save Energy 14
- Turning the Appliance On / Off 16
- The Right Temperature 18
- Using SuperCool in the refrigerator section 21
- Using SuperCool in the freezer section 22
- Temperature and Door Alarm 23
- Additional Settings 25
- Using the Refrigerator Efficiently 30
- Arranging the Interior - Refrigerator Section 32
- Freezing and Storing Food 34
- Making Ice Cubes 36
- Arranging the Interior - Freezer Section 39
- Defrosting 41
- Cleaning and Care 42
- Frequently asked questions 46
- Noises 54
- After sales service 55
- Caring for the environment 58
- Installation Information 59
- Installation Dimensions 62
- Niche Dimensions 64
- Door Swing Clearance 65
- Planning the Water Connection 66
- Information Concerning the door panel 67
- Installing the Appliance 69
- Installing the Appliance 69
- Installing the anti-tip brackets 69
- Fastening the covers 71
- Pushing the appliance into the niche 72
- Aligning the appliance 72
- Securing the appliance in the niche 73
- Aligning the appliance door 73
- Aligning the drawer front 74
- Install the base cover with the ventilation slits 74
- Removing the mounting rails 76
- Installing the mounting rails on the door panel 77
- Installing the door panel on the appliance door 77
- Installing the door panels on the freezer drawers 81
- Plumbing 82
- Electrical connection 86
- Contact details 91

The solenoid valve b can be found at
the front of the appliance. It has a 3/4"
connection thread (the position of the
solenoid valve as shown in the picture
may differ from your appliance).
The connection parts included with the
appliance permit the connection of
various water lines (a water line is not
included in delivery).
^
Remove the cap a from the solenoid
valve b.
^
Insert the adapter c into the union
nut d.
,
In the following, please note:
inserting the water filter incorrectly
can cause damage!
^
Place the water filter e on top of the
adapter c as shown in the picture.
,
Do not over-tighten the union
nut, damage can result!
^
Connect the union nut d to the
solenoid valve b and tighten it.
^
If you want to divert the water line by
90°, screw on the elbow f.
^ Vent the air from the water line by
opening the water supply
temporarily.
In case of a water line with a 1/4"
thread:
^ Connect the water line g (e.g.,
copper) using the clamping ring h
and the nut i on the adapter c or
elbow f.
In case of a water line with a 7/16"
24-UNS thread:
^
Connect the water line g directly to
the adapter c or elbow f (a
clamping ring h and nut i are not
required).
^
Slowly open the water shut-off valve
and check for leaks.
Plumbing
84