
User Guide and Installation Instruction

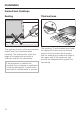
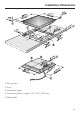
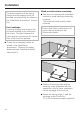
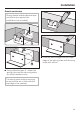


Table Of Contents
- Contents
- IMPORTANT SAFETY INSTRUCTIONS 4
- Description of the appliance 9
- Before using for the first time 12
- How the burners operate 13
- Use 14
- Selecting cookware 19
- Timer 20
- Safety features 25
- Cleaning and Care 29
- Programming 30
- Frequently asked questions 33
- Technical Service 36
- IMPORTANT INSTALLATION SAFETY INSTRUCTIONS 38
- Installation 41
- Installation dimensions 43
- Installation 44
- Electrical connection 47
- Help protect our environment 48

Insert the cooktop
^
Feed the power cord down through
the cut-out.
^
Place the cooktop lightly on the
spring clips.
^
With a hand on each side of the
appliance press down evenly on the
edges until it clicks into position.
When doing so make sure that the
appliance seal sits tightly on the
countertop to ensure it is sealed
correctly. This is important to ensure
an effective seal. Do not permanently
seal into the countertop.
If during installation the seal around
the frame does not sit flush with the
countertop in the corners, the corner
radius, maximum
3
/
16
" (4 mm), can be
carefully filed down to fit.
^ Connect the appliance to the main
power supply (see "Electrical
connection").
^
Turn the appliance on and check the
function.
The appliance may be lifted out
using a special tool.
The appliance can also be pushed
up and out from underneath.
Installation
46