
Operating and Installation Manual

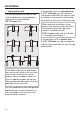

Table Of Contents
- Contents
- IMPORTANT SAFETY INSTRUCTIONS
- Caring for the environment
- Installation
- Installation location
- Installation notes
- Installation dimensions
- Dimensions of the cabinet front
- Installing the wine conditioning unit
- Before starting...
- Tools required
- Weight of cabinet front
- Aligning the installation niche
- Checking the installation niche
- Before installation
- Preparing the installation niche
- Pushing the wine conditioning unit into the niche
- Aligning the wine conditioning unit
- Securing the wine conditioning unit in the niche
- Preparing the cabinet fronts
- Securing and aligning the cabinet front
- Mounting the fixing brackets
- Securing the covers
- Installing the cover in a side-by-side combination
- Fitting the door trim
- Securing the toe-kick ventilation grille and toe-kick panel
- Limiting the opening angle of the appliance door
- Electrical connection
- Saving energy
- Guide to the appliance
- Accessories
- Before first use
- Switching the wine conditioning unit on and off
- Selecting additional settings
- Switching on or off /
- Performing a
- Switching on the
- Switching off the
- Miele@home
- Availability of the WiFi connection
- Miele@home availability
- Miele@mobile App
- Connecting your wine conditioning unit via the Miele@mobile app
- Connecting your wine conditioning unit via WPS
- Deactivating Miele@home
- Activating Miele@home
- Checking the WLAN connection status
- Setting up Miele@home again
- Resetting the network configuration
- Switching off
- Resetting the settings to their default settings
- Switching on or off
- Switching on or off
- Selecting the
- The ideal temperature and humidity
- Door alarm
- Storing wine bottles
- Automatic defrosting
- Cleaning and care
- Frequently Asked Questions
- Causes of noises
- Customer Service
- Declaration of conformity
- Copyrights and licenses

Installation
*INSTALLATION*
18
. . .with partition wall
The wall a between the side-by-side
wine conditioning units/refrigeration
appliances must be at least
5/8" (16mm) thick.
If the door hinges of the appliances
are next to each other, you must take
into account the thickness of the
cabinet fronts and door handles so
that the appliance doors do not col-
lide and become damaged if they are
opened at the same time.
The wine conditioning units/refrigeration
appliances are secured individually in
their installation niche using the sup-
plied installation material.
If the partition wall a is narrower than
6 5/16" (160mm), you will need the
side panel heater from the side-by-side
installation kit to prevent condensation
from forming and any resulting damage.
When planning installation niches,
please note that the niche into which
the appliance with the side panel
heater is installed must be
3/16" (4mm) wider (see “Installation
– Installation dimensions”).
If the partition wall a is thicker than
6 5/16" (160mm), you do not need the
side-by-side installation kit, nor the side
panel heater.