
Operating and Installation Manual
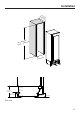

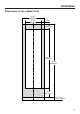
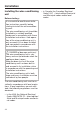
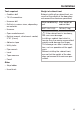
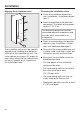
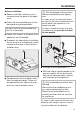
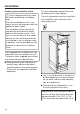


Table Of Contents
- Contents
- IMPORTANT SAFETY INSTRUCTIONS
- Caring for the environment
- Installation
- Installation location
- Installation notes
- Installation dimensions
- Dimensions of the cabinet front
- Installing the wine conditioning unit
- Before starting...
- Tools required
- Weight of cabinet front
- Aligning the installation niche
- Checking the installation niche
- Before installation
- Preparing the installation niche
- Pushing the wine conditioning unit into the niche
- Aligning the wine conditioning unit
- Securing the wine conditioning unit in the niche
- Preparing the cabinet fronts
- Securing and aligning the cabinet front
- Mounting the fixing brackets
- Securing the covers
- Installing the cover in a side-by-side combination
- Fitting the door trim
- Securing the toe-kick ventilation grille and toe-kick panel
- Limiting the opening angle of the appliance door
- Electrical connection
- Saving energy
- Guide to the appliance
- Accessories
- Before first use
- Switching the wine conditioning unit on and off
- Selecting additional settings
- Switching on or off /
- Performing a
- Switching on the
- Switching off the
- Miele@home
- Availability of the WiFi connection
- Miele@home availability
- Miele@mobile App
- Connecting your wine conditioning unit via the Miele@mobile app
- Connecting your wine conditioning unit via WPS
- Deactivating Miele@home
- Activating Miele@home
- Checking the WLAN connection status
- Setting up Miele@home again
- Resetting the network configuration
- Switching off
- Resetting the settings to their default settings
- Switching on or off
- Switching on or off
- Selecting the
- The ideal temperature and humidity
- Door alarm
- Storing wine bottles
- Automatic defrosting
- Cleaning and care
- Frequently Asked Questions
- Causes of noises
- Customer Service
- Declaration of conformity
- Copyrights and licenses

Installation
*INSTALLATION*
28
Preparing the installation niche
Risk of damage and injury from
the wine conditioning unit tipping
over.
The wine conditioning unit is very
heavy and can tip forwards when the
appliance door is open.
The installation niche must be se-
cured to the wall behind it and/or
above it with several screws. Only
this can ensure that the wine condi-
tioning unit will not tip over after be-
ing installed in the installation niche.
In addition, use the provided anti-tip
brackets to secure the installation
niche.
Parts required for installation are sup-
plied with the wine conditioning unit.
The plastic bags supplied are marked
with letters for easy identification.
When performing the individual as-
sembly steps, observe the letters
specified and use the matching plas-
tic bag with the required installation
equipment.
The anti-tip brackets prevent the wine
conditioning unit from tipping.
The anti-tip brackets are also used to fix
the installation niche securely to the
surrounding walls.
Use 2 anti-tip brackets for each in-
dividual appliance or 4 anti-tip brack-
ets for each (side-by-side) combina-
tion of 2 appliances.
Position the anti-tip brackets on
the left and right of the niche.
Depending on the subsequent adjust-
ment of the feet, the anti-tip brackets
are positioned 84"-85 3/16" (2,134–
2,164mm) from the floor of the niche.