
Operating and Installation Manual
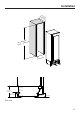

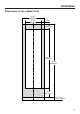
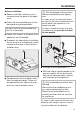
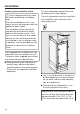


Table Of Contents
- Contents
- IMPORTANT SAFETY INSTRUCTIONS
- Caring for the environment
- Installation
- Installation location
- Installation notes
- Installation dimensions
- Dimensions of the cabinet front
- Installing the wine conditioning unit
- Before starting...
- Tools required
- Weight of cabinet front
- Aligning the installation niche
- Checking the installation niche
- Before installation
- Preparing the installation niche
- Pushing the wine conditioning unit into the niche
- Aligning the wine conditioning unit
- Securing the wine conditioning unit in the niche
- Preparing the cabinet fronts
- Securing and aligning the cabinet front
- Mounting the fixing brackets
- Securing the covers
- Installing the cover in a side-by-side combination
- Fitting the door trim
- Securing the toe-kick ventilation grille and toe-kick panel
- Limiting the opening angle of the appliance door
- Electrical connection
- Saving energy
- Guide to the appliance
- Accessories
- Before first use
- Switching the wine conditioning unit on and off
- Selecting additional settings
- Switching on or off /
- Performing a
- Switching on the
- Switching off the
- Miele@home
- Availability of the WiFi connection
- Miele@home availability
- Miele@mobile App
- Connecting your wine conditioning unit via the Miele@mobile app
- Connecting your wine conditioning unit via WPS
- Deactivating Miele@home
- Activating Miele@home
- Checking the WLAN connection status
- Setting up Miele@home again
- Resetting the network configuration
- Switching off
- Resetting the settings to their default settings
- Switching on or off
- Switching on or off
- Selecting the
- The ideal temperature and humidity
- Door alarm
- Storing wine bottles
- Automatic defrosting
- Cleaning and care
- Frequently Asked Questions
- Causes of noises
- Customer Service
- Declaration of conformity
- Copyrights and licenses

Installation
*INSTALLATION*
30
Securing with a wooden wedge
Secure the installation niche to the
wall behind it and/or above it as re-
quired using the anti-tip brackets .
Pushing the wine conditioning unit
into the niche
Then push the wine conditioning unit
into the niche, taking care not to
damage the electrical cord.
If you are installing several appliances
side by side, secure the wine condi-
tioning units/refrigeration appliances
to one another now (see the installa-
tion instructions for the side-by-side
installation kit).
To ensure that the wine conditioning
unit can then be aligned correctly, the
toe-kick ventilation grille must be re-
moved from the appliance toe-kick:
Carefully guide a flat-head screw-
driver through the toe-kick ventilation
grille on both sides and use it to
push the internal plastic latches out-
wards to release the toe-kick ventila-
tion grille.
Place the toe-kick ventilation grille to
one side.