
Operating and Installation Manual
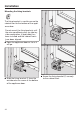


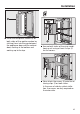
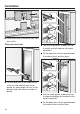
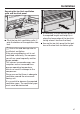
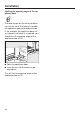
Table Of Contents
- Contents
- IMPORTANT SAFETY INSTRUCTIONS
- Caring for the environment
- Installation
- Installation location
- Installation notes
- Installation dimensions
- Dimensions of the cabinet front
- Installing the wine conditioning unit
- Before starting...
- Tools required
- Weight of cabinet front
- Aligning the installation niche
- Checking the installation niche
- Before installation
- Preparing the installation niche
- Pushing the wine conditioning unit into the niche
- Aligning the wine conditioning unit
- Securing the wine conditioning unit in the niche
- Preparing the cabinet fronts
- Securing and aligning the cabinet front
- Mounting the fixing brackets
- Securing the covers
- Installing the cover in a side-by-side combination
- Fitting the door trim
- Securing the toe-kick ventilation grille and toe-kick panel
- Limiting the opening angle of the appliance door
- Electrical connection
- Saving energy
- Guide to the appliance
- Accessories
- Before first use
- Switching the wine conditioning unit on and off
- Selecting additional settings
- Switching on or off /
- Performing a
- Switching on the
- Switching off the
- Miele@home
- Availability of the WiFi connection
- Miele@home availability
- Miele@mobile App
- Connecting your wine conditioning unit via the Miele@mobile app
- Connecting your wine conditioning unit via WPS
- Deactivating Miele@home
- Activating Miele@home
- Checking the WLAN connection status
- Setting up Miele@home again
- Resetting the network configuration
- Switching off
- Resetting the settings to their default settings
- Switching on or off
- Switching on or off
- Selecting the
- The ideal temperature and humidity
- Door alarm
- Storing wine bottles
- Automatic defrosting
- Cleaning and care
- Frequently Asked Questions
- Causes of noises
- Customer Service
- Declaration of conformity
- Copyrights and licenses

Installation
*INSTALLATION*
47
Securing the toe-kick ventilation
grille and toe-kick panel
Click the toe-kick ventilation grille
onto the bottom of the appliance toe-
kick.
Risk of fire and damage due to
insufficient ventilation.
If the wine conditioning unit is not
ventilated sufficiently, the compres-
sor will run more frequently and for
longer periods.
This causes increased energy con-
sumption and an increased com-
pressor operating temperature,
which can result in damage to the
compressor.
Please ensure that there is adequate
ventilation around the wine condi-
tioning unit.
It is essential to observe the required
ventilation gaps. The ventilation gaps
must never be obstructed.
If necessary, cut the toe-kick panel to
the required length and height (cut
along the lower edge of the toe-kick
facing where it touches the floor).
Secure the toe-kick panel to the bot-
tom of the toe-kick ventilation grille.