
Operating and Installation Manual
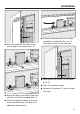
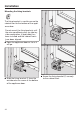


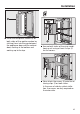
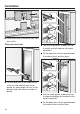
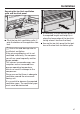
Table Of Contents
- Contents
- IMPORTANT SAFETY INSTRUCTIONS
- Caring for the environment
- Installation
- Installation location
- Installation notes
- Installation dimensions
- Dimensions of the cabinet front
- Installing the wine conditioning unit
- Before starting...
- Tools required
- Weight of cabinet front
- Aligning the installation niche
- Checking the installation niche
- Before installation
- Preparing the installation niche
- Pushing the wine conditioning unit into the niche
- Aligning the wine conditioning unit
- Securing the wine conditioning unit in the niche
- Preparing the cabinet fronts
- Securing and aligning the cabinet front
- Mounting the fixing brackets
- Securing the covers
- Installing the cover in a side-by-side combination
- Fitting the door trim
- Securing the toe-kick ventilation grille and toe-kick panel
- Limiting the opening angle of the appliance door
- Electrical connection
- Saving energy
- Guide to the appliance
- Accessories
- Before first use
- Switching the wine conditioning unit on and off
- Selecting additional settings
- Switching on or off /
- Performing a
- Switching on the
- Switching off the
- Miele@home
- Availability of the WiFi connection
- Miele@home availability
- Miele@mobile App
- Connecting your wine conditioning unit via the Miele@mobile app
- Connecting your wine conditioning unit via WPS
- Deactivating Miele@home
- Activating Miele@home
- Checking the WLAN connection status
- Setting up Miele@home again
- Resetting the network configuration
- Switching off
- Resetting the settings to their default settings
- Switching on or off
- Switching on or off
- Selecting the
- The ideal temperature and humidity
- Door alarm
- Storing wine bottles
- Automatic defrosting
- Cleaning and care
- Frequently Asked Questions
- Causes of noises
- Customer Service
- Declaration of conformity
- Copyrights and licenses

Installation
*INSTALLATION*
49
Electrical connection
Risk of electric shock!
The wine conditioning unit must only
be switched on when it has been in-
stalled in accordance with the instal-
lation instructions.
Ground the wine conditioning unit.
The wine conditioning unit must not
be grounded via a gas pipe.
If in doubt, have a suitably qualified
and experienced electrician check
that the wine conditioning unit com-
plies with relevant regulations.
Do not install a fuse into neutral cur-
rent or grounding electrical circuit.
Do not use an extension cord or
power bar.
Do not use a frayed or damaged
power cord.
Risk of electric shock!
For protection against electric shock,
this wine conditioning unit is
equipped with a pole-free plug which
is protected against reverse polarity.
The plug must be grounded in the
usual way.
Do not remove the round grounding
connector pin from the plug.
Use only a grounded plug adapter.
Wait for 1hour after installation before
plugging the wine conditioning unit into
the power supply. This allows coolant
and refrigerator oil to settle in accor-
dance with regulations.
Ensure that the voltage of the power
supply corresponds to the connection
voltage of the wine conditioning unit. A
power supply of 110–120V, 60Hz and
10 –16Amps, which is protected by a
power switch or a fuse, is required to
operate the wine conditioning unit.
The manufacturer recommends operat-
ing the wine conditioning unit on a sep-
arate circuit to avoid overloading the
electrical circuit.
All relevant legal electrical, fire, and
building regulations must be observed
when installing the outlet and/or the
wine conditioning unit.
In certain countries, wine conditioning
units are required to be connected to
the electrical supply via a wall-mounted
ON/OFF switch.
To avoid the risk of fire, electric shock,
or other injuries, the wine conditioning
unit must be installed and connected by
a suitably qualified electrician in accor-
dance with all relevant local and na-
tional regulations and standards, in-
cluding fire prevention.
The outlet must be easily accessible so
that the wine conditioning unit can be
quickly disconnected from the electrical
supply in case of an emergency.