
Operating instructions/Installation instructions
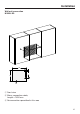
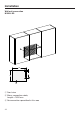
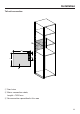

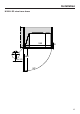

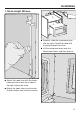
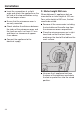
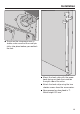
Table Of Contents
- Contents
- Warning and Safety instructions
- Before using for the first time
- Installation
- Caring for the environment
- Guide to the appliance
- Accessories supplied
- Control panel
- Description of function
- Modes of operation
- Suitable containers for microwave ovens
- Before using for the first time
- Operation
- Operation – grilling
- Gourmet plate
- Operation - Automatic programmes
- Recipes for automatic programmes
- A 10 Vegetables
- _
- Carrots in a chervil cream sauce (serves 2)
- Golden curried potatoes (serves 3)
- A 17 Gratins/Bakes: Vegetable gratin (serves 4)
- Potato cheese gratin (serves 4)
- A 13 Pork kebabs (makes 8 kebabs)
- Chicken kebabs (makes 8 kebabs)
- A 15 Chicken thighs
- A 14 Whole chicken
- Re. A 15 and A 14
- A 12 Fish: Fish curry (serves 4)
- A 16 Fish bake: Crispy fish pie (serves 2)
- Rosefish and tomato gratin (serves 4)
- Changing settings
- Reheat
- Cooking
- Defrost
- Examples of use
- Note for test institutes
- Cleaning and care
- Problem solving guide
- After sales service

Installation
*INSTALLATION*
28
Insert the screwdriver at a slight
angle and attach the appliance on the
left side at the top and bottom using
the two longer screws.
Ensure that the microwave oven is
securely mounted.
Check whether the distance between
the sides of the microwave oven and
the furniture walls is at least 2.5mm
and there is a clearance of approx.
4mm above.
Connect the appliance to the
electrical supply.
2. Niche height 360mm
When delivered, 4appliance feet are
mounted for a niche height of 350mm.
For a niche height of 360mm, the feet
need to be raised.
Remove all the accessories including
the turntable and the roller ring from
the microwave oven compartment.
Place the microwave oven on is right-
hand side so that the front frame
overhangs the front of the table or the
work surface.
Unscrew the 4appliance feet from
the base of the appliance and rotate
the feet a quarter turn into the raised
position.