
Operating Instructions
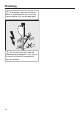
Table Of Contents
- Contents
- Notes about these instructions
- IMPORTANT SAFETY INSTRUCTIONS
- Machine description
- Caring for the environment
- Initial commissioning
- Caring for the environment
- Loading the dishwasher
- Detergents
- Operation
- Options
- Program chart
- Cleaning and care
- Frequently asked questions
- Miele Service
- INSTALLATION INSTRUCTIONS
- Electrical connection
- Plumbing
- Technical details
- Settings
- Opening the Settings menu
- Changing settings
- Language
- Time of day
- Water hardness
- Rinse Aid
- Temperature unit
- High-temperature final rinse
- Miele@home
- Remote control
- RemoteUpdate
- SmartStart
- EcoStart
- Consumption (EcoFeedback)
- Display brightness
- Volume
- Memory
- Refill reminders
- AutoOpen
- BrilliantLight (depending on model)
- Software version
- Showroom program
- Factory default
- Sound emission tests

Plumbing
*INSTALLATION*
85
Connecting the water drainage
system
- The machine drainage system has a
non-return valve, which prevents dirty
water from flowing back into the
dishwasher via the drain hose.
- The dishwasher drainage hose
should be connected to a separate
on-site drain for the dishwasher only.
If no separate drain is available, we
recommend connecting it to a dual-
chamber siphon.
- The dishwasher is supplied with an
approx. 4' 11" (1.5m) flexible drain
hose with an internal diameter of
7/8" (22mm).
Hose clips are supplied with the dish-
washer.
- A method of avoiding using a counter
mounted airgap is to advise the fol-
lowing: A "high loop" can be used to
provide a drainage air gap by routing
a drain line above a sink's flood level.
- The drain hose must not be short-
ened. The hose can be extended us-
ing a connection piece to attach a
further length of hose. The drainage
length must not be longer than 13'
1" (4m) and the delivery head no
higher than 3' 3" (1m).
- The drainage system must be able to
handle a discharge rate of at least
16l/min.
Make sure that there are no kinks
in the hose, and that it is not crushed
or stretched.
Hose installation when water
drainage is low
If the on-site water drainage connection
is situated lower than the guide path for
the lower basket rollers in the door, the
water drain hose must be installed at
that level with a bend in it. Otherwise,
water may flow out of the wash cabinet
during a program.
Tall-unit installation
APFD101 and APFD102 are available
as optional accessories for use when
installing the dishwasher in a tall unit.