Operating and Installation Instructions Washer PW 6241 PW 6321 To prevent accidents and appliance damage read these instructions before installing or use. en - US, CA M.-Nr.
Contents IMPORTANT SAFETY INSTRUCTIONS Guide to the washer Operating panel . . . . . . . . . . . . . . . . . . . . . . . . . . . . . . . . . . . . . . . . . . . . . . . . . . . . . . . . . . . . . . . . . . . . . . . . . . . . . 8 Use 1. Turn on the washer . . . . . . . . . . . . . . . . . . . . . . . . . . . . . . . . . . . . . . . . . . . . . . . . . . . . . . . . . . . . . . . . . . . . . . . . 10 2. Sort and load the laundry . . . . . . . . . . . . . . . . . . . . . . . . . . . . . . . . . . . . . . . .
IMPORTANT SAFETY INSTRUCTIONS Correct usage of the washer Explanation of safety instructions and warnings on the washer Read the operating instructions. ~ Only use the washing machine to wash items which are specified by the manufacturer to be machine washable on the fabric care label. Any other applications may be dangerous. ~ Persons who lack physical, sensory or mental abilities, Read all the instructions, e.g. the installation instructions.
IMPORTANT SAFETY INSTRUCTIONS Electrical Safety Use ~ Be certain this appliance is properly installed and grounded by an authorized technician. For electrical safety this machine must be grounded. It is imperative that this basic safety requirement be tested by a qualified electrician. Consult a qualified electrician if in doubt. ~ Do not let children play in, on or near the washer.
IMPORTANT SAFETY INSTRUCTIONS Additional information ~ Disinfecting and cleaning agents often contain chlorides (salts) which can cause steel surfaces to rust. To protect the machine from rust damage, only use chloride free disinfecting and cleaning agents for washing/disinfecting and for cleaning the machine. If you are not sure about an agent contact Miele’s Professional Department.
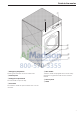
Guide to the washer a b c d e f g a Emergency Stop button e Door handle Pressing the red button turns the machine off. The door handle is equipped with an extra safety mechanism to guarantee that the door remains locked. b Control panel c Detergent compartments Pull the handle to open the flap. d Drum door f Service panel g Plinth Pull the door handle to open the drum door. Do not use force.
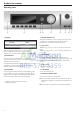
Guide to the washer Operating panel d Optical interface PC a Display* 1 Hot Wash 194 °F 2 Cottons 140 °F 3 Cottons Intensive 140 °F i FC The optical interface on the machine’s control panel provides the connection point for data transfer between the machine’s controls and a PC. A After turning the machine on, the display shows briefly a welcome screen and switches to the program list. The last started program is highlighted.
Guide to the washer Control keys e/- Following or previous line ^ Press once to activate the function, press again to deactivate the function. S Save See Programming Manual i Manual operation (Used by Miele Service Technicians) See Programming Manual. $ Program locked If a program is locked it cannot be stopped or ended with the 0 "Off" button after 1 minute. FC Functions Press this key to temporarily select another language and/or access the Supervisor level.
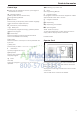
Use 1. Turn on the washer 2. Sort and load the laundry ^ Open the on-site water faucet (and the supply faucet for steam, if relevant). ^ Turn on the electrical supply at the mains (on site). ^ Press l "On" to turn the washer on. The welcome screen shows. PROFESSIONAL PW 6xx1 Welcome Then the program list is shown. The last started program is highlighted. 1 Hot Wash 194 °F 2 Cottons 140 °F 3 Cottons Intensive 140 °F i ä FC ^ Empty all pockets. Foreign objects left in pockets (e.g.
Use 3. Add detergent ^ Open the detergent compartment flap, pull out the respective containers and add detergent. To prevent fabric damage, check that laundry will not be caught in the closed door. ^ Close the drum door with the handle. Do not swing the door shut.
Use Detergent Fabric softener Only use the correct amount of high efficiency low sudsing detergent. Too much detergent will cause oversudsing. ^ Close the compartment lid and push in the dispenser drawer. Dosage Follow the instructions on the detergent packaging to ensure the correct usage and dosage amount for your water hardness. Adjust the amount of detergent if the load is smaller and more or less soiled than normal.
Use Starch Bleach In the detergent container 1 Hot Wash m Program stop - Starch stop Door can be opened. i ü f "Program stop - Starch Stop" flashes in the display when it is time to add starch to the laundry. ^ Add starch prepared according to manufacturer’s instructions into compartment 3, 4 or 5. The wash time is automatically extended by 4 minutes. ^ Press "Start" to continue the program. Only bleach items with the x symbol on the fabric care label.
Use 4. Select a program 5. Select wash options (if needed) ^ Select a program by turning the jog shuttle (e.g. Program 1 Hot Wash). ^ Press one of the wash option buttons. To deselect the option, press it again. The following will appear in the display: + i Block Plus 18 Extra Drain 1 Hot Wash 2 Cottons A pre-wash can be selected for heavily soiled laundry in certain programs. If a pre-wash is an option the "+i" field is highlighted. If a pre-wash is not available, the "+i" will not be shown.
Use 6. Adjust the program (if needed) Spin speed Laundry weight The laundry weight can be manually selected. 1 Hot Wash 104 °F Pre-wash 194 °F Main wash +i m k 54.0 m /54.0 lb e A ^ Turn the jog shuttle to "Laundry weight" and press to confirm the selection. The weight shown on the right side indicates the max. weight. ^ Turn the jog shuttle to the desired laundry weight and press to confirm the selection. The spin speed can be adjusted from 0 - 300 in 25 rpm increments.
Use 7. Select Delay Start (if needed) 8. Start the program Use the m "Delay start" button to program the washer to start automatically at a later time. ^ Press the "Start" button to start the program. Setting the delay start When using the "Spin Stop" wash option, "Without spin" will flash in the display when the spin cycle is reached. ^ Press m "Delay Start". The following will appear in the display: 1 1 Hot Wash Start time: 16 54.0 / 54.0 lb : 10 Start date: 2.4.
Use 9. End of program At the end of the program, once the drum is stationary and no water is in the machine the display shows (for example): 1 Hot Wash Program end Door can be opened. m FC A At the same time a tone will sound for a short time to signal the program end. ^ Pull the door handle to open the drum door. Important: If the door cannot be opened, press against the door handle then pull again. Do not use force! ^ Remove the laundry. ^ Leave the drum door open to air dry the interior.
Use Skipping program cycles Program end with water in the drum Cycles of a program in progress can be skipped or repeated. If the program is interrupted during a cycle, the display shows either: ^ Press the f "End" button to stop the program. 1 1 Hot Wash Program end - Water in the drum Hot Wash Program stop m i ü f ^ Press the ü "Skip/Repeat" button. The display shows the current area, block or step. See also "Program structure" in the Programming Manual.
Use Canceling a program Canceling a locked program ^ To cancel a program, press the f "End" button twice. Locked programs cannot be stopped or canceled. If the program was canceled with water in the machine or during spinning, the display shows: 1 194 °F Hot Wash Main wash Locked! 1 Hot Wash End at 12:35 ) A Program stop - Water in the drum i ü f The display shows that the program is locked if the f "End" button is pressed. ^ To unlock the program press the ) "Unlock" button.
Use K Information Program sequence The program sequence is shown in the display after the start of the program. 1 104 °F 68 °F 194 °F k m K f m Main wash m k Cold k End at 12:35 m K f Press the K "Information" button during the program to show information in the display. 1 Hot Wash Delay start: 10.7.2003 Hot Wash Rinse 1 +i +i 140 °F End at 12:35 The second display line, here Pre-wash, shows the wash water temperature.
Use Language selection The language can be selected with the F flag symbol. The language is set back to its original setting 5 minutes after the program ends or when the door is opened. 1 Hot Wash 194 °F 2 Cottons 140 °F 3 Cottons Intensive 140°F i FC A Press the function button FC. The display shows: Settings Back A Main menu Language Supervisor level FC A ^ Turn then press the jog shuttle to select "Language".
Chip card use Chip cards are programmed to a machine type. Empty cards can be used with any machine. ^ Press l "On" to turn the washer on. If the card was inserted the wrong way, the display shows: § The Welcome screen shows. Card fault Reinsert card correctly in card reader. i ü f ^ Reinsert the card properly into the card reader.
Optional modules Liquid dispensing system Deselecting the dispensing (Dispensing systems vary) 1 Hot Wash 194 °F 2 Cottons 140 °F 3 Cottons Intensive i ä FC 140 °F A The liquid dispensing can be manually deselected before a program start. The dispensing pump is turned off. The display shows: 1 194 °F Hot Wash 56.0/56.
Optional modules Priming the dispensing pumps Use the calibration to get liquid detergent to the pumphead. Once calibration is complete run an empty program to get detergent to the machine before actually washing a load of laundry in the machine. ^ The dispensing can be manually stopped by pressing the 0/1 button or it will stop automatically after 60 seconds. ^ Measure the pumped amount in the measuring cup.
Optional modules Peak load cutoff Load module When activating the peak load cutoff the heat is turned off and the program is stopped. The display shows: If the machine is equipped with a load module, the load weight will be displayed, in 0.5 lb increments, while loading the laundry. The maximum laundry weight is displayed next to the selected program. 1 Hot Wash ^ Reset with the -> I <- "zero - setting" if the weight display does not show "00.0" when the drum is empty.
Cleaning and Care After each use Never use high pressure cleaners to hose down the machine. Detergent containers and siphon tube ^ Regularly clean detergent residues from the detergent dispensers, drawers and siphons with warm water. The machine should be cleaned immediately after use. ^ After use do not shut the drum door, allow the interior to air dry. Cleaning the exterior ,Never use abrasive cleaners, scouring pads, steel wool or caustic cleaners on the machine. They will damage the surface.
Cleaning and Care Vent grille Water inlet filters ^ Check and clean regularly the wash water vent grille at the rear of the machine. Rust The drum and the wash water drum are made of stainless steel. Water with a high iron content or items like paper clips or iron buttons which are in the laundry, can lead to rust in the drums. ^ To help prevent rust, a conditioner for stainless steel can be used. ^ Check the door gasket for iron residue and clean with stainless steel conditioner. ^ Clean regularly.
Cleaning and Care Drum bearing lubrication Maintenance during downtime If the machine needs to be serviced the following message shows: When the machine is not in use for an extended time (4 weeks or more), the drum bearings must be lubricated (before the downtime). § Drum bearing lubrication ^ Lubricate the drum bearing according to the warning message and turn the drum by hand a few times. Call Technical Service. A ^ Press A "back" to delete the message.
Frequently asked questions Reasons for oversudsing The drum door cannot be opened Detergent type ^ Press against the door handle, turn the machine on then off and pull on the door handle once more. ^ Only use detergent formulated for use in commercial washers. Detergents for domestic machines are not suitable. The safety mechanism of the door handle is disengaged Too much detergent ^ Follow the detergent manufacturer’s instructions and adjust the amount to the local water hardness.
Frequently asked questions Power failure - Emergency door release Open the door manually During a short power failure The program remains in the last position. When power is restored the following message appears in the display: y Power failure Program stop Press Start f ^ Press "Start" to continue the program. Extended power failure ^ Turn the machine off. ^ Turn the electrical supply off at the mains. ^ Close the steam valve (on-site).
Frequently asked questions Display Maintenance notice Fault messages ^ Call Technical Service for maintenance if the display shows the following message after turning the machine on. § Maintenance notice Call Technical Service. A ,Repairs to electrical or steam appliances should only be carried out by a Miele authorized technician in accordance with local and national safety regulations. Unauthorized repairs could cause injury or machine damage.
Frequently asked questions M Water intake fault m Call Technical Service Program stop. Press Start. if restart w/o success. Motor temperature too high. i f ^ Check the water supply and press "Start". / i Door lock fault § if restart w/o success. f ^ Press the door handle so that it closes with a click, press "Start". i A Large imbalance, the imbalance switch has activated. ^ Turn the machine off and on again Heating system fault ^ Press "Start". Program stop. Press Start.
After sales service ^ In the event of a fault which you cannot correct yourself, please contact Technical Service. ^ When contacting Technical Service please quote the model, serial number (SN) and part number (M.-Nr.) of the machine. They can be found on the data plate located at the top of the door opening (when drum door is open) or on the back of the machine at the top. ^ When contacting Technical Service report the fault in the display.
Guide to the data plate symbols a b c d o r p q s e f g t i j h n u v k l m 1 Model 2 Serial number 3 Item number 4 Material number 5 Voltage / Frequency 6 Control breaker 7 Motor 8 Drum data 9 Drum diameter / Drum depth 10 Spin speed 11 Drum volume / Dry laundry weight 12 Kinetic energy 13 Acceleration time 14 Deceleration time 15 Heating 16 Name / Year of manufacture 17 Commissioning date 18 Electrical heating 19 Breaker at the building's electrical service panel 20 Steam heat indirect 21 Ste
Installation Instructions
Help to protect the environment Disposal of the packing materials Disposal of an old appliance The packing materials protect the appliance during shipping. They have been designed to be biodegradable and recyclable. Old appliances may contain materials that can be recycled. Please contact your local recycling center about the possibility of recycling these materials. To prevent suffocation, ensure that any plastic wrappings, bags, etc. are disposed of safely and kept out of the reach of children.
Installation Instructions Removing the shipping struts The washer must only be installed by a Miele authorized service technician. ^ The fixing angles "A" on the diagram, 2 on each side panel are fixed with 3 M 10 (SW 17) hex screws. Remove these. Before installation or service disconnect the power supply to the work area. The shipping struts "B" on the diagram, 2 at the front and 2 at the rear are each fixed with 3 M 10 (SW 17) hex screws.
Installation Instructions Plumbing The machine should be connected to two water supply faucets, which conform with local and national regulations. Installation must be carried out by an authorized service technician. To ensure the machine is correctly connected please follow the installation plan and the installation instructions supplied with the machine. Connecting the water intake / water drain hoses See the enclosed installation plan. A water pressure flow rate of at least 14.
Installation Instructions Electrical connection ,All electrical work must be performed by a qualified service technician in accordance with applicable codes and standards. When installaing a residual current device (RCD) a Type B GFCI circuit breaker must be installed. The connecting terminal is located behind a cover. Steam connection The steam connection must only be connected by a certified installer. For more information see the enclosed installation plan and the installation manual.
Quick Guide 1. Sort the laundry Only use this machine for items that are machine washable, see the fabric care label. ^ Empty all pockets. 2. Turn the machine on and load the laundry ^ Press the I "On" button to turn the machine on. ^ Open the drum door and load the laundry. ^ Close the drum door. 3. Add detergent ^ Add detergent to compartment: 1 = for the Prewash (if required) 2 = for the main wash 3 = fabric softener 4 = liquid bleach 5 = liquid detergent 4.
Alteration rights reserved / 3112 M.-Nr. 06 572 435 / 00 INFORMATION IS SUBJECT TO CHANGE. PLEASE REFER TO OUR WEBSITE TO OBTAIN THE MOST CURRENT PRODUCT SPECIFICATIONS, TECHNICAL & WARRANTY INFORMATION.