
Operating instructions


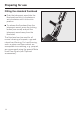
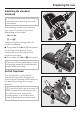

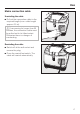
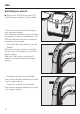

Table Of Contents
- Contents
- Caring for the environment 3
- Description of the appliance 4
- Warning and Safety instructions 6
- Preparing for use 12
- Using the accessories supplied 16
- Use 17
- Setting down, transportation and storage 22
- Maintenance and care 23
- Purchasing new dustbags and filters 23
- Ordering the correct dustbags and filters 23
- When to change the dustbag 24
- Replacing the dustbag 25
- When to change the exhaust filter 26
- Correctly replacing the Air Clean filter 27
- Replacing the Active Air Clean or Active HEPA filter 28
- Replacing one type of exhaust filter with another 29
- When to change the dust compartment filter (for motor protection) 30
- Correctly changing the dust compartment filter 30
- When to change the battery in the radio frequency operated handle 31
- How to change the battery in the radio frequency operated handle 31
- When to change the thread lifters 32
- Correctly replacing the thread lifters 32
- Cleaning and care 33
- Problem solving guide 34
- After sales service / Electrical connection 35
- Optional accessories 36

Switching on and off
^
Step on the On/Off foot control s.
The Stand-by indicator - illuminates.
There are three ways of switching on
your vacuum cleaner.
The Stand-by indicator will go out when
the vacuum cleaner is switched on. An
LED will indicate each time a button is
pressed on the handle.
– Press the Stand-by button - on the
handle.
When the vacuum cleaner is used for
the first time, it will switch to the "Auto"
power setting.
After this, the vacuum cleaner will
switch on at the last selected power
setting.
–
Press the + button on the handle.
The vacuum cleaner switches on at the
"max." power setting.
–
Press the - button on the handle.
The vacuum cleaner switches on at the
"min." power setting.
Use
18