Operating instructions for vented tumble dryer T 430 It is essential to read these operating instructions before installing or using the machine to avoid the risk of accident, or damage to the machine. Q\ M.-Nr.
Contents Guide to the appliance. . . . . . . . . . . . . . . . . . . . . . . . . . . . . . . . . . . . . . . . . . . . . . . 3 For the user Warning and safety instructions. . . . . . . . . . . . . . . . . . . . . . . . . . . . . . . . . . . . . . . . 6 Notes on laundry care . . . . . . . . . . . . . . . . . . . . . . . . . . . . . . . . . . . . . . . . . . . . . . 8 Loading and unloading washing . . . . . . . . . . . . . . . . . . . . . . . . . . . . . . . . . . . . . . . 9 Programme selection . . . . . . .
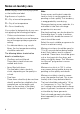
Guide to the appliance 1 a.c.
Guide to the appliance Pushbuttons Programme selector switch Door opens the door Cottons Extra dry Normal+ Normal Hand iron r Hand iron rr Machine iron On/Off for switching the appliance on and off. Low temperature low temperatures for delicate fabrics, e.g. acrylics. Buzzer sounds when the drum turns during the intermittent anti-crease action period.
Guide to the appliance Environmentally conscious drying The sensitive system automatically adjusts drying to suit the water quality. The water conductivity is measured, and registered by the control which then compensates to achieve a uniform residual moisture level. The Novotronic control offers 9 programmes with electronic moisture measuring and 2 timed programmes.
Warning and safety instructions Please read the operating instructions before using the tumble dryer for the first time. They contain important information about the safety, use and maintenance of the machine. This will avoid the risk of accidents and damage to the machine. Keep these operating instructions in a safe place and ensure that new users are familiar with the content. Pass them on any future owner of the machine.
Warning and safety instructions In the event of a fault or for cleaning purposes, the machine is only completely isolated from the electricity supply either when: – the plug is withdrawn, or – it is switched off at the mains – the mains fuse is withdrawn. Faulty components must only be exchanged for Miele original spare parts. Only when these parts are fitted can the safety standards of the machine be guaranteed.
Notes on laundry care Before drying, check the drying symbol on the textile care label. Significance of symbols: q = Dry at normal temperature r = Dry at low temperature s = Do not tumble dry If no symbol is featured dry at your own risk applying the following principles: – Cottons and minimum iron items should be dried at a normal temperature at the appropriate programme setting. – For delicate fabrics, e.g. acrylic fibres, the low temperature setting should be selected.
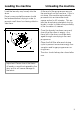
Loading the machine Load the laundry very loosely into the drum. Duvet covers and pillowcases should be fastened before drying in order to prevent small items from being rolled inside them. Unloading the machine At the end of the programme remove the washing from the machine. If this is not done, the machine automatically proceeds into an intermittent anticrease action for 60 minutes. This entails the drum being rotated at short intervals in order to reduce the possibility of the formation of creases.
Programme selection Selecting a programme This tumble dryer is fitted with an electronic sensor system. The required degree of dryness is measured and monitored electronically so that the heating element is switched off as soon as it is reached. The drying cycle automatically finishes with a cooling down period. This may be followed by the anti-crease action cycle.
Programmes - Cottons Extra dry Hand iron rr Multi-layer fabrics which would not be thoroughly dried using the “Normal +” programme. Cotton or linen fabrics, e.g. table linen, bedding, starched laundry, etc. max. 5 kg Note: Jerseywear tends to shrink depending on the quality and type of manufacturing involved. The “Extra dry” programme should therefore not be selected for these fabrics. Normal+ Mixed load of cotton fabrics, e.g. towelling and jerseywear, i.e. single-layer and multi-layer fabrics. max.
Programmes - Minimum iron and timed drying Normal + 15 minutes cool air Minimum iron items made of synthetics or blended fabrics, e.g. pullovers, dresses, trousers, etc., which are not dried adequately in the “Normal” programme. Items which are only to be aired. max. 2,5 kg Normal Minimum iron shirts, table cloths, etc., made of blended woven or knitted fabrics, e.g. cotton/synthetics. max. 2,5 kg Hand iron Minimum iron shirts, table cloths, etc. made of blended woven or knitted fabrics, e.g.
Consumption data Drying stage Capacity (kg) Final spin speed in a domestic washing machine (rpm) Electricity consumption Drying time incl. cooling down time (kWh) (mins) Cottons Extra dry 5 1200 1400 1550 3.32 3.16 3.06 71 68 66 Normal+ 5 1200 1400 1550 3.06 2.91 2.81 66 63 61 Normal 5 1200 1400 1550 2.78 2.63 2.54 61 59 56 Hand iron rr 5 1200 1400 1550 2.02 1.88 1.79 47 44 43 Machine iron 5 1200 1400 1550 1.59 1.46 1.36 39 36 35 Normal+ 2.5 1000 1.48 37 Normal 2.
Cleaning and care The fluff which occurs during drying is collected in the fluff filter in the door. Clean the filter after every programme to save time and energy. Before cleaning the tumble dryer: Always disconnect the machine from the power supply. The dryer can be cleaned with a cloth using soapy water or a mild detergent (not scouring powder) and dried with a soft cloth. The drum may be cleaned using a suitable proprietary stainless steel cleaner following the manufacturer’s instructions.
Problem solving guide Electrical appliances should only be repaired by qualified personnel. Incorrectly repaired machines may pose a considerable risk to the user. There are, however, minor faults which can be corrected without contacting the Service Department. The tumble dryer fails to start when switched on. Check whether the “On” indicator lamp lights up. If so, failure to start may be due to an incorrect selection procedure sequence when switching on the machine.
Problem solving guide The “Anti-crease” indicator lamp in the sequence indicator display starts flashing. Release the “On/Off” button and then press it in again. Press the“Start” button. If the indicator lamp starts flashing again, this indicates a fault in the machine. Please then contact your Miele Dealer or the Miele Service Dept. The interior drum lighting fails to function. The bulb may be defective. Replace it as follows: Switch off the machine or disconnect from the mains supply. Open the door.
Problem solving guide To open the door in the event of power failure After-sales service In the event of any faults which cannot be remedied, or if the appliance is under guarantee, please contact: – your Miele Dealer or – the nearest Miele Service Department (see back cover for the address). When contacting the Service Department, please quote the Model and Serial nos. of your appliance, both of which are shown on the data plate on the right hand side below the opening to the drum.
Installation Important A gap of 10 mm must be maintained between the bottom of machine and the floor. This gap must not be blocked by deep pile carpet, plinths etc., as this will prevent a sufficient intake of cold air. Installation The machine must be perfectly level to ensure safe and proper operation. Minor differences do not, however, have an adverse effect on operation.
Installation - venting The moist air from the dryer must be vented via a ducting system, or through direct venting to the outside. When installing avoid: – very long venting systems – too many bends or corners – tight corners otherwise . . . . . . the drying result will be less effective, . . . it will take longer and use more energy. Installation to the rear The machine is supplied with the connection at the rear open.
Installation - venting The shortest passage for the expelled air is preferable, to ensure the tumble dryer functions most efficiently. Expelled air is slowed down in the vent duct due to friction against the inner walls of the duct, therefore the shorter the duct and the smoother the inner walls, the less friction occurs. An elbow or bend creates more friction than a straight duct. An additional duct length factor should therefore be calculated for each elbow or bend (see Table I).
Installation - venting Result: Table II Effective duct lenght Internal diameter or edge length 0-20 m 20-30 m 30-43 m 43-60 m 100 mm Ø 110 mm Ø 120 mm Ø 130 mm Ø A duct diameter of 100 mm is adequate since the effective length is less than 20 m as specified in Table II. Flexible ducting has been used for the following example. See Table I for additional duct length factors for other types of ducting. Example: Side connection, left. . . . . . . . . . . . 6.00 Length (L). . . . . . . . . . . . . . . . .
Installation - venting For installation where up to 5 machines are connected to a shared system the pipe diameter must be increased. The factor to increase by is given in Table III. Table III Number of Dryers Increase factor for pipe diameter (D) 2 3 4-5 1.00 1.25 1.50 Note: It is advisable to install a non-return flap for each machine to act as an odour trap.
Installation examples Moist air can be ducted outside by a wall vent kit or window vent kit, both of which are available from the Miele Spare Parts Department. Window vent kit Wall vent kit 1. Louvre frame 2. Wall pipe 3. Connecting piece 4. Louvred grille 5. Flap 6. Wood screw 7. Wall plug A flexible foam gasket must be used if the tumble dryer is directly connected to the wall vent. 1. Wall vent duct 2. Flexible foam gasket 1. Louvre frame 4. Grille 5. Flap 8. Clips (x 4) 9.
Installation examples Fig. 1 Ducting (side view) with flexible vent hose to an exhaust flue. 1. Wall vent duct A. Wire spiral-wound hose 2. Adapter B. Flexible ducting 3. Flue isulated against damp Fig. 2 Ducting (side view) with plastic piping to a wall vent kit. 1. Wall vent kit 2. Adapter 3. Plastic drain pipe (outer dia. 110 mm) 24 Fig. 3 Connection of plastic piping to the tumble dryer. 1. Plastic drain pipe 2. Adapter for vent duct between tumble dryer and plastic drain pipe Fig.
Electrical connection For U.K. only This tumble dryer is supplied ready for connection to an a.c. single phase 230 V, 50 Hz supply. The rated load is 3 kW. The machine is supplied with a 2 m long mains cable with moulded plug and the fuse rating is 13 A. The appliance should be connected up only by a qualified electrician, in accordance with national and local safety regulations. Connection should be made via a fused plug and a suitable switched socket which is easily accessible.
Electrical connection For IRL only This tumble dryer is supplied ready for connection to an a.c. single phase 230 V, 50 Hz supply. The rated load is 2.7 kW. The machine is supplied with a 2 m long mains cable with moulded plug and the fuse rating is 13 A. The appliance should be connected up only by a qualified electrician, in accordance with national and local safety regulations.
Technical data Height. . . . . . . . . . . . . . . . . . . . . . . . . . 85.0 cm (adjustable +1/-0.5 cm) Width . . . . . . . . . . . . . . . . . . . . . . . . . . 59.5 cm Depth (incl. distance from wall) . . . . . . 60.0 cm Weight . . . . . . . . . . . . . . . . . . . . . . . . . 44 kg Drum volume . . . . . . . . . . . . . . . . . . . . 103 l Capacity . . . . . . . . . . . . . . . . . . . . . . . . 5 kg dry weight Voltage . . . . . . . . . . . . . . . . . . . . . . . . . Fuse rating . . . . . .
Alteration rights reserved / 001 2096