Operating instructions for condenser tumble dryer T 650 C It is essential to read these operating instructions before installing or using the machine to avoid the risk of accident, or damage to the machine. Q\ M.-Nr.
Contents Contents Guide to the appliance. . . . . . . . . . . . . . . . . . . . . . . . . . . . . . . . . . . . . . . . . . . . . . 4 Caring for the environment . . . . . . . . . . . . . . . . . . . . . . . . . . . . . . . . . . . . . . . . . 6 Warning and safety instructions . . . . . . . . . . . . . . . . . . . . . . . . . . . . . . . . . . . . . 7 Brief instructions . . . . . . . . . . . . . . . . . . . . . . . . . . . . . . . . . . . . . . . . . . . . . . . . . 10 Notes on laundry care . . . . . . . . .
Contents Cleaning and care Cleaning the fluff filters. . . . . . . . . . . . . . . . . . . . . . . . . . . . . . . . . . . . . . . . . . . . . . Cleaning the tumble dryer . . . . . . . . . . . . . . . . . . . . . . . . . . . . . . . . . . . . . . . . . . . Emptying the condensed water container . . . . . . . . . . . . . . . . . . . . . . . . . . . . . . . Cleaning the condenser unit . . . . . . . . . . . . . . . . . . . . . . . . . . . . . . . . . . . . . . . . .
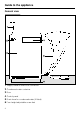
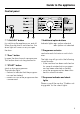
Guide to the appliance Guide to the appliance General view 1 2 3 4 5 6 4 Supply cable for electrical connection Condensed water container Door Control panel Drain hose for condensed water (if fitted) Four height-adjustable screw feet
Guide to the appliance Control panel b “I-On/0-Off” button e Additional option buttons for switching the appliance on and off. When the machine is switched on, the drum light will come on as you open the door. Indicator lights: on= option selected off= option not selected f Programme selector c “Door” button can be turned clockwise or anti-clockwise. to open the door/cancel a programme. This button does not stay pressed in. d “START” button starts a drying programme.
Caring for the environment Caring for the environment Disposal of packing The transport and protective packing has been selected from materials which are environmentally friendly for disposal and can normally be recycled. Rather than just throwing these materials away, please ensure they are offered for recycling. 6 Disposal of your old machine/appliance Old machines/appliances contain materials which can be recycled.
Warning and safety instructions Warning and safety instructions Please read the operating instructions before using the tumble dryer for the first time. They contain important information about the safety, use and maintenance of the machine. This will avoid the risk of accidents and damage to the machine. Keep these operating instructions in a safe place and ensure that new users are familiar with the content. Pass them on to any future owners of the machine.
Warning and safety instructions For safety reasons, do not use an extension cable. There is a danger of overheating. Faulty components must only be exchanged for Miele original spare parts. Only when these parts are fitted can the safety standards of the machine be guaranteed. Use Do not install the machine in a room where the temperature may drop below freezing, as temperatures below zero could damage the machine.
Warning and safety instructions In countries where there are areas which may be subject to infestation by cockroaches or other vermin, pay particular attention to keeping the appliance and its surroundings in a clean condition at all times. Any damage which may be caused by cockroaches or other vermin will not be covered by the appliance guarantee. Using accessories Accessory parts may only be fitted when expressly approved by Miele.
Brief instructions Brief instructions Brief description Programmes are selected by turning the programme selector and can be supplemented by pressing the additional option buttons. Press the “START” button to begin a programme. The indicator lights in the sequence display (on the right hand side of the control panel) show which stage has been reached in the programme. The Sensitive system automatically adjusts drying to suit the water quality and ensure more precise results.
Notes on laundry care Notes on laundry care Before drying, check the drying symbol on the textile care label. Significance of symbols: q = Dry at normal temperature r = Dry at low temperature – Pure linen* These items should only be machine dried if specified as suitable by the manufacturer on the textile care label, as the surface of the fabric may otherwise “roughen”.
How to dry correctly How to dry correctly Hints on saving energy Make sure that your laundry has been thoroughly spun at the highest appropriate spin speed before drying. Spinning at 1600 rpm, for example, saves approximately 30% energy and time compared with 800 rpm. Load the full amount of laundry according to the programme chosen (see “Programme chart”) for the most economical drying related to the size of the load. Make sure that the drum is not over- or underloaded.
How to dry correctly 2Selecting a programme 3Selecting additional option(s) Turn the programme selector to the programme required. Additional options can be switched on and off as required. See the “Programme chart” for a description of each programme. See the section on “Additonal options" for a description of each option. COTTONS; MINIMUM IRON; Woollens hand care; Smoothing The length of the programme is determined by the electronics according to each load.
How to dry correctly "Clean out airways" indicator light After drying This indicator light shows that the dryer is not working most efficiently or economically. When the drying programme has finished the “Anti-crease / finish” sequence indicator light comes on. The causes of this check message can be: Press the “Door” button to open the door. – the fluff filters in the door and the secondary filters in the door opening are blocked; Remove the laundry. – the condenser unit is blocked.
Additional options Additional options Anti-crease Once a programme has ended the drum will turn at regular intervals to prevent the laundry from settling into creases and folds. Short The programme running time is reduced. Additional options can be switched on or off by pressing the relevant button before the start of a programme.
Programme chart Programme chart Programme Fabric type maximum load (2) Special notes Multi-layered fabrics, not thoroughly dried with “Normal +” Mixed load of cotton fabrics, eg towelling, jerseywear, ie single and multi-layered fabrics. Load of similar fabrics (jersey wear, flannelette sheets, towelling). Cotton or linen fabrics (eg table linen, bedlinen, starched laundry etc) 5 kg Do not dry jersey wear in the Extra dry programme – tendency to shrink.
Programme chart Programme Fabric type Maximum load (2) Special notes 5 kg – 5 kg – To refresh and fluff up woollen garments quickly. Remove garments immediately at the end of the programme. Do not repeat. Woollen fabrics are not dried completely by this programme. Smooths out creases caused during the spin cycle in the washing machine. Fabrics are not dried completely in this programme. Remove garments immediately at the end of the programme and hang on a line or coat hangers to dry.
Altering a programme Altering a programme Once a programme has started, no changes to the programme or additional options will be accepted. If the programme selector is turned to a different programme after a programme has begun, the “Drying” indicator light will flash. The programme originally selected will continue to run as normal. The indicator light will go out when the selector is returned to its original position. To cancel a programme Open the door or switch off the machine.
Electronic system lock Electronic system lock The system lock prevents anyone from interfering with the dryer. To activate the system lock 1 Ensure that the door is closed and that the programme selector is turned to “Finish”. 2 Turn the machine on. 3 Press the “Short” button and keep it pressed in while carrying out steps 4 to 6. 4 Slowly turn the programme selector clockwise stage by stage until it reaches the “COTTONS/Normal” position.
Programmable functions Programmable functions General view The programmable functions can be used to create drying programmes to suit your individual requirements. They will remain in the machine’s memory until cancelled. One or all of the programmable functions can be activated or cancelled. (See following page). Programmable function “Correcting the drying level” The Sensitive System aims to dry using as little energy as possible.
Programmable functions Activating and storing in the memory The programmable functions are activated using the additional option buttons in special combinations with the programme selector to intoduce extra features not marked up on the control panel. 1 Switch the machine off and shut the door. Turn the programme selector to the “Finish” position. 2 Press the “Low temperature” and “Buzzer” buttons at the same time. Keep them pressed in and ... 3 ...
Cleaning and care Cleaning and care Cleaning the fluff filters The fluff which is created by the drying process is collected in the fluff filters in the door and door opening. Clean the filters after every programme to reduce drying time and save energy. These filters should only be removed for cleaning with water. Dry the filters well after rinsing and put back in place. Cleaning the tumble dryer Open the door. Grip the filter by the recessed handle and pull upwards to remove.
Cleaning and care Emptying the condensed water container If the hose drain has not been fitted and connected, the condensed water will be collected in the condensed water container. The condensed water container should be emptied after every drying cycle, or as soon as the “Empty out container” indicator light comes on. If . . . . . . the condensed water container is full when a programme is started or . . .
Cleaning and care Cleaning the condenser unit The machine must be disconnected from the electricity supply before cleaning. Check the condenser unit at least twice a year and clean it if necessary. If the dryer is used frequently then clean the condenser unit after approx. 100 drying cycles. Open the door. Pull the cover off. Turn the cover lock downwards to the vertical position. Turn both levers on the condenser unit to the vertical position.
Cleaning and care Pull the condenser unit out. Clean the two long sides of the unit. Stand the condenser unit lengthwise on a towel until it is quite dry. Replace the condenser unit (see illustration above left). Return both levers on the condenser unit to the horizontal position. Pull forwards on the unit to check that it is firmly in place. Replace the cover and check that it is also firmly in place, otherwise water may leak from the machine. Close the door.
Problem solving guide Problem solving guide What to do if ... Electrical appliances should only be repaired by qualified personnel. Incorrectly repaired machines may pose a considerable risk to the user. What to do if . . . Cause . . . This may be due to an incorrect selection procedure sequence when switching on the machine. Remedy . . . Repeat the switch-on procedure (see section on “Drying correctly”).
Problem solving guide What to do if . . . . . . drying process goes on too long. Cause . . . Ventilation to and from the dryer is insufficient (eg in a small room). This could cause the room temperature to rise sharply. The vent below the door is blocked. The dryer cannot blow air out correctly. Remedy . . . Open a door or window while the machine is in operation for increased air flow. Remove any objects that are blocking the vent below the door.
Problem solving guide Check and indicator lights What to do if . . . Cause . . . The system lock is activated. The programme cannot be started. Remedy . . . See section “Electronic system lock”. . . . the “Locked” indicator light comes on during drying. That is not a fault. The light will go out at the end of the programme. . . . the “Drying” indicator light flashes. The programme selector was moved after the beginning of the programme, but the programme will continue to run correctly.
Problem solving guide The interior drum lighting does not come on: changing the bulb Open the door. Before changing the bulb, disconnect the machine from the mains power supply. The cover must be fixed securely otherwise moisture may seep in and cause a short circuit. The temperature resistant bulb should only be ordered from your Miele dealer or the Miele Spare Parts Department. Opening the door in the event of a power failure. Unscrew the plastic cover above the door inside the drum. Replace the bulb.
After sales service After sales service Repairs Future updates In the event of any fault which you cannot remedy yourself, please contact: The indicator or check light marked PC allows a service engineer to update your machine in future years. – your Miele dealer or – your nearest Miele Service Department (see back cover for the address).
Installation Installation The ventilation slots beneath the door must on no account be blocked as this will prevent a sufficient intake of cold air. Installation Building under a continuous worktop/in a row of kitchen units The machine must be perfectly level to ensure safe and proper operation. Minor differences do not, however, have an adverse effect on operation. A special conversion kit* is necessary.
Installation External condensed water outlet The condensed water can be drained off directly if the machine is installed near a sink, drain outlet etc. A special drainage kit is required which is available from the Miele Spares Department or from your Miele dealer. Detach the hose clip from the drain outlet at the back of the machine. Push the drain hose onto the drain outlet. Ensure that the hose is firmly secured with the hose clip and that it is not kinked. Maximum drain hose length: 3.
Installation The dryer is fitted with a non-return valve as standard to prevent water from flowing back into the machine. Connection to wash basin drain outlet (where appropriate) Push the hose clip (1) and the knurled nut connector from the sink drain outlet (2) over the drain hose. Close the water inlet port to the condensed water container with the bottom part of the rubber plug. The plug must face towards the interior of the machine so that the condensed water container can be pushed in easily.
Electrical connection Electrical connection Electrical connection U.K. All electrical work should be carried out only by a suitably competent person, in strict accordance with national and local safety regulations. The appliance is supplied with a mains cable with moulded plug for connection to a 230-240V mains supply. The voltage, rated load and fuse rating are given on the data plate. Please ensure these match the household mains supply.
Consumption data Consumption data Drying time incl. cooling down time Minutes Capacity Final spin speed (in a domestic washing machine) Electricity consumption kg rpm kWh 10 A (2) 16 A (2) Extra dry 5 1200 1400 1600 3.4 3.3 3.0 102 99 89 84 81 74 Normal + 5 1200 1400 1600 2.9 2.75 2.45 92 88 79 74 71 64 Normal (1) 5 800 (70 % residual moisture) 3.5 109 88 Normal 5 1200 1400 1600 2.75 2.6 2.35 88 85 77 71 68 62 Hand iron rr (1) 5 800 (70 % residual moisture) 2.
Technical data Technical data Height. . . . . . . . . . . . . . . . . . . . . . . . . . 850 mm (adjustable +10/-5 mm) Width . . . . . . . . . . . . . . . . . . . . . . . . . . 595 mm Depth (incl. distance from the wall) . . . 600 mm with lid 560 mm without lid Weight . . . . . . . . . . . . . . . . . . . . . . . . . 57 kg Drum volume . . . . . . . . . . . . . . . . . . . . 103 l Maximum capacity . . . . . . . . . . . . . . . . 5 kg dry weight Capacity of condensed water container . . . . . . . .
Alteration rights reserved/001 This paper is made from 100% chlorine free bleached cellulose and is recyclable.