
User manual

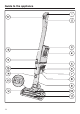


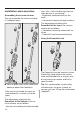


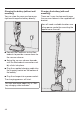
Table Of Contents
- Contents
- Warning and Safety instructions
- Guide to the appliance
- Caring for the environment
- -
- Installation and connection
- Assembling the vacuum cleaner
- Using the PowerUnit solo
- Connecting the Comfort handle
- Connecting the PowerUnit and the suction tube
- Inserting the battery
- Connecting the Electrobrush
- General battery information
- Charging the battery (without wall mounting)
- Charging the battery (with wall mounting)
- Wall mounting
- Attaching the mounting plate
- Connecting the accessories holder (if required)
- Connecting the wall bracket
- Battery charging state indicator (while charging)
- Battery charging state indicator (while in use)
- Using the supplied accessories
- Use
- Maintenance
- Error messages
- Problem solving guide
- Cleaning and care
- Service
- Optional accessories
- Electrical connection for the UK
- Installation and connection

17
Connecting the Comfort handle
Depending on how you decide to con-
figure your vacuum cleaner, you can
connect the Comforthandle to either
the suction tube or the PowerUnit.
Push the Comforthandle down onto
the suction tube connector from
above until it audibly clicks into place
(left image detail).
Slide the Comforthandle along the
guide line on the dust container
handle and down onto the PowerUnit
connector from above until it audibly
clicks into place (right image detail).
Switch off the vacuum cleaner using
the On/Off switch on the front of the
Comforthandle if you want to separ-
ate the sections.
Press the release catch and remove
the Comforthandle by pulling it up-
wards.
Connecting the PowerUnit and the
suction tube
Depending on how your vacuum
cleaner is configured, the suction tube
is located either above or below the
PowerUnit.
Slide the suction tube along the guide
line on the dust container handle and
down on to the PowerUnit connector
from above until it audibly clicks into
place (left image detail).