
User manual


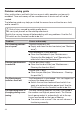


Table Of Contents
- Contents
- Warning and Safety instructions
- Guide to the appliance
- Caring for the environment
- -
- Installation and connection
- Assembling the vacuum cleaner
- Using the PowerUnit solo
- Connecting the Comfort handle
- Connecting the PowerUnit and the suction tube
- Inserting the battery
- Connecting the Electrobrush
- General battery information
- Charging the battery (without wall mounting)
- Charging the battery (with wall mounting)
- Wall mounting
- Attaching the mounting plate
- Connecting the accessories holder (if required)
- Connecting the wall bracket
- Battery charging state indicator (while charging)
- Battery charging state indicator (while in use)
- Using the supplied accessories
- Use
- Maintenance
- Error messages
- Problem solving guide
- Cleaning and care
- Service
- Optional accessories
- Electrical connection for the UK
- Installation and connection

38
AP01additionalbattery (HXLA)
For doubling the amount of time the va-
cuum cleaner can be used for.
Before charging for the first time, you
must read the information in “Installa-
tion and connection – General battery
information”.
LS03 charger cradle (HX LS)
For charging the additional battery inde-
pendently of the appliance, i.e. while
the appliance is in use.
Electrical connection for the
UK
All electrical work should be carried out
by a suitably qualified and competent
person in strict accordance with current
national and local safety regulations (BS
7671 in the UK). The voltage and fre-
quency are given on the data plate loc-
ated underneath the vacuum cleaner.
Please ensure that these match the
household mains supply. The fuse rat-
ing is quoted on the plug. The appli-
ance is supplied with a cable and moul-
ded plug ready for connection to a
230-240 V/50 Hz a.c. single phase sup-
ply.