Operating instructions for Washing machine W 3444 WPS To avoid the risk of accidents or damage to the machine it is essential to read these instructions before it is installed and used for the first time. G M.-Nr.
Caring for our environment Disposal of the packing material Disposal of your old appliance or machine The transport and protective packing has been selected from materials which are environmentally friendly for disposal and can normally be recycled. Electrical and electronic appliances / machines often contain materials which, if handled or disposed of incorrectly, could be potentially hazardous to human health and to the environment.
Contents Caring for our environment. . . . . . . . . . . . . . . . . . . . . . . . . . . . . . . . . . . . . . . . . . 2 Disposal of the packing material . . . . . . . . . . . . . . . . . . . . . . . . . . . . . . . . . . . . . . . 2 Disposal of your old appliance or machine . . . . . . . . . . . . . . . . . . . . . . . . . . . . . . . 2 Warning and safety instructions . . . . . . . . . . . . . . . . . . . . . . . . . . . . . . . . . . . . . 6 Description of the machine . . . . . . . . . . . . . . . . . . .
Contents Garment care label symbols . . . . . . . . . . . . . . . . . . . . . . . . . . . . . . . . . . . . . . . . 24 Changing the programme sequence . . . . . . . . . . . . . . . . . . . . . . . . . . . . . . . . . 25 Cancelling a programme . . . . . . . . . . . . . . . . . . . . . . . . . . . . . . . . . . . . . . . . . . . . 25 To interrupt a programme . . . . . . . . . . . . . . . . . . . . . . . . . . . . . . . . . . . . . . . . . . . 25 Altering a programme . . . . . . . . . . . . . . . . . . . . . .
Contents After sales service . . . . . . . . . . . . . . . . . . . . . . . . . . . . . . . . . . . . . . . . . . . . . . . . 42 Future updates (PC) . . . . . . . . . . . . . . . . . . . . . . . . . . . . . . . . . . . . . . . . . . . . . 42 Appliance guarantee . . . . . . . . . . . . . . . . . . . . . . . . . . . . . . . . . . . . . . . . . . . . 42 Optional accessories . . . . . . . . . . . . . . . . . . . . . . . . . . . . . . . . . . . . . . . . . . . . 42 Installation and connection . . . . . . . . . .
Warning and safety instructions To avoid the risk of accidents and damage to the machine please read these instructions carefully before using it for the first time. They contain important information on its safety, use and maintenance. Keep these instructions in a safe place and ensure that new users are familiar with the content. Pass them on to any future owner of the machine.
Warning and safety instructions The Miele "Water protection system" protects from water damage provided the following conditions have been met: – the machine is correctly plumbed in and connected to the electricity supply. – if a fault has been identified, the machine must be examined by a competent person before further use, and repaired if necessary. Faulty components must only be replaced by genuine Miele original spare parts.
Warning and safety instructions If the correct amount of detergent is dispensed, the machine should not need to be descaled. If, however, you do wish to descale the machine only use proprietary non-corrosive descaling agents and strictly observe the instructions on the packaging. If in doubt, contact the Miele Customer Service Dept. or your Miele Dealer. Textiles which have been pretreated in solvent based cleaning agents must be thoroughly rinsed in clean water before being washed in the machine.
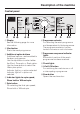
Description of the machine Control panel a Display See the following page for more information. b Start button Starts the wash programme. c Additional option buttons Additional options can be added to the basic programme. Use the top button to select either the Short, Pre-wash, or Soak option. Use the lower button to select the Water plus option. Indicator light on = option selected Indicator light off = option not selected d Indicator lights for spin speed, Rinse hold or Without spin.
Description of the machine Display Programmable functions The display shows: The programmable functions can be used to tailor washing programmes to suit your individual requirements. In programming mode, the display will show the function selected. – the programme duration (Time left display) – the programmable functions Programme duration After the start of a programme, the estimated programme duration will appear in the display in hours and minutes.
Before using for the first time Before using the machine for the first time ensure that it is correctly installed and connected. See "Installation and connection". Also check that the drain filter is securely tightened. Otherwise there is a risk of water leakage during use. For safety reasons spinning is not possible until the machine has been prepared for using for the first time. To activate the spinning function you must run a wash programme without laundry and without detergent.
Washing environmentally and economically Energy and water consumption Detergent – Water consumption and energy usage are determined by the size of the load. To make the most out of your machine, load the maximum dry load for the programme you are using. – Do not exceed the amounts of detergent recommended by the manufacturer on the packaging. – Use the Automatic and Express programmes for small loads.
How to wash correctly Brief instructions The headings numbered A, B, C, . . . show the operating sequence and can be used as brief instructions. A Sort the laundry ,If you use a solvent-based cleaning agent (e.g. one containing benzene) to pre-treat a stain, make sure that any plastic parts (e.g. buttons) are protected, and that the cleaning agent is rinsed off before washing the garment in the machine. ,Do not use solvent-based cleaning agents in this machine.
How to wash correctly B Switch on the washing machine D Select a programme C Load the drum ^ Press the Door button to open the drum door. ^ Unfold the laundry and load loosely in the drum. Mixing both large and small items gives better wash results and also helps distribute the load evenly during spinning. The most efficient use of energy and water is achieved when a full load is washed. Do not overload as this causes creases and reduces cleaning efficiency.
How to wash correctly E Select additional option(s) F Select a spin speed Each press of the top button selects the additional options in the following order: Short, Pre-wash, Soak, no selection. Use the lower button to select the Water plus option. ^ Press the "Spin" button repeatedly until the indicator light for the spin speed you want comes on. ^ Select the option you want. Not all the additional options are suitable for every programme.
How to wash correctly G Add detergent It is important to dispense the correct amount, because . . . . . . too little detergent results in: – Laundry not getting properly clean and with time it may become grey and hard to the touch. – Greasy particles clinging to the laundry. – Limescale deposits on the heater elements. . . . too much results in: – Excessive foam which causes a low level of agitation and poor wash, rinse and spin results.
How to wash correctly H Start the programme ^ Press the flashing Start button. The estimated programme duration will show in the display. During the first 10 minutes the washing machine measures how much water is being absorbed by the laundry. The programme duration may be longer or shorter depending on this absorbency rate. I Remove the laundry Only remove laundry from the machine once the drum has stopped turning. Reaching into a moving drum is extremely dangerous and could result in injury.
Additional options You can use the additional option buttons to augment the basic wash programmes. Short For light to nomal soiling with no visible staining. The duration of the main wash is reduced. In the Dark garments and Denim programmes, 2 rinses will be carried out instead of 3. Pre-wash For laundry with large amounts of dirt e.g. dust, sand. Soak For heavily soiled and stained items with protein stains (e.g. blood, fats and oils, cocoa).
Spinning Final spin speed Programme To omit the final spin (Rinse hold) rpm Cottons 1600 Minimum iron 1200 Delicates 600 Automatic 900 Dark garments 1200 Shirts 600 Denim 900 Express 1600 Silks 400 Woollens 1200 Drain/Spin 1600 Separate rinse/Starch 1200 You can reduce the final spin speed. However, you cannot select a final spin speed higher than that shown in the chart above. Rinse and interim spin There is a spin after the main wash and between the rinses.
Programme chart Cottons 30°C to 95°C 9876 Fabric Max. load 6.0 kg Cottons, linens or cotton mix fabrics. Additional options Short or Pre-wash or Soak, Water plus Note for test institutes: Short programme: 3.0 kg load and additional option Short Minimum iron*) 30°C to 60°C 421876 Fabric Max. load 3.0 kg Synthetics, mixed fibres and easy care cottons. Reduce the spin speed for fabrics which crease easily. Additional options Short or Pre-wash or Soak, Water plus Delicates cold to 40°C 21ac Fabric Max.
Programme chart Max. load 2.0 kg Shirts 40°C Additional options Pre-wash or Soak Notes – Pre-treat collars and cuffs if necessary. – Wash silk garments in the Silks programme. Max. load 3.0 kg Denim 40°C Additional options Short or Pre-wash or Soak Notes – Wash denim inside out. – Denim often contains excess dye and will run during the first few washes. Wash light and dark coloured items separately. Express 40°C 72 Fabric Max. load 3.
Programme sequence Main wash Rinses Spinning Water level Wash rhythm Water level Rinses Interim spin Final spin Cottons d a d 2-31) L L Minimum iron d a ( 2-32) L L Delicates e b e 3 – L Automatic d a ( 2-3 L L Dark garments d a ( 3 L L Shirts ( a ( 2 – L Denim ( a ( 3 – L Express d a d 2 L L Silks ( d ( 2 – L Woollens ( c ( 2 L L Drain/Spin – – – – – L Separate rinse/ Starch – – ( 1 – L d = Low water level ( = Medi
Programme sequence This washing machine has fully electronic controls with automatic load recognition. It takes in the right amount of water required for the programme depending on the amount of laundry and its absorbency rate. This means that programme cycles and durations can vary. The programme sequences outlined in the chart are based on the basic programme with a full load. Additional options which can be selected have not been taken into account.
Garment care label symbols Washing The figure quoted in the bucket is the maximum temperature the garment can be washed at. The number of bars under the symbol indicates the level of agitation permitted.
Changing the programme sequence Cancelling a programme Changing a programme You can cancel a programme at any time after it has started. After the start of a programme it is no longer possible to select a different programme. If the programme selector is moved, the Anti-crease/Finish indicator light will start flashing. However, the programme sequence remains unaffected. ^ Turn the programme selector to Finish. The programme has been cancelled when the Anti-crease/Finish indicator light comes on.
Changing the programme sequence Adding or removing laundry after a programme has started ^ Press the Door button in until the drum door springs open. ^ Add or remove items. Safety lock The safety lock prevents the machine from being opened or the programme cancelled during a wash programme. ^ Close the door. To activate the safety lock The programme will continue automatically.
Changing the programme sequence Electronic system lock The system lock prevents your machine being used without your knowledge. E Next slowly turn the programme selector anti-clockwise stage by stage to Shirts 40°C. The Locked check light (lower right on the control panel) will flash. If the system lock has been activated it is not possible to start a programme. F Now release the Short, Pre-wash or Soak button. To activate the system lock G Turn the programme selector to the Finish position.
Detergent The correct detergent All modern detergents produced for automatic washing machines are suitable. Use dispensing aids, e.g. balls, if these are supplied with the detergent. Tablets are suitable for full loads but note that it may be impractical to reduce tablets for smaller loads. Some tablets do not dissolve as rapidly as others and may not be suitable for programmes with short durations.
Detergent The right amount to dispense will depend on the following: – The quantity of laundry. – The soiling level of the laundry. Lightly soiled No visible dirt or stains. Normally soiled Visibly dirty and/or just a few slight stains. Heavily soiled Visible dirt and stains and/or dried on soiling. – The water hardness level. Check with your local water supplier if you do not know the hardness level in your area.
Detergent Fabric conditioners and liquid starch Fabric conditioners make garments soft to handle and help prevent static cling when tumble drying. Starch stiffens and gives body to items of laundry, e.g. shirts, tablecloths and bed linen. Automatic dispensing of fabric conditioner or liquid starch to laundry at the end of a programme If starching frequently, the dispenser compartment and especially the siphon tube and conditioner channel will need regular cleaning to remove any residual starch.
Cleaning and care ,Disconnect the machine from the mains electricity supply and withdraw the plug from the socket prior to cleaning the machine. ^ Clean the casing with a mild nonabrasive detergent or soap and water. Wipe dry with a soft cloth. ^ Clean the fascia panel with a damp cloth and wipe dry with a soft cloth. ^ The drum can be cleaned using a suitable proprietary stainless steel cleaning agent following the manufacturer's instructions on the packaging.
Cleaning and care Cleaning the detergent dispenser drawer Remove detergent residues regularly. ^ Clean the siphon. ^ Pull out the detergent dispenser drawer until a resistance is felt. Press down the release catch and at the same time pull the drawer right out of the machine. ^ Clean the detergent drawer with warm water. 32 1. Remove the siphon from compartment §. Wash under running warm water. Clean the siphon tube in the same way. 2. Replace the siphon.
Cleaning and care Cleaning the filter in the water inlet The washing machine has a filter to protect the water inlet valve. ^ First turn off the stopcock. ^ Unscrew the threaded union connecting the free end of the inlet hose to the stopcock. The accessible filter in the union in the open end of the inlet hose should be checked every six months, or more often if there are frequent interruptions to the external water supply. ^ Remove the rubber seal 1 from the recess.
Problem solving guide With the help of the following notes minor faults in the performance of the appliance, some of which may result from incorrect operation, can be put right without contacting the Service Department. ,Repair work to electrical appliances should only be carried out by a suitably qualified person in accordance with local and national safety regulations. Repairs and other work by unqualified persons could be dangerous. The manufacturer cannot be held liable for unauthorised work.
Problem solving guide The wash programme stops and a fault indicator light comes on Problem Possible cause The Check drain light The water outlet is flashes. "– – –" appears blocked. in the display. The drain hose has been fixed too high. Remedy A Clean the drain filter and the drain pump as described in "Problem solving guide Opening the drum door in the event of a blocked drain outlet and/or power failure". The maximum delivery head is 1 m. The Check inlet light The water inlet is flashes.
Problem solving guide A fault indicator light comes on but the wash programme continues as normal Problem Possible cause Remedy A The Check drain light flashes. The drain outlet is Clean the drain filter and the drain restricted. pump as described in "Problem solving guide - Opening the drum door in the event of a blocked drain outlet and/or power failure". The Check inlet light flashes. The water inlet is restricted. Check whether – the stopcock is opened wide enough. – the inlet hose is kinked.
Problem solving guide General problems Problem Possible cause Remedy The machine shakes during the spin cycle. The machine feet are not level. Level the machine (see "Installation"). The pump makes strange noises. This is not a fault! These noises occur at the end of a pump sequence as a normal part of the operation. The programme selector The machine has switched off the light ring to save light ring is not lit up. energy.
Problem solving guide An unsatisfactory wash result Problem Possible cause Remedy Liquid detergent does not give the required result. Liquid detergents usually contain no bleaching agents. They do not remove fruit, coffee and tea stains. Grey, greasy particles cling to washed laundry. Insufficient amounts of – Use more detergent. detergent were used – Before washing the next load to break down the run a Cottons 95°C programme particles of grease in with powder detergent but heavily soiled laundry.
Problem solving guide The drum door does not open when you press the Door button Possible cause The machine is not connected to the electricity supply and / or is not switched on. Remedy Put the plug in the socket and switch on and / or switch the machine on with the I-On/0-Off button. The electronic programme This is automatically deactivated at the end of a locking has been programme. To deactivate it early see "Changing activated. the programme sequence".
Problem solving guide Opening the drum door in the event of a blocked drain outlet and/or power failure ^ Switch the washing machine off. There is a lever behind the detergent drawer fascia panel. Blocked drain outlet If the drain outlet is blocked, up to 25 litres of water will be retained in the machine. ,Caution: if laundry has been washed at a high temperature, water draining out of the machine will still be hot.
Problem solving guide Once the flow of water ceases: ,Make sure the drain filter is securely tightened. Otherwise there is a risk of water leakage during use. Opening the drum door ,Always make sure that the drum is stationary before reaching into the machine to remove laundry. Reaching into a moving drum is extremely dangerous. ^ Remove the drain filter completely. ^ Clean it thoroughly. ^ Pull the emergency release downwards (see illustration). The drum door will open. ^ Remove any foreign objects (e.
After sales service In the event of any faults which you cannot remedy yourself, please contact: – your Miele Dealer or – the Miele Service Department (see back cover for contact details). When contacting your Dealer or the Service Department, please quote the model and serial number of your machine, both of which are shown on the data plate visible above the porthole glass when the door is open.
Installation and connection Front view a Inlet hose with "Waterproof" system h Detergent dispenser drawer b Electricity supply cable i Drum door c - f Flexible drain hose (with detachable swivel elbow) j Access to drain filter, drain pump and emergency release g Control panel k Handle recesses for moving the machine l Four height adjustable feet 43
Installation and connection Rear view a Protruding lid for holding when moving the machine b Electricity supply cable c Inlet hose with "Waterproof" system d Drain hose 44 e Transit bar covers f Restraining clip for inlet hose and drain hose g Restraining clips for transit bars when removed
Installation and connection Installation surface Installing the washing machine A concrete floor is the most suitable installation surface for a washing machine, being far less prone to vibration during the spin cycle than wooden floorboards or a carpeted surface. To manoeuvre the machine out of its packing case to its installation site hold it by the edge of the lid where it protrudes to the rear of the washing machine as well as by the handle recesses at the front.
Installation and connection ^ Using the spanner supplied turn the left-hand transit bar 90°, then ^ Turn the right-hand transit bar 90°, then ^ withdraw the transit bar. ^ withdraw the transit bar.
Installation and connection ,The washing machine must not be moved without the transit bars in place. Store the transit bars as shown or keep them in a safe place for future use. They must be re-fitted if the machine is to be moved again (e.g.when moving house). Re-fitting the transit bars ^ Fit the covers on to the two holes. Then plug the holes as shown with the caps. Re-fitting is carried out by reversing the procedure. ^ Secure the transit bars to the back of the washing machine.
Installation and connection Levelling the machine The machine must stand perfectly level on all four feet to ensure safe and proper operation. ^ Using the spanner supplied turn counter nut 2 in a clockwise direction. Then turn counter nut 2 together with foot 1 to unscrew. Incorrect installation may increase electricity and water consumption and may cause the machine to move about. Screwing out and adjusting the feet The four adjustable screw feet are used to level the machine.
Installation and connection Washer and Dryer stack The fitting of building under kits and stacking kits must only be undertaken by qualified and competent persons, in accordance with the instructions supplied with the kit. Building under a continuous worktop/in a kitchen run A Miele tumble dryer can be stacked with the washing machine. A "WTV" stacking kit* is necessary and can be purchased from the Miele Spare Parts Department.
Installation and connection The Miele Waterproof system The Miele Waterproof system protects the washing machine from water damage. The system consists of three main components: 1) the inlet hose 2) the electronic unit and the washing machine housing 3) the drain hose 1) Inlet hose – The inlet hose is fitted with an additional electrical safety valve which works like an automatic stopcock and is housed in the inlet hose connection box. – It is pressure tested to between 7,000 and 10,000 kPa.
Installation and connection Connection to the water supply ,The plastic casing of the safety valve contains electrical components. The Waterproof system must only be connected to its own stopcock. It must not be connected to mixer taps or similar and must not be fitted in areas where there is the risk of water or other liquids reaching it. The machine should be connected to the mains water supply in accordance with local and national safety regulations.
Installation and connection Maintenance and care If you intend to unscrew the Miele Waterproof system hose from the stopcock it is essential to disconnect the machine from the electricity supply first. Only use a Miele Waterproof system hose should you need a replacement. In order to protect the water inlet valve, the dirt filter in the water inlet valve connection must not be removed. Extension hose A 1.
Installation and connection Connection to the drainage system Drain hose connection: The machine drains via a drain pump with a delivery head of 1 metre*. Please note the following The drain hose must not be kinked as this restricts drainage. The swivel elbow at the end of the hose can be turned in either direction, or can be detached if required, with a sharp twist and pull. If required, the drain hose can be extended to a length of 5 m.
Installation and connection Electrical connection U.K. Non-rewireable plugs BS 1363 All electrical work should be carried out by a suitably qualified and competent person, in strict accordance with national and local safety regulations. The fuse cover must be refitted when changing the fuse, and if the fuse cover is lost, the plug must not be used until a suitable replacement is obtained.
Consumption data Load Cottons Minimum iron Consumption data Energy Water in kWh in litres Duration Short Normal 95°C 6.0 kg 1.99 49 2 h 09 min 60°C1) 6.0 kg 1.02 49 1 h 49 min 60°C 3.0 kg 0.75 39 40°C1) 6.0 kg 0.65 55 59 min 2) 40°C 3.0 kg 0.40 39 59 min 40°C1) 3.0 kg 0.50 55 1 h 02 min 1 h 55 min 1 h 19 min Delicates 30°C 2.0 kg 0.35 69 43 min 59 min Automatic 40°C 3.5 kg 0.35 - 0.50 40 - 55 58 min 1 h 13 min Dark garments 40°C 3.0 kg 0.
Technical data Height 850 mm Width 595 mm Depth 580 mm Depth with door open 975 mm Weight 94 kg Maximum floor load 1600 Newton (approx. 160 kg) Capacity 6 kg dry laundry Voltage see data plate Connected load see data plate Fuse rating see data plate / plug Consumption data see "Consumption data" Water flow pressure minimum 100 kPa (1 bar) Water flow pressure maximum 1000 kPa (10 bar) Inlet hose length 1.60 m Drain hose length 1.50 m Mains connection cable length 1.
Programmable functions for changing default settings The programmable functions can be used to tailor washing programmes to suit your individual requirements.
Programmable functions The programmable functions are activated with the help of the Start button and the programme selector. A Press the Start button and keep it pressed in whilst carrying out steps B-C. Water plus system B Switch the machine on with the I-On/0-Off button. This is used to select the water intake setting for the Water plus additional option.
Programmable functions Gentle action Activating gentle action reduces the drum action and is suitable for washing slightly soiled articles more gently. Gentle action can be used with the Cottons, Express and Automatic programmes. If Gentle action is programmed into the machine, every wash cycle in these programmes will be carried out with gentle action rhythm. The washing machine is delivered with the Gentle action setting deactivated. Follow steps A to G to programme and store in memory.
Programmable functions Top-up rinse for Cottons When this is activated, additional water flows into the drum at the end of the main wash to cool the suds down. Hot suds can damage plastic drainage pipes. Top-up rinse takes place when a temperature of 95°C is selected. Top-up rinse should be activated: – to prevent the danger of scalding if the drain hose is hooked over the edge of a sink or basin. – where the drainage pipes do not comply with DIN 1986.
Programmable functions Memory function If an additional option is selected for a programme, and / or the spin speed is altered, the machine stores these changes in memory at the start of a programme. When that particular programme is chosen again, the washing machine will display the additional option(s) and / or spin speed which have been stored for that programme in the memory. A Press the Start button and keep it pressed in whilst carrying out steps B-C.
Programmable functions Soak A length of time of between 30 minutes and 2 hours can be programmed in 30 minute increments for the soak process. A Press the Start button and keep it pressed in whilst carrying out steps B-C. B Switch the machine on with the I-On/0-Off button. If the Soak option is pressed, the selected soak time will be carried out for the period selected before the wash programme is run. C Wait until the Start button indicator light comes on . . .
Alteration rights reserved/0906/W 3444 WPS M.-Nr.