*INSTALLATION* 11625452-01 Installation Front view a Inlet hose (tested to withstand pressures up to 7000 kPa) e Detergent dispenser drawer b Electrical connection g Access to filter, pump and emergency release c Flexible drain hose (with detachable swivel elbow) d Control panel f Door h Access panel for TwinDos cartridges i Four height-adjustable feet
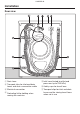
*INSTALLATION* 11625452-01 Installation Rear view a Drain hose b Transport clips for inlet and drain hoses and mains connection cable c Electrical connection d Protruding lid for holding when moving the machine e Inlet hose (tested to withstand pressures up to 7000 kPa) f Safety caps for transit bars g Transport clips for inlet and drain hoses and for storing transit bars when not in use
*INSTALLATION* 11625452-01 Installation Installation surface A concrete floor is the most suitable installation surface. It is far less prone to vibration during the spin cycle than wooden floorboards or a carpeted surface. Please note: The machine must be level and securely positioned. To avoid vibrations during spinning, the machine should not be installed on soft floor coverings. If installing on a wooden joist floor: Install the machine on a plywood base (at least 59 x 52 x 3 cm).
*INSTALLATION* 11625452-01 Installation Removing the transit bars Removing the right transit bar Removing the left transit bar Push the flap outwards and turn the transit bar 90° using the enclosed spanner. Push the flap outwards and turn the transit bar 90° using the enclosed spanner. Then pull the transit bar out. Then pull the transit bar out.
*INSTALLATION* 11625452-01 Installation Covering the holes Securing the transit bars Risk of injury from sharp edges! There is a risk of injury from reaching into holes that are not covered. To avoid the risk of injury, the holes for the transit bars must be covered after the transit bars have been removed. Secure the transit bars to the back of the washing machine. Make sure that the top catch is located above the holder.
*INSTALLATION* 11625452-01 Installation Fitting the transit bars Opening the flaps Push against the catch with a pointed object, e.g. a narrow screwdriver. The flap will open. Fitting the transit bars Install the transit bars in reverse order to their removal. Useful tip: If you lift the drum slightly, the transit bars can be pushed in more easily.
*INSTALLATION* 11625452-01 Installation Levelling the machine The washing machine must stand perfectly level on all four feet to ensure safe and proper operation. Incorrect installation may increase electricity and water consumption and may cause the machine to move about. Screwing out and adjusting the feet The four adjustable screw feet are used for levelling the washing machine. All four feet are screwed in when the appliance is delivered.
*INSTALLATION* 11625452-01 Installation Installing under a continuous worktop Risk of electric shock due to exposed cables. There is a risk of coming into contact with live parts while the lid is removed. The fitting of cover plates and stacking kits must only be undertaken by qualified and competent persons, in accordance with the instructions supplied with the kit. - A special building under conversion kit* is required. The machine lid must be replaced by a cover plate.
*INSTALLATION* 11625452-01 Installation The Miele water protection system The Miele water protection system protects all parts of the washing machine and surrounds from water damage. The system consists of three main components: - the inlet hose - the electronic unit and drainage and overflow protection - the drain hose Inlet hose - Protection against bursting The inlet hose is tested to withstand pressures up to 7000 kPa.
*INSTALLATION* 11625452-01 Installation Connection to the water supply Maintenance Connecting the water inlet Health risk and risk of damage due to contaminated mains water. The quality of the water used must correspond to the drinking water specification of the country in which the washing machine is being operated. Always connect the washing machine to potable water. The washing machine must be connected to a mains water supply in accordance with current local and national safety regulations.
*INSTALLATION* 11625452-01 Installation Drainage Using the elbow The suds are drained through a drain pump with a 1 m high delivery head. For the water to drain freely, the hose must be free of kinks. If required, the hose can be extended to a length of up to 5 m. The necessary parts can be ordered from Miele (depending on country). To prevent the drain hose from slipping, use the enclosed elbow. For a delivery head of more than 1 m (up to a max. of 1.
*INSTALLATION* 11625452-01 Installation Direct connection to a sink drain outlet a Adapter b Washbasin nut c Hose clip d End of the hose Fit the adapter to the sink drain outlet using the nut . Attach the end of the hose to the adapter . Use a screwdriver to tighten the hose clip up close to the nut.
*INSTALLATION* 11625452-01 Installation Electrical connection The washing machine is supplied with a mains cable with moulded plug ready for connection to a switched socket. The socket should be easily accessible after the machine has been installed. If the switch is not accessible after installation, an additional means of disconnection must be provided for all poles.