Operating instructions for the W 1903 Washing Machine To prevent accidents and machine damage, read these Operating Instructions before installation or use. ö M.-Nr.
Contents Contents Guide to the machine. . . . . . . . . . . . . . . . . . . . . . . . . . . . . . . . . . . . . . . . . . . . . . . 3 Important safety instructions . . . . . . . . . . . . . . . . . . . . . . . . . . . . . . . . . . . . . . . . 5 Preparation for use Help protect our environment . . . . . . . . . . . . . . . . . . . . . . . . . . . . . . . . . . . . . . . . . 6 Operating instructions Optimal usage . . . . . . . . . . . . . . . . . . . . . . . . . . . . . . . . . . . . . . . . . . . . . . . .
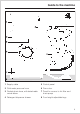
Guide to the machine Guide to the machine 1 Supply cable 5 Control panel 2 Cold water pressure hose 6 Drum door 3 Flexible drain hose, with detachable swivel elbow 7 Panel for access to lint filter and drain pump 4 Detergent dispenser drawer 8 Four height-adjustable legs 3
Guide to the machine Detergent dispenser drawer Compartment i - for the pre-wash. Compartment j - for the main wash. Compartment p (with lid) - for fabric softener or starch. b “Door” button; opens the drum door. c “ON/OFF” button; Turns the machine on and off or interrupts a program. The “On” lamp illuminates. d Pushbuttons for additional functions. 4 e SPIN SPEED SELECTOR switch. f PROGRAM SEQUENCE indicators (LED indicator lamps).
Important safety instructions Important safety instructions WARNING - To reduce the risk of fire, electric shock, or injury to persons while using your appliance, follow basic safety precautions, including the following: 1. Read the instructions before using the appliance. 2. Do not wash materials that have been previously cleaned or soaked in gasoline, dry cleaning solvents, or other flammable or explosive substances.
Help protect our environment Help protect our environment Warning - To reduce the risk of fire, electric shock, or injury to persons, read the IMPORTANT SAFETY INSTRUCTIONS before operating this appliance. Disposal of the packing material The transport and protective packing is mostly manufactured from the following recycled or recyclable materials: Disposal of your old appliance Old appliances contain materials that can be recycled.
Optimal usage Optimal usage The key to good wash results is finding the correct combination of detergent and temperature, and then allowing the washing machine to optimize their usage through its programming. Program lengths can vary for this reason. The fully electronic controls offer a combination of simple operation with many optional features.
Before using the first time Before using the first time Important: The appliance must be properly installed and connected to the water and electrical supply in accordance with local and national codes. See “Installation instructions”. Make sure the shipping struts on the rear of the washer have been removed. Any residual water left in the machine from the testing process should be flushed out as follows: ^ Do not put any laundry in the machine.
Preparing the Laundry Preparing the Laundry The headings numbered (1,2,3,...) show the operating sequence and can be used as a brief guide. Before washing 1 Prepare the wash load Dark fabrics often contain “excess dye” and should be washed separately several times before being included in a mixed load. Delicate fabrics should be washed separately using the FINE/DELICATES program. Only wash wool or wool mixtures if they are labeled machine washable on the textile care label.
Preparing the Laundry 2 Press the “Door” button to open the door 3 Load the machine Unfold the laundry and place it in the drum. For best results we recommend washing mixed loads consisting of both large and small items. This improves washing effectiveness and helps distribute the load evenly to keep the machine stable and reduce noise during spinning. Recommended load sizes are noted below: COTTONS 13 lbs (6.0 kg) PERMANENT PRESS 6.5 lbs (3.0 kg) FINE/DELICATES 3.5 lbs (1.5 kg) WOOLENS 4.5 lbs (2.
End of Program End of Program After washing 4 Remove the wash. 1 Turn the program selector switch to “Finish/Start” 2 Press the “ON/OFF” button. 3 Press the “Door” button. Do not attempt to remove laundry from the machine if the drum is turning. You may seriously injure yourself. If the drum turns with the door open, contact the Miele Service Department. 5 Check the folds in the door seal for any small articles such as buttons or nails which may be lodged there.
Textile care symbols Textile care symbols Some clothing manufacturers have started placing textile care symbols on their products. The following is an explanation of some of these symbols. Washing (°C) 987 COTTONS 4321 PERMANENT PRESS a@ FINE / DELICATES, WOOLENS The significance of the bar beneath the wash tub is: no bar normal (maximum) agitation; used in the Cottons program bar reduced (medium) agitation; used in the Permanent Press, Gentle wash, or Delicates program.
Adding detergent Adding detergent Powder detergent should be added to compartment j (main wash) and compartment i (pre wash, if selected) at the beginning of each wash cycle. Due to the design of the Miele 1/3 to 1/2 the manufacturer’s recommended amount of detergent is plenty for excellent wash results. Do not use chlorine bleach! Water is taken in through compartment j during the main wash.
Adding fabric softener or starch Adding fabric softener or starch If fabric softener is desired, it will work more effectively and be gentler on the clothes if it is dispensed in the final rinse cycle of the wash, rather than in the dryer with softener sheets. To automatically dispense fabric softener: ^ Open the lid of compartment p. At the end of the program a small amount of water will normally remain in compartment p.
Programs Programs COTTONS X = additional options For cotton fabrics without special finishes. Temperature: (guidelines) 85 - 105°F - dark colored items. 105 - 120°F - light colored items. 140 - 170°F - exclusively white items. max. load : 11 lbs (5 kg) max. spin: 1200 rpm Normal run time: 1 h 55 min (app.) Short run time: 1 h 20 min (app.
Programs FINE / DELICATES X For synthetics, machine washable silks, lace or crocheted (non-woolen) items, curtains and knit garments. Temperature: (guidelines) cold - 85°F - dark colored silks and all synthetic items (lingerie). 105 - 120°F - light colored silks and lace tablecloths. 140°F - white cotton lace and crocheted items. 1) Water level used: wash - high rinse - high 2) Rinse cycles used: Normal program - three Short program - three WOOLENS For all machine washable woolens and wool blends.
Programs Starch QUICKWASH 105°F For tablecloths, napkins, aprons and shirts. For lightly soiled items or new garments which need to be washed before wearing for the first time. max load: 11 lbs (5kg) max. spin: 900 rpm Runtime: 18 min (app.) max load: 5 lbs (2.5 kg) max spin: 1200 rpm. Runtime: 40 min (app.) Spin For spinning wet items not washed in the machine (hand washed). Such items must be suitable for machine spinning. The spin speed can be set to a maximum of 1200 rpm.
Additional options Additional options By selecting one or more pushbutton functions, basic programs can be tailored to the type of laundry being washed. “Gentle wash” For gentle washing of lighty soiled items, or delicate fabrics which tend to pill. “Pre-wash” Drum movement is reduced by half. – Use for heavily soiled or stained laundry items. Available in the “COTTONS”, “PERMANENT PRESS” and “FINE / DELICATES” programs. – Available in the “COTTONS”, “PERMANENT PRESS” and “FINE / DELICATES” programs.
Changing the program sequence Changing the program sequence To cancel a program: During operation, it is possible to: ^ Turn the Program Selector to the “Finish/Start” position. – manually omit one or more program stages To interrupt a program: ^ Turn the machine off. To re-start a program, turn the machine on again. To change an incorrectly selected program: ^ Turn the Program Selector to “Finish/Start”. When only the “On” LED is lit, a new program can be selected.
Cleaning and care Cleaning and care To clean the washing machine: ^ Clean the casing using a mild nonabrasive detergent or soap and water, and wipe dry with a soft cloth. ^ Clean the control panel with a damp cloth. ^ If necessary, the drum can be cleaned using a stainless steel cleaner according to the manufacturer’s instructions. A stainless steel cleaner specially formulated for use in washing machines is available from the Miele Technical Service Department. Do not use abrasive cleaners or solvents.
Cleaning and care Cleaning the drain pump and lint trap ^ Place a 2 quart (2l) capacity container underneath the drain tube. Occasionally small objects, (buttons, coins, etc.), may find their way into the lint trap. If the machine does not drain completely, the lint trap should be checked to ensure that it is free of foreign objects. ^ Turn the lint trap lid counterclockwise 2 - 3 times. Do not remove it. Approx. 2 quarts (2 l) of water will drain out of the hose.
Cleaning and care ^ Once the flow of water stops, remove the lint trap and clean it. ^ Clean the inside of the lint trap housing. ^ Remove any foreign objects (e.g. buttons, coins, etc.) or lint. ^ Turn the drain pump impeller (in the back of the chamber) by hand to check that it rotates freely. 22 Remove any detergent deposits or foreign objects from the thread of the filter housing and filter unit before replacing the lint trap.
Cleaning and care Cleaning the water inlet filters. The washing machine has two water inlet filters to protect each inlet valve. To clean the filter in the inlet hose: ^ Turn off the valve. ^ Carefully unscrew the inlet hose from the valve by turning the connector counterclockwise using a wrench if necessary. ^ Remove the rubber seal from the connector. ^ Using needle nose pliers, grasp the plastic filter and pull it out of the hose connector.
Problem solving guide Problem solving guide Any work done on the electrical components of this appliance should only be performed by a qualified and trained person in accordance with all local and national codes and regulations. Unauthorized repairs may result in personal injury and damage to the machine. The following are minor problems that can be corrected without contacting the Technical Service Department.
Problem solving guide The „Pre-wash“ indicator flashes ^ Start the program again. Large amounts of unused detergent remain in the dispenser drawer If the indicator still flashes, call the Miele Technical Service Department. The water supply pressure is too low. The „Main wash“ indicator flashes during, or after the end of a program ^ Select the „ Water plus“ function if necessary. If this occurs again during the next program,call the Miele Service Department.
Problem solving guide Excessive build-up of foam Pilling on fabrics To avoid this problem please note: Normal, everyday wear of certain fabrics causes pilling to occur. The „ Gentle wash“ function should be selected when washing these fabrics, or use a program with a higher water level and reduced agitation to decrease the risk of further pilling. ^ Use only powder detergents, and carefully follow the manufacturer’s dosage recommendations.
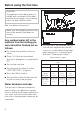
Problem solving guide The machine shakes during the spin cycle If this is a new installation, check to see that the shipping struts have been removed from the back of the washer. If this occurs on an existing washer, the most likely cause is that the machine’s four feet are not resting securely on the floor. Level the machine (see „ Installation instructions“). Weak floorboards can also lead to excessive noise and shaking during the spin cycle (see „ Installation instructions“).
After sales service After sales service If problems occur that cannot be easily fixed, or if the appliance is under warranty, please contact: – The nearest Miele Technical Service Department (see back cover). When contacting the Technical Service Department, please have the model and Serial numbers of your appliance available, both which can be found on the dataplate visible above the front glass on the inside of the door.
INSTALLATION INSTRUCTIONS INSTALLATION INSTRUCTIONS Installation surface Installation Experience has shown that a concrete floor is the most suitable surface for a washing machine. Concrete floors are less prone to vibration during the spin cycle than wooden floors. Lift the machine from its shipping pallet and move it to the installation site. Please note: Please note the following points: ^ Ensure that the machine feet and the floor are dry to prevent slippage during the spin cycle.
INSTALLATION INSTRUCTIONS ^ Turn the right shipping strut 90° clockwise. ^ Plug the two holes with the plastic caps provided. Movement of the machine without the shipping struts in place should be kept to a minimum. The shipping struts should be stored in a safe place for future use. They must be reinstalled before the machine is moved. Reinstallation can be performed by reversing the above procedure. ^ Withdraw the two struts together with the support plate.
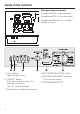
INSTALLATION INSTRUCTIONS Leveling the machine To ensure smooth operation, it is essential that the machine is level. ^ Unscrew each of the four feet as much as necessary by turning both the foot 1 as well as the locking ring 2 to the left using a screwdriver (see illustration). ^ Remove the supports, stand the machine on its feet and check to see if it is level. Repeat this procedure as often as necessary until the machine stands level.
INSTALLATION INSTRUCTIONS Washer / Dryer Stack If a countertop is placed over the washer, at least a 1/4 gap must be left between the top of the machine and bottom of the countertop; and nothing should be within 1/2” of any other side of the washing machine. This Miele washing machine can be installed as part of a washer dryer stack in combination with a Miele tumble dryer. The dryer can only be stacked on top of the washer and never vice versa.
Plumbing Plumbing Connect the water supply hose (the hose marked blue) to the cold water valve. Turn on the valve and check for leaks. The water pressure must be within 15-145 psi (1-10 bar). If the water pressure is greater than 145 psi (10 bar), a pressure reducer must be installed. If the water pressure is below 15 psi (1 bar), insufficient water may be available for a complete fill. The water supply hose is equipped with a filter; please do not remove this filter. Connection to the drain system.
Electrical connection Electrical connection GROUNDING INSTRUCTIONS This appliance must be grounded. In the event of a malfunction or breakdown, grounding will reduce the risk of electric shock by providing a path of least resistance for the electric current. This appliance is equipped with a cord having an equipment grounding conductor and plug. The plug must be plugged into an appropriate outlet that is properly installed and grounded in accordance with all local codes and ordinances.
Programmable functions Programmable functions The following additional functions can be programmed into the machine if desired: A High water level (only in “Cottons” rinses). Where rinse results are particularly important.(e.g. Soap allergies) B 5th Rinse in the “Cottons” program. For soft water areas (up to 135 ppm calcium carbonate). In soft water areas, a higher water level can be selected in addition to a 5th rinse cycle, if required.
Programmable functions To activate the additional functions: Turn off the machine, close the door, and release all pushbuttons. Set the Program Selector to “Finish/Start”. Carry out steps 1 and 2 within 4 seconds. Step 1: ^ Press the “ON/OFF” button Step 2: ^ Press the “Water plus” button 4 times (i.e. press in and out twice) The “On” LED will light up and the “Pre-wash” and “Main-wash” lights will flash.
Programmable functions Step 3: additional function: A High water level (Only in “Cottons” rinse cycles) ^ Set the Program selector to “Quickwash”. ^ Set the Program selector to “Drain”. additional function: ^ Set the Program selector to “Woolens - cold” additional function: B 5th rinse in “Cottons” program C Program Lock (Child safety feature) Step 4: ^ Press the “Water plus” button twice, (i.e.
Programmable functions If, after Step 2, the Program Selector is accidentally turned to a setting other than one of the three shown: – If the Rinse/Rinse & hold indicator does not light up - no function was activated – If the Rinse/Rinse & hold indicator lights up - proceed as in “Deleting the additional functions”. Exception: the Rinse/Rinse & hold indicator will light up if the Program Selector is set to “COTTONS 190°F”.
Technical data Technical data 1.1 Dimensions Height 331/4 - 337/8" (845 mm + 860mm) Width 23 1/2" (600 mm) Depth (including distance from wall) 24" (610 mm) Weight 220 lbs. (100 kg) Capacity 11 lbs. (5 kgs.) dry laundry Rated load 2.8 kW Circuit breaker 15 Amp Water pressure 15 - 145 p.s.i (1 - 10 bar) Maximun drain height 4.0 ft. (1.2 m) Drain hose diameter 1" I.D. (25 mm) Maximum drain length 15 ft. (4.
Technical data 1.2 Specifications Cold water hose with 3/4” female hose thread connection Drainage is via a 5 ft. long (1.5m) , 1 1/4 “ (32mm) OD hose. This washing machine is supplied with a 5 foot long (1.5m) cable with plug for connection to a 120/240 V (208 V) 60 Hz (3-pole-4 wire grounding) power supply. Power consumption: (Normal cycles) “COTTONS” without prewash 190°F 1.
Alteration rights reserved/002 3100 These instructions are printed on 100% unbleached, recycled paper are completely Biodegradable.