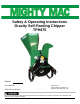
Saftey & Operating Instructions Gravity Self-Feeding Chipper TPH475 Serial No. P/N: 950-4000 Published: 10/11/2019 MacKissic Inc. Toll-free phone: 1-800-348-1117 Website: www.MacKissic.com Read and understand this manual and all instructions before operating or servicing this 3-Point Hitch MIGHTY MAC GRAVITY SELF-FEEDING Chipper.
Table of Contents Chapter 1: General Safety Rules........................................................................................................ 3 Chapter 2: Setting Up Your 3-POINT HITCH MIGHTY MAC GRAVITY SELF-FEEDING CHIPPER .... 8 Chapter 3: Operating Your 3-POINT HITCH MIGHTY MAC GRAVITY SELF-FEEDING CHIPPER.... 16 Chapter 4: Maintaining Your 3-POINT HITCH MIGHTY MAC GRAVITY SELF-FEEDING CHIPPER . 20 Chapter 5: Troubleshooting ...................................................................
Chapter 1: General Safety Rules • • • Read this Safety & Operating Manual before you use the 3-Point Hitch MIGHTY MAC GRAVITY SELF-FEEDING Chipper. Become familiar with the operation and service recommendations to ensure the best performance from your machine. Thoroughly inspect the area in which you will be working and remove all foreign objects. Look for Rope, Wire, ECT., and remove these objects before chipping.
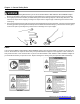
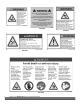
930-0022 091-0458 930-0024 091-0385 091-0445 930-0025 4 3-POINT HITCH Mighty Mac Gravity Self-Feeding CHIPPER
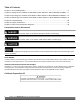
Protecting Yourself and Those Around You This is a high-powered machine, with moving parts operating with high energy at high speeds. You must operate the machine safely. Unsafe operation can create a number of hazards for you, as well as anyone else in the nearby area. Always take the following precautions when using this machine: • Always wear protective goggles or safety glasses with side shields while chipping to protect your eyes from possible thrown debris.
General Safety Operating this chipper safely is necessary to prevent or minimize the risk of death or serious injury. Unsafe operation can create a number of hazards for you. Always take the following precautions when operating this chipper: • This machine is designed to operate at 540 rpm only! Never operate the machine at a faster speed; doing so can cause serious injury to the operator or bystanders and could cause damage to the machine that is not covered under warranty.
Transportation Safety • • • • • • • • • • Before transporting, be certain the 3-Point Hitch MIGHTY MAC GRAVITY SELF-FEEDING Chipper is correctly and securely attached to your tractor and the safety chains of the PTO are in place. Make sure the 3-Point Hitch MIGHTY MAC GRAVITY SELF-FEEDING Chipper is raised high enough to clear all obstacles during transportation. Never transport the machine for long distances. Never allow anyone to ride on the 3-Point Hitch MIGHTY MAC GRAVITY SELF-FEEDING Chipper.
Chapter 2: Setting Up Your 3-POINT HITCH MIGHTY MAC GRAVITY SELF-FEEDING CHIPPER This chapter outlines unpacking and a few simple steps you will need to follow to set up your new machine before you use it. It may be helpful to familiarize yourself with the controls and features of your 3-POINT HITCH MIGHTY MAC GRAVITY SELF-FEEDING CHIPPER as shown in Figure 1 before beginning these procedures. If you have any questions at all, please feel free to contact us at www.MacKissic.
Specifications Tractor Horsepower Drive PTO Speed PTO Shaft Extension Sheave Chipping Capacity Rotor Speed Rotor Pulley Number of Chipper Knives Chipper Knife Size Chipper Knife Material Adjustable Knife Wear Plate Chipper Flywheel Flywheel Weight Chipper Housing Material Hopper Material Belt Belt Adjustment Hopper Opening at Top Chipper Weight w/PTO Shaft Shipping Dimensions Shipping Weight Category 1 – 45 HP Max. Tractor PTO 540 RPM 14" – 2 Groove 3V 4-3/4" 2,071 RPM 3.65" DIA.
Hopper Assembly Attaching the Hopper Assembly Install Hardware Note: We recommend that you have someone help you lift the Hopper in place and support it until it is secured to the Chipper. Tools Needed: • One 1/2" Wrenches 1. Gather x8 5/16- 18 x 3/4” Truss Head Bolts, x8 5/16- 18 Think Nylon Locknuts, and x8 5/16 SAE washers from your Bolt Bag. 2. Place the Hopper Assembly inside of the Hopper Neck. 3.
Installing Lift Arm Pins There are two styles of Pins we use for the Lift Arm Pins. One style has a shoulder and the other style does not. Installation methods for both styles are explained here so follow the steps that apply to the style you received. Tools Needed: • Large Philips Screwdriver (or Shaft) • Large Flat Head Screwdriver (or Pry Bar) • Large Adjustable Wrench • Tape Measure (needed to install pin with no shoulder only) PIN INSTALLATION (WITH SHOULDER) 1.
Upper (pivot) Draft Arm Arm Attaching the 3-POINT HITCH MIGHTY MAC GRAVITY SELF-FEEDING CHIPPER Before performing the following procedure, be sure your tractor engine is off, brake is set, and the key removed for safety. Chipper Hookup Pins Lower (lifting) Draft Arms Draft Arms Figure 10 Note: The PTO Driveshaft provided with your new machine is sized to fit a standard category 1 PTO (1-3/8" DIA. x 6" Spline).
2. Raise the Chipper up until the Tractor PTO Shaft and Chipper PTO Shaft are parallel with each other. Measure from the end of the Tractor PTO Shaft to the end of the Chipper PTO Shaft and record this dimension in the “SHAFTS LEVEL” row of the table above (Figure 14). End of tractor PTO shaft End of Chipper PTO Shaft 3. Raise the Chipper up as far as it will go.
3-Philips 3-Phillips Screws Screws Modifying the PTO Shaft-if required The PTO Shaft included with your new MIGHTY MAC Chipper may be too long for your tractor. To shorten the Driveshaft, proceed as follows: Tools and Supplies Needed: PTO Guard • • • • • • Hacksaw Bench Vise Tape Measure File General purpose Lithium Grease Philips Head Screw Driver 1. Separate the PTO Shaft Halves by pulling them apart. Figure 16 2. Remove the 3 Philips Screws from the PTO shaft Halves (Figure 16).
Attaching the PTO Shaft to the Tractor and Chipper 1. Insert the Key into the 3-Point Hitch Drive Shaft of the Chipper (Figure 20). 2. Align the Key Slot of the PTO Shaft with the Key in the Shaft and slide it onto the Shaft. You must install the 1/4" X 1/4" X 1-1/4" key supplied in the hardware package where the PTO shaft attaches to the chipper. Failure to do so will result in damage to the machine and is not covered under warranty.
Chapter 3: Operating Your 3-POINT HITCH MIGHTY MAC GRAVITY SELF-FEEDING CHIPPER This chapter covers the procedures for starting and stopping your new 3-POINT HITCH MIGHTY MAC GRAVITY SELF-FEEDING CHIPPER and discusses basic operation features. • • • • • • This machine is designed to operate at 540 rpm only! Never operate the machine at a faster speed; doing so can cause serious injury to the operator or bystanders and could cause damage to the machine that is not covered under warranty.
Operation Notes • Visually check the Chipper Knife for damage before each use of the machine. See “VISUAL INSPECTION OF THE CHIPPER KNIFE (before each use)” in Chapter 5 for info on accessing the Chipper Knife. • Always operate the Tractor PTO at 540 RPM when chipping. • Only operate the MIGHTY MAC GRAVITY SELF-FEEDING CHIPPER from the Operator Zones shown in (Figure 23). • Keep proper balance and footing while operating the MIGHTY MAC GRAVITY SELF- FEEDING CHIPPER.
• Your MIGHTY MAC GRAVITY SELF-FEEDING CHIPPER can process dry or green wood up to 4.75" in diameter. • The Chipper will self-feed the wood once it contacts the knife edge so forcing the branches into the Hopper is not necessary if the knife is sharp. • Green wood will process quicker and easier than dry wood. • Softwood processes easier than hardwood. • Your operator experience will teach you how different types of wood will chip and how fast you can process them.
To Free a Jammed Flywheel Disengage PTO, shut down the tractor engine, remove the key, wait for all moving parts to come to a complete stop, disconnect the PTO shaft from the tractor, then wait 5 minutes before moving or performing maintenance/inspection on the chipper. Never pry against the scroll weldment when removing the deflector or discharge chute, or at any other time. This will cause damage to the machine. Tools Needed: • Two 1/2" Wrenches Disassemble: 1. Disconnect the PTO Shaft. 2.
Chapter 4: Maintaining Your 3-POINT HITCH MIGHTY MAC GRAVITY SELF-FEEDING CHIPPER This chapter covers regular maintenance procedures that will ensure the best performance and long life of your 3-POINT HITCH MIGHTY MAC GRAVITY SELF-FEEDING CHIPPER. Maintenance Kits and Accessories are available through our website at www.MacKissic.com.
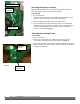
Flywheel Bearing Grease Fittings Your GRAVITY SELF-FEEDING CHIPPER was greased at the Factory. The operator needs to periodically lubricate the four Bearings of the Chipper Assembly and the PTO Shaft. Set Screws Disengage PTO, shut down the tractor engine, remove the key, wait for all moving parts to come to a complete stop, disconnect the PTO shaft from the tractor, then wait 5 minutes before performing any maintenance procedure or inspection on the chipper.
Upper UpperTPH TPH Support Support Removing, Replacing and Adjusting the Drive Belt Boltand and Bolt Locknut Locknut Belt Belt Guard Guard Disengage PTO, shut down the tractor engine, remove the key, wait for all moving parts to come to a complete stop, disconnect the PTO shaft from the tractor, then wait 5 minutes before performing any maintenance procedure or inspection on the chipper.
4. Check the alignment of the Sheaves by placing a Straightedge flat against the front face of the PTO Sheave (Figure 31). Edge 5. Check the gap from the Straightedge to the Belt near the Flywheel Sheave and near the PTO Sheave. If the gap is the same then no adjustment is needed. If the gap is not the same then adjustment is necessary, correct the alignment as follows: Gap Gap Straight Edge a) Use a 7/16" Wrench to loosen the Bushing Key Bolt (Figure 32).
VISUAL inspection of the Chipper Knife (before each use) Routinely check the chipper knife for sharpness. Using a dull knife will decrease performance and cause excessive vibration that will cause damage to the MIGHTY MAC GRAVITY SELF-FEEDING Chipper. Tools Needed: • 7/16" Wrench 1. Loosen the Locknuts that secure the Front Access Cover with a 7/16" Wrench . Move the Cover over to align the larger portion of the hole with the Locknuts and remove the Cover. (Figure 33) 2.
Removing and Replacing the Chipper Knife Tools Needed: • 7/16" Wrench • 1/2" Socket with extension • 3/16" Allen wrench • Awl or Sharp Tool • Gloves 1. Remove the Belt Cover (see “Removing, Replacing and Adjusting the Drive Belt” in this Chapter) and Shredder Hopper (see “VISUAL inspection of the Wear Plate (every 8-10 hours)” in this Chapter). 2. Loosen the Locknuts that secure the rear Access Cover with a 7/16" Wrench (Figure 35).
Checking and Adjusting the Knife to Wear Plate Gap When you replace the Knife or Wear Plate you must check and set the clearance between the Knife and Wear Plate. Set this clearance or gap to 1/16" by using the Gap Tool that is supplied with the Chipper and with a new Knife kit. If the gap between the Wear Plate and the Knife is not set correctly, you will have excessive vibration when chipping and the Knife will seem to be dull. The Wear Plate should have a square edge and be free of dents or gouges.
Chipper Knife Sharpening • You should never attempt to sharpen the Chipper Knife freehand. • It is extremely important to consistently maintain the 45-degree angle for proper performance (Figure 41). • Excessive heat generated during the sharpening process will damage Knives and weaken the metal. Be sure not to overheat the Knife during sharpening because it will shorten the life of the Knife. • Take the Chipper Knife to a machine shop for proper sharpening.
Wear Plate Sharpening File this edge flat The Wear Plate edges become rounded and chipped during use and must be squared off to ensure efficient operation. Tools Needed: • Flat File Secure the Wear Plate in a vise. Front View Figure 42 28 End View File the edge of the Wear Plate to take out any nicks and to square rounded edges (Figure 43).
Chapter 5: Troubleshooting Most problems are easy to fix. Consult the Troubleshooting Table below for common problems and their solutions. If you continue to experience problems, contact us at www.MacKissic.com or call MacKissic Inc. for support. Disengage PTO, shut down the tractor engine, remove the key, wait for all moving parts to come to a complete stop, disconnect the PTO shaft from the tractor, then wait 5 minutes before performing any maintenance procedure or inspection on the chipper.
Troubleshooting Table (continued) SYMPTOM POSSIBLE CAUSE/FIX - Belt burns. - Flywheel won’t turn. The machine has excessive vibration. Immediately disengage the PTO and shut off the tractor. Turn the Flywheel with a wooden stick to be sure it turns freely. Check for a loose Drive Belt. See Chapter 5. Remove any built-up debris from the Chipper Hopper Inlet and Discharge Chute. Check for a dull or damaged Knife; sharpen or replace the Knife. See Chapter 5.
Chapter 6: Chipper Accessories Disengage PTO, shut down the tractor engine, remove the key, wait for all moving parts to come to a complete stop, disconnect the PTO shaft from the tractor, then wait 5 minutes before performing any maintenance procedure or inspection on the chipper. Extended Top-Discharge Chute The Extended Top-Discharge Chute enables you to better control the direction of the discharged chips and allows you to direct them into a trailer or truck bed for transport.
Chapter 7: Parts List and Schematic Diagrams Schematic – Drive Assembly 32 3-POINT HITCH MIGHTY MAC ® GRAVITY SELF-FEEDING™ CHIPPER
Parts List – Drive Assembly ITEM NO. 1 2 5 6 8 9 12 13 14 PART NUMBER 950-4010-BL 950-4201 090-0460 090-0066 090-0461 913-0302-BL 030-0333 080-0081 900-0092 DESCRIPTION FRAME TPH475 BASIC UNIT NUT, NYLON LOCK, 5/16-18 5/16-18 X 3/4" HHCS 3/8-16 Nylock Nut SPRING MOUNT BRACKET 1" SK BUSHING .25 X 1.
Schematic – Unit Assembly 34 3-POINT HITCH MIGHTY MAC ® GRAVITY SELF-FEEDING™ CHIPPER
Parts List – Unit Assembly ITEM NO.
Schematic – Basic Unit 36 3-POINT HITCH MIGHTY MAC ® GRAVITY SELF-FEEDING™ CHIPPER
Parts List – Basic Unit ITEM NO.
Parts List – High Discharge Accessory Note: Part numbers listed are available through MacKissic Inc.
Notes CONTACT US AT www.MacKissic.
Notes
Notes CONTACT US AT www.MacKissic.
Daily Checklist for the 3-POINT HITCH MIGHTY MAC GRAVITY SELF-FEEDING CHIPPER To help maintain your 3-POINT HITCH MIGHTY MAC GRAVITY SELF-FEEDING CHIPPER for optimum performance, we recommend you follow this checklist each time you use your Chipper. Disengage PTO, shut down the tractor engine, remove the key, wait for all moving parts to come to a complete stop, disconnect the PTO shaft from the tractor, then wait 5 minutes before performing any maintenance procedure or inspection on the chipper.