
Installation Guide


37
rev 07.12.12
IF THIS OPENER WILL BE USED WITH GATES THAT ARE MOUNTED ON
MASONRY, BRICK, OR ROCK (etc.) COLUMNS:
READ THE FOLLOWING CAREFULLY BEFORE PROCEEDING
A. The simplest solution is to install the opener in a push-to-open configuration. The minimum
clearance is easier to achieve and clearance is no longer a problem, since the opener will be
pushing the gate away from the column instead of pulling it toward the column. It is recommended
that you place a steel plate between the opener mounting brackets and masonry surface for
additional strength.
B. If a push-to-open installation is impossible due to traffic hazards, terrain, etc., another option is to re-
hang the gate. You may hang it on a post, either in the center of the column or at the back corner, or
move the gate to the back corner of the columns.
C. The most difficult solution is to cut a notch in the column to accommodate the opener and power
cable. This job is NOT for the inexperienced!
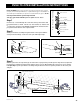
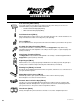
Column
Pivot Bracket
Gate
A
B
Column Mount Example
(A + B can not exceed 14 inches)
Example: If A is 2" then B can not exceed 12"
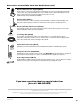
Hinge
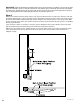
Column
Pivot Bracket
Gate
A
B
Column Mount Example
(A + B must be between 7 and 19 inches)
Hinge
COLUMN INSTALLATION INFORMATION