
Installation Guide
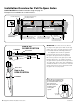

rev 082211 Mighty Mule FM402 Installation Instructions 5
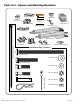
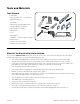
Tools and Materials
Tools Needed:
• Power Drill
• Open End Wrenches —
1
/2" and
9
/16"
• Adjustable Wrench
•
3
/8" Drill Bit
• Hacksaw or Heavy Duty Bolt Cutters
• Small Flat Bladed Screwdriver
• Large Phillips Screwdriver
• Tape Measure
• Level
• Wire Strippers
• C-Clamps — small, medium, and large
• Center Punch
• Hammer (for center punch)
• Extra person will be helpful
Materials You May Need for the Installation:
These items are NOT included with the gate opener kit. Some of these items can be purchased or special ordered
through your retailer. Please see page 26 or www.mightymule.com.
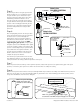
• Low voltage wire [RB509] will be needed to run from the transformer to the opener control board; length
depends upon the distance between the transformer power supply and the control box. (Page 14 & 26)
• If your gate is more than 1000' away from an AC power source you will need to use at least one 10 Watt solar
panel [FM123] or two 5 Watt panels (FM121) to charge the 12 Volt battery. (Page 2 & 26)
• PVC conduit for protecting wiring. (Page 6)
• Push-To-Open Brackets [FM148] are required if gates open out from property. (Page 3 & 26)
• Materials to reinforce thin walled tube or panel gates. (Page 7)
• Depending on the type of gate, a horizontal cross member or mounting plate may be needed to mount the front
of the opener and gate bracket to the gate. (Page 3 & 7)
• Some installations may require mufer clamps for the gate bracket. (Page 7)
• (2)16 AWG crimp on fork lugs (Page 15)
• Surge protection for transformer. (Page 16)
• Weather proof outlet is required if transformer is plugged into outside outlet. (Page 16)
• Some types of installations require U-Bolts for closed position stop plate. (Page 11)
• A low prole ground stop is required for dual gates when using the Mighty Mule gate lock. (Page 11)