TVMicro Express User Guide Revision 1.
Table of contents Introduction and Overview of TVMicro Express . . . . . . . . . . . . . . . . . . . . . . . . . . . . . . . . . . . . . . . . . . . . . . .3 Introduction and System requirements . . . . . . . . . . . . . . . . . . . . . . . . . . . . . . . . . . . . . . . . . . . . . . . . . . . . . . . .3 Overview of TVMicro Express . . . . . . . . . . . . . . . . . . . . . . . . . . . . . . . . . . . . . . . . . . . . . . . . . . . . . . . . . . . . . . . .
Introduction and Overview of TVMicro Express TVMicro Express™ User Guide Page 1
Introduction Thank you for choosing TVMicro Express™ from Miglia. TVMicro Express™ lets you watch, pause, rewind and skip forward live TV on your Mac and enables you record TV shows straight to your hard drive. TVMicro Express™ supports analog TV (Cable and Antenna) following the NTSC/M, PAL/I, PAL D/K, PAL B/G standards. System requirements: • Mac with built-in USB 2.0 connectivity • G4/1.
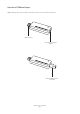
Overview of TVMicro Express TVMicro Express has a single connector at the back of the unit for the antenna connection.
Installing and using TVMicro Express and The Tube software TVMicro Express™ User Guide Page 4
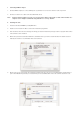
I. Connecting TVMicro Express 1. Connect TVMicro Express to a free USB 2.0 port of your Mac. You can use the extension cable if you wish. 2. Connect an antenna or a cable from the CableTV wall outlet. Note: Portable antenna usually do not give very good reception. Bad reception will be visible when watched on a computer screen. Miglia recommends using CableTV or a roof-top antenna. II. Installing The Tube 1. Insert the The Tube CD-ROM in your CD/DVD Drive 2.
6. Once the installation is finished, you can quit the Installer and eject the CD-ROM. The Tube software will normally be located on your hard drive, in the Applications folder. III. Initial setup for The Tube 1. Double-click on the application The Tube located in the Applications folder. Make sure your TV Device is connected to the USB bus. 2. When required, please enter the software activation key located on the QuickStart Guide. You will most likely first have to create a user account 3.
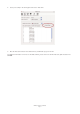
4. Select your country in the Tuning panel and click on Auto-Tune. 5. Once the Auto-tune function has found channels, click OK and enjoy your new TV! For additional information on how to use The Tube software, please refer to the full The Tube user guide located on the CD-ROM.
Warranty Agreement Hardware Products: Hdmi ltd warrants your hardware product against any defect in material and workmanship, under normal use, for the designated warranty period. The warranty becomes effective from the date of purchase by the end user. If the product is found to be defective within the warranty period, Hdmi ltd will, at its sole option, repair or replace the defective product.