HSERIES Installation and Operator’s Manual H9000 (PN 70-50080C) H10500 (PN 70-50050C) H12000 (PN 70-52000C) 2121 BLOUNT ROAD POMPANO BEACH, FL 33069 USA WWW.MILEMARKER.COM INFO@MILEMARKER.COM 800.886.8647 TOLL FREE 954.782.0604 USA & INT’L 954.782.
TABLE OF CONTENTS Safety Warnings & Precautions.................................2 Winching Tips & Techniques......................................4 Getting Started: Unpacking Your Winch.........................................6 Winch Mounting...................................................6 Solenoid Valve Assembly............................................7 Wiring Instructions.....................................................8 Plumbing Connections................................................
SAFETY WARNINGS 1. Wear leather gloves when handling winch cable. DO NOT handle cable with bare hands as broken wires can cause injuries. 2. When extending winch cable, ensure that at least five wraps of cable remain on drum under load. Serious personal injury or property damage may result. 3. Ensure that all persons stand well clear of winch cable and load during winch operation, 1.5 times the cable length is recommended.
PRECAUTIONS 1. Keeps hands and body away from Fairlead (cable intake slot) when operating. 2. Secure vehicle in position before using winch. 3. Do not exceed winch load weight capacity (see Winch Specifications). 4. Be certain winch is properly bolted to a structure (or vehicle) that can hold the winch load. 5. Always use proper couplings when connecting winch cable hook to load. 6. Do not lift items vertically. The winch was designed for horizontal use only. 7.
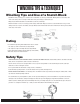
WINCHING TIPS & TECHNIQUES Winching Tips and Use of a Snatch Block • Use OEM tow hooks, recovery eyes or a clevis mount for attachment of a tow strap or winch cable. Warning: Never use a ball and/or ball mount as an anchor point for tow strap or winch cable. Severe personal injury or death could occur. •Always heed all winch manufacturer’s recommendations, cautions, and warnings. • Attach return cable to tow hook or recovery eye when using a snatch block.
Self Recovery 1. Always attempt to get the cable as straight as possible to the direction of the vehicle. It is acceptable to start a pull at an angle if it is obvious that the vehicle will turn towards the hook anchoring point. Turning the steering wheel will assist the process. It is recommended that the driver is in the vehicle. 2. Make sure hand brake and foot brake are free and that the transmission is in neutral. 3.
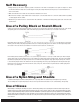
GETTING STARTED Unpacking Your Winch Unpack your new Mile Marker winch and ensure that all the parts are included by referring to parts list and exploded view drawings provided in this manual. NOTE: If you find any missing or broken parts, please call Mile Marker as soon as possible at the number present on the front page of this manual. Winch Mounting NOTE: Mile Marker recommends the use of its mounting systems for proper winch installation and optimum winch performance.
SOLENOID VALVE ASSEMBLY The Mile Marker solenoid valve should be mounted away from any areas where heat may be considered too extreme such as an exhaust manifold or turbo. Be sure all plumbing and wiring reaches from the area selected without being stressed. The Mile Marker solenoid valve may be mounted by using the bracket and alien screws supplied. Using the bracket as a guide, mark the location of where the mounting holes are going to be drilled and remove the plate and drill two 2¼/ holes.
WIRING INSTRUCTIONS Electrical Connections The Mile Marker valving system is designed to default to the power steering gearbox so power steering is always available even when the winch is in use. The power source to the solenoid is not energized until the four pole Quick Connector Plug is plugged in. Each solenoid has two black wires, either of which can be used as a ground or for electric power. The grounds are connected to each other at the factory.
PLUMBING CONNECTIONS Please refer to illustration. Keep all hoses away from any areas where heat may be considered too extreme (such as exhaust manifold or turbo). Lines should not to be allowed to rub on any abrasive or vibrating surfaces. In some applications, 90° fittings on the solenoid valve are necessary to make hose mounting more flexible. After plumbing has been laid out on vehicle, install O-ring fittings supplied to valve. Torque tight. Do not over tighten any fittings.
WINCH OPERATION General The vehicle’s steering pump is used to power the winch. The engine must be running while operating the winch, as the engine turns the power steering pump which pumps fluid to rotate the winch. The winch will have full pulling capabilities at an engine idle. The winch is operated by an electric activated switching valve. When engaging or disengaging the clutch and/or shift lever, it may be necessary to rotate the drum by hand to align gears. Preparation for Use 1.
2-SPEED WINCH LEVER POSITIONS Page 11
WARANTY INFORMATION Hydraulic Winch Limited Warranty Mile Marker Industries warrants each winch when used in normal s ervice against fac tory defects in materials and workmanship to the original purcha ser, (Commercial and recreational warranty) for the period of two (2) years. (Exclusion from this warranty are cab les , the finish, and any condition Mile Marker determines to have been caused by mis-use, abnormal use. All electronics have a 1 year warranty.
2121 BLOUNT ROAD POMPANO BEACH, FL 33069 USA WWW.MILEMARKER.COM INFO@MILEMARKER.COM 800.886.8647 TOLL FREE 954.782.0604 USA & INT’L 954.782.