
Installation Guide


GETTING STARTED
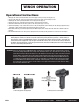
Unpacking Your Winch
Unpack your new Mile Marker winch and ensure that all the parts are included by referring to parts list and exploded view drawings provided in this manual.
NOTE: If you find any missing or broken parts, please call Mile Marker as soon as possible at the number present on the front page
of this manual.
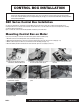
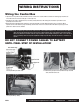
Winch Mounting
Your winch should be aligned and secured to a solid part of the vehicle (front or rear) where the full rated load will be evenly distributed.
NOTE: Mile Marker recommends the use of its mounting systems for proper winch installation and optimum winch performance. However,
when not using Mile Marker Mounting System, ensure that the mounting platform is strong enough to meet the maximum rated load of the winch
in use. Mile Marker recommends steel plates with thickness of at least 0.25”.
CAUTION: It is essential that the mounting surface be flat and the winch is mounted such that the three major sections
(Gear housing end, drum and motor end) are in proper alignment.
CAUTION: When replacing the cap screws or when longer bolts are required, make sure that you use bolts of Grade 5 or greater.
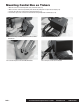
1. Drill four mounting holes (10mm in Dia.), if necessary, according to the bolt pattern mentioned in the winch specifications.
2. Fasten the winch body to the mounting platform using the four Capscrews (M10 X 34mm) and Nuts (M10) provided.
3. Torque the Capscrews to about 35 ft-lb (47.5 N-m).
4. All Mile Marker Mounting Systems come predrilled with fairlead holes. If you are using any other mounting platforms, drill two holes for the
roller fairlead installation. Position the holes such that the fairlead opening hole stretches from the circumference of the drum to the end of
the maximum permissible layers on the drum in the direction cable is being rolled.
2121 Blount Road Pompano Beach, FL 33069 MileMarker.com 1.800.886.8647PAGE 4