
Installation Guide

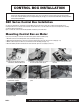

CONTROL BOX INSTALLATION
SEC Series Control Box Installation
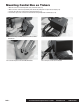
Mounting Control Box on Motor
You will need a 14mm wrench, 10mm wrench, a metric Allen wrench set and a pair of snips. Also you will need general hand tools for
mounting the winch. Your control box can be mounted over the winch motor, or over the tie bars. This decision is usually based on mounting
constraints, and personal preference.
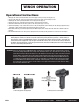
Figure 2-1 shows the control box and mounting hardware included in your new winch box.
If you choose to mount your control box on the winch motor, please follow the following steps.
1. Mount the control box to mounting brackets using 10 mm wrench (Fig 2-2 & 2-3).
2. With mouting bracket attached to control box, locate the mounting points on the side of the motor die casting (Fig. 2-4).
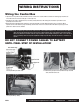
3. With the control box placed on the motor, screw in the bolts to the mounting points (Fig. 2-5).
4. Attach the Tie Wrap around the small bracket to hold it down and clip the excess length (Fig. 2-6 & 2-7).
NOTE: Your Mile Marker Control Box can either be mounted to the winch or in a remote location. However, Mile Marker recommends you to
mount it to the winch following the instructions below. If you choose to mount it in a remote location, please ensure that: (a) the
location does not interfere with any vehicle’s moving/functioning parts, and (b) you use electrical cables with similar or better specifications
as that provided by Mile Marker.
2-1: Control Box and Tolls Needed: 14mm &
10mm Wrench, Metric Allen Wrench Set
2-3: Install the smaller mounting bracket on the
other side.
2-2: Install the mounting bracket to the bottom of
the control box with a 10mm wrench.
2-4: These are the mounting points where the
bracket will be screwed in.
2-5: Screw bolts with control box in the mounting
points.
2-7: Clip Excess Length
2-6: Attach Tie Wrap
2121 Blount Road Pompano Beach, FL 33069 MileMarker.com 1.800.886.8647PAGE 6