
Instruction Manual


Milestone Husky M30/M50
Administrator's Manual
www.milestonesys.com
45
Getting started
Steps in this wizard:
Configure storage: Video settings and preview ....................................... 45
Configure storage: Online schedule ........................................................ 45
Live and recording settings Motion-JPEG cameras ................................ 46
Live and recording settings MPEG cameras ........................................... 47
Drive selection ......................................................................................... 49
Recording and archiving settings ............................................................ 51
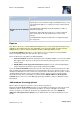
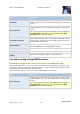
Configure storage: Video settings and preview
Video settings let you control bandwidth, brightness, compression, contrast, resolution, rotation, and
more. Use the list on the left side of the wizard window to select a camera and adjust its video
settings. Then select the next camera and adjust its settings. Video settings are to a large extent
camera-specific, so you must configure these settings individually for each camera.
Click Open Settings Dialog to configure the camera's settings in a separate dialog. When you
change video settings, they are applied immediately. This means that—for most cameras—you can
immediately see the effect of your settings in a preview image. However, it also means that you cannot
undo your changes by exiting the wizard. For cameras set to use the video formats MPEG or H.264,
you can typically select which live frame rate to use for the camera.
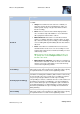
Video settings may feature an Include Date and Time setting. If set to Yes, date and time from the
camera are included in the video. Note, however, that cameras are separate units which may have
separate timing devices, power supplies, etc. Camera time and XProtect system time may therefore
not correspond fully, and this may occasionally lead to confusion. As your system time-stamps all
frames upon reception, and exact date and time information for each image is already known,
Milestone recommends that you set it to No.
Tip: For consistent time synchronization, you may automatically synchronize camera and system time
through a time server if your camera supports this.
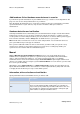
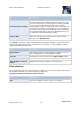
Configure storage: Online schedule
Specify when each camera should be online. An online camera is a camera that transfers video to the
server for live viewing and further processing. The fact that a camera is online does not in itself mean
that your system records video from the camera (configure recording settings on one of the following
pages). By default, cameras you add to your system are automatically online (Always on), and you
only need to modify their online schedules if you require cameras to be online only at specific times or
events. Note, however, that you can change this default as part of the scheduling options (on page
133).
For each camera, you can initially select between two online schedules:
Always on: The camera is always online.
Always off: The camera is never online.
If these two options are too simple for your needs, use the Create / Edit... button to specify online
schedules according to your needs, and then select these schedules for your cameras. This way, you
can specify whether cameras should be online within specific periods of time, or whether they should
start and stop transferring video when specific events occur within specific periods of time.