Milestone Systems XProtect® Transact Administrator's Guide
® Milestone XProtect Transact Administrator's Guide Contents TARGET AUDIENCE .........................................................................6 INTRODUCTION................................................................................7 PRODUCT OVERVIEW ........................................................................................... 7 INTERACTION WITH SOURCES AND SURVEILLANCE SOLUTIONS ................................ 7 SYSTEM REQUIREMENTS..............................................
® Milestone XProtect Transact Administrator's Guide Refresh the status of sources ........................................................................................... 19 The Create/Edit Source window ....................................................................................... 19 MANAGING CONFIGURATIONS ............................................................................ 22 Create a configuration ....................................................................................
® Milestone XProtect Transact Administrator's Guide CREATE A VIEW WITH TRANSACTIONS IN THE XPROTECT SMART CLIENT ............... 51 BACK UP AND RESTORE THE TRANSACT DATABASE .............54 BACK UP .......................................................................................................... 54 About the SQL Server transaction log ............................................................................. 54 PREREQUISITES ....................................................................
® Milestone XProtect Transact Administrator's Guide Copyright, trademarks and disclaimer Copyright 2012 Milestone Systems A/S. Trademarks XProtect is a registered trademark of Milestone Systems A/S. Microsoft and Windows are registered trademarks of Microsoft Corporation. App Store is a service mark of Apple Inc. Android is a trademark of Google Inc. All other trademarks mentioned in this document are trademarks of their respective owners.
® Milestone XProtect Transact Administrator's Guide Target audience This document is intended for system administrators. This document explains how to install and configure XProtect Transact as an add-on to a Milestone XProtect surveillance system.
® Milestone XProtect Transact Administrator's Guide Introduction Product overview XProtect Transact is a powerful tool for tracking transactions linked with video recordings of the transactions taking place. XProtect Transact is an add-on to Milestone's IP video surveillance solutions XProtect Basis+, XProtect Professional, XProtect Enterprise and XProtect Corporate.
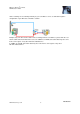
® Milestone XProtect Transact Administrator's Guide Video recordings are stored independently on your surveillance server, as defined through the configuration of your XProtect surveillance solution. Example only: The blue arrows outline video recordings from the surveillance system, while the red arrows outline transaction data from sources.In addition to an ATM, transaction data may also come from a cash register or any other RS-232-enabled device.
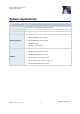
® Milestone XProtect Transact Administrator's Guide System requirements Name Description CPU Intel® Pentium 4 or compatible, minimum 2.4 GHz RAM 512 MB Network Ethernet (100 Mbit recommended) Operating System Software www.milestonesys.com Microsoft® Windows® XP Professional Microsoft Windows Server 2003 Microsoft Windows Server 2008 Windows Vista™ Windows 7 (32-or 64-bit) Microsoft .NET 4.0 framework required XProtect Corporate 3.0 or newer XProtectEnterprise 6.
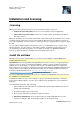
® Milestone XProtect Transact Administrator's Guide Installation and licensing Licensing When you purchase XProtect Transact, you also purchase two types of licenses: Software License Code (SLC): A license to use the XProtect Transact application. Connection License Key (CLK): A license for a certain number of simultaneously opened transaction sources. During the installation you are asked to enter both the SLC and the CLK.
® Milestone XProtect Transact Administrator's Guide Important: If you are updating from a previous version of XProtect Transact, we recommend you install the new database application (read Updating from a Previous Version on page ). o If you choose to setup a SQL Express Edition, only edit the SQL services user and System administrator password fields are required. For example, if your local security setup requires you to use another user than the one suggested per default.
® Milestone XProtect Transact Administrator's Guide Even if the old database and its content remain on the computer, if you choose to install the new database, it is not possible for you to access the data in the old database by removing XProtect Transact 2.5 and reinstalling XProtect Transact 2.2. If it is very important for you to access the old database, you can contact your Milestone vendor.
® Milestone XProtect Transact Administrator's Guide 4. Copy the updated CLK's 16-digit hexadecimal number displayed on the page. 5. Start the XProtect Transact Administrator, and click the General Settings tab. 6. In the Connection License Key (CLK) field, replace the current CLK by pasting the updated CLK into the field. 7. If relevant, click the Sources tab, select an existing suspended source and click the Resume button to be able to view data from this source. You can also add new sources.
® Milestone XProtect Transact Administrator's Guide Getting started Once the XProtect Transact Server is installed, you should perform the configuration tasks in this order. Check that your XProtect Transact Server service settings are correct. 1. From the taskbar, right-click the XProtect Transact Server Service Taskbar icon. Select Server Service Configuration....
® Milestone XProtect Transact Administrator's Guide Administration The XProtect Transact Server listens for transactions from cash registers and other sources, and stores such transactions in the XProtect Transact Database. End-users can browse recordings and transaction data (see "View transactions" on page 49) with the XProtect Smart Client.
® Milestone XProtect Transact Administrator's Guide Outside port Specify the outside port number on which communication between the XProtect Transact Server service and the client applications should take place so they can communicate over the internet. Sources and configurations A source is a data source through which transaction data is fed to the XProtect Transact Server and subsequently stored in the XProtect Transact Database. transaction data can originate from cash registers, ATMs, etc.
® Milestone XProtect Transact Administrator's Guide Use when receiving alarm data in connection with the XProtect Analytics software. Analytics XProtect Transact provider Additional kinds of sources may be available in customized XProtect Transact installations. When creating and editing a source (see "Managing sources" on page 18), the different source settings vary depending on your choice of source provider. See Managing Sources on page for more information about how to create or edit sources.
® Milestone XProtect Transact Administrator's Guide Advanced event features Through XProtect Transact's event and event group features you can get XProtect Transact to listen for occurrences of specific words, numbers, characters etc. in the transaction data and generate events when the specified occurrences are found. Sources are also associated to event groups in the XProtect Transact Administrator window's Sources tab.
® Milestone XProtect Transact Administrator's Guide Edit a source To edit the properties and configuration of an existing source, do the following: 1. Either from the Start menu or the desktop shortcut, open the XProtect Transact Administrator window. 2. On the Sources tab, select the required source and click Edit.... 3. In the Edit Source window, change the necessary (see "The Create/Edit Source window" on page 19) settings for the selected source. 4. Click OK to save the changes.
® Milestone XProtect Transact Administrator's Guide Name Description Source name Read-only field displaying the name of the source as defined in the New Source window. Provider name Read-only field displaying the type of the source as defined in the New Source window. Specify how long transaction data from the source in question should be kept in the XProtect Transact Database. Default:Use the XProtect Transact solution's default.
® Milestone XProtect Transact Administrator's Guide Select the flow control to be used on the serial connection. Flow control adjusts the flow of data from one unit to another, making sure that the receiving unit will be able to handle all the incoming data. The use of flow control is relevant in asynchronous communication, for example when the sending unit sends data faster than the receiving unit is able to receive it. None: Do not use flow control.
® Milestone XProtect Transact Administrator's Guide Delete Copy... Event groups Available only when an existing configuration is selected. Lets you delete the selected configuration. You will be asked to confirm that you want to delete the configuration. Available only when an existing configuration is selected. Lets you copy the selected configuration, edit it as required and save it under a new name. Editing and saving takes place in the Create Configuration window.
® Milestone XProtect Transact Administrator's Guide Create a configuration You do not need to create new configurations for sources that use the source provider TCP XML XProtect Transact provider. Simply use the built-in configuration Analytics. To create a new configuration to a source, do the following: 1. Open the XProtect Transact Administrator window. 2. On the Sources tab, click Add New... if you want to add a new source or the Edit... button to edit an existing source.
® Milestone XProtect Transact Administrator's Guide 1. Click and drag in the Raw data field to select two control characters (non-printing characters, typically used by printers for indicating line breaks, when to cut off a till receipt, etc.). 2. Click the Add New Line... button. A line break is inserted instead of the two control characters.
® Milestone XProtect Transact Administrator's Guide In this example, the line break is all the formatting we require. In most cases, omissions (removal of certain content) and substitutions would be required as well. They are applied in a similar way, by dragging to select the required characters in the Raw data field, then clicking the relevant button.
® Milestone XProtect Transact Administrator's Guide We have noticed that all transactions end with a line beginning with the characters Date. We therefore type Date in the Stop Mask field.
® Milestone XProtect Transact Administrator's Guide 1. Access the Select Input Source window by clicking the Capture from source... button in the Create/Edit Configuration window. 2. In the Select Input Source window's top section, select the required input source. Properties of the selected source will be displayed in the Select Input Source window's lower section. Tip: The list will only contain input sources matching the type of source you are currently working with.
® Milestone XProtect Transact Administrator's Guide Configurations are saved together with the type of source (serial port, TCP client, TCP XML or Troy box) for which it has been created. However, exported filters can be used with configurations created for any type of source.
® Milestone XProtect Transact Administrator's Guide Edit a configuration (on page 27) The create/edit configuration window (on page 32) Export/import a configuration If you want to reuse a configuration between different source types (serial port, TCP client or Troy box), you can export the configuration from one source type and import it when you create or edit the configuration for another source type. Do the following: 1. Open the XProtect Transact Administrator window. 2.
® Milestone XProtect Transact Administrator's Guide To omit characters in a source's configuration, do the following: 1. In the Create/Edit Configuration, window click and drag to select the characters in the Raw data field that you want to filter out. 2. Click the Omit button to filter out (remove) the selected characters. You can immediately view the effect of your filter in the Filtered data field. Tip: You can omit regular characters as well as control characters.
® Milestone XProtect Transact Administrator's Guide Tip: You can substitute regular characters as well as control characters. Note, however, that new control characters must be specified in Hex notation, e.g. ¥x[0-F][0-F]. Tip: If you are not happy with an applied substitution, you can always remove or edit it: Select the unwanted substitution in the [Filters overview field], then click the Delete Filter or Edit Filter... button.
® Milestone XProtect Transact Administrator's Guide 3. In the Raw data field in the Create/Edit Configuration window find the characters in the transaction data that indicate that a transaction begins or ends. 4. Type the start mask in the Start mask field and the stop mask in the Stop mask field. In the Filtered data field, the start and stop mask will be indicated by a horizontal line: This example shows a horizontal line inserted before the start mask TEXT and after the stop mask Date.
® Milestone XProtect Transact Administrator's Guide Filtered data: Provides a preview of the transaction data as it will be presented in client applications when viewed by end-users, with the omissions, substitutions, line breaks and masks applied. Omit: Lets you filter out one or more characters selected in the Raw data field. Substitute...: Opens the Edit Filter window, with which you can substitute one or more characters selected in the Raw data field.
® Milestone XProtect Transact Administrator's Guide You can use wildcards in start and stop masks. A wildcard is a special symbol that stands for one or more characters. Wildcards allow you to define start and stop masks without being 100% specific about the masks' character content. Two different types of wildcard use are available: Wildcards: The start and/or stop mask are case sensitive.
® Milestone XProtect Transact Administrator's Guide The Edit Filter window contains the following settings: The Edit Filter window Name Description Field may be used for three purposes: If creating/editing an omission: Type or edit the characters to be filtered out. If creating/editing a substitution: Type or edit the characters to be substituted, then type/edit the characters you want to be used instead in the Substitution field.
® Milestone XProtect Transact Administrator's Guide Name Description Select a source for input sampling: Select the required input source from the list. The list will only contain input sources matching the type of source you are currently working with. Example: If you are currently working with a configuration for a serial port source, only serial port input sources will appear in the list. Properties: Names and values of the selected source are listed here.
® Milestone XProtect Transact Administrator's Guide master/slave setup is defined in the ImageServer Administrator window. For more information see the separate Enterprise documentation. Prerequisites – Corporate The XProtect Transact master server must be located on the same computer as the Corporate management server. See Integrating with Milestone XProtect Corporate on page for more information.
® Milestone XProtect Transact Administrator's Guide Update slave information To send a slave server's server service settings to its master servers, click the Update button on the Masters tab. When you change a slave server's server service settings information, it is immediately sent to the server's master servers. If, for some reason, a master server is not running when this happens, you are notified.
® Milestone XProtect Transact Administrator's Guide Transaction events are supported in XProtect Enterprise and XProtect Professional. To trigger transaction events in the surveillance system it is prerequisite that you define generic events in the surveillance system that match the criteria of the transaction events from XProtect Transact.
® Milestone XProtect Transact Administrator's Guide For example, you can create a search string that looks for the occurrence of Word1 Word2. This will find occurrences of Word1 Word2 but not occurrences of Word2 Word1 or Word1 Word3 Word2 and so on. Select Case sensitive if you would like to differentiate between upper and lowercase letters in the Search string field. 5.
® Milestone XProtect Transact Administrator's Guide Create a generic event triggered by Transaction data (on page 43) Test events (on page 44) Edit an event To edit an event, do the following: 1. In the XProtect Transact Administrator window, on the Events tab, select the required event and click Edit.... 2. In the Edit Event window, change the required settings. 3. Click OK to save your settings.
® Milestone XProtect Transact Administrator's Guide 4. In the Address field, specify the host name or IP address of your surveillance system. 5. In the Port field, specify the port number on which to send events to your surveillance system. It is prerequisite that the specified port number is the same as the one the surveillance system uses when listening for generic events.
® Milestone XProtect Transact Administrator's Guide Create a generic event triggered by transaction data Generic events in XProtect Enterprise or XProtect Professional can be based on the analysis of received TCP and UDP data packets as it is the case with transaction events from Milestone XProtect XProtect Transact. To add a generic event in XProtect Enterprise or XProtect Professional, do the following: 1. In the Administrator window, click the Generic Events... button.
® Milestone XProtect Transact Administrator's Guide When you have created an event, an event group and a generic event in your surveillance system that matches the criteria in the transaction event, you can test your transaction event to verify that the specified action is triggered in your surveillance system.
® Milestone XProtect Transact Administrator's Guide 2. Create an event group called Withdrawal Event Group and fill in the necessary information about the surveillance systems address and port number. Select UDP as protocol. 3. Create a generic event called Withdrawal in your surveillance system's Administrator application. See How to Create a Generic Event Triggered by transaction Data on page for more information.
® Milestone XProtect Transact Administrator's Guide Access to features in the Administrator application, including generic events, may require administrator rights. 4. In the XProtect Transact Administrator window, on the Event Groups tab, select the event group Withdrawal Event Group. 5. Select the Withdrawal event from the Events list and click Test. Example: The event Withdrawal is selected for testing. You can also test events that are already included in the event group. 6.
® Milestone XProtect Transact Administrator's Guide 7. So far you have only tested the transaction event. The event must be included in an event group and a source must be associated with the event group before XProtect Transact listens for occurrences in the transaction data. If the test was successful, include the Withdrawal event in the event group Withdrawal Event Group, and if required associate sources with the event group. 8. You can include the event in other events groups.
® Milestone XProtect Transact Administrator's Guide XProtect Transact Server Service menu 1. You access the XProtect Transact Server Service Icon right-click menu from the taskbar. 2. Right-click the XProtect Transact Server Service Icon and a menu appears. In addition to Help, About and Exit, it contains the following: Name Description Start Server Service Lets you start the XProtect Transact Server service. Lets you stop the XProtect Transact Server service.
® Milestone XProtect Transact Administrator's Guide View transactions With the XProtect Smart Client application, you can view transaction data together with recordings of the transaction taking place. In the XProtect Smart Client you simply create a view, select the required transaction data source (for example a particular cash register), then the required video sources (for example two cameras covering the area around the cash register from different angles), and you are ready to browse.
® Milestone XProtect Transact Administrator's Guide Tip: The XProtect Transact server's default port number is 9001; if in doubt, you can find the port number used by the required XProtect Transact server on the Server Service Setting window in the right-click menu of the XProtect Transact Server Service Taskbar icon. 6. Enter your user name and password in the Username and Password fields.
® Milestone XProtect Transact Administrator's Guide 9. Click Network... to define that Corporate will be handling the token authentication of the XProtect Smart Clients. 10. Specify the LAN IP address of the XProtect Corporate Management Server. 11. When you are ready, click OK. 12. Click Close to close the Add/Remove Protect Enterprise Servers window. You are now ready to view transaction data together with recordings from Corporate cameras in XProtect Smart Clients.
® Milestone XProtect Transact Administrator's Guide You may select any view layout from the list, but some layouts, such as the Transact + 2 layout, are particularly suited for viewing transaction data and camera images together: Example of available layouts; more layouts may be available in your version. Depending on requirements and user rights, you may create the view in a shared or private group.
® Milestone XProtect Transact Administrator's Guide 3. Select the view's transaction data position, then expand the Setup tab's Properties section and expand the list over XProtect Transact servers: Color legend: o Gray: Starting up (will only be visible on slow connections). o Yellow: Getting status. o Red: Unable to connect to server. o Green: OK. If color indication for a service is red, the system will keep trying every five seconds until contact is made to the server. 4.
® Milestone XProtect Transact Administrator's Guide Back up and restore the Transact Database Back up The Transact Server stores data in a database. You can choose to store the database in two different ways: Network SQL Server: Lets you store XProtect Transact data in a database on an existing SQL Server on your network. XProtect Transact points to the database location on the SQL Server.
® Milestone XProtect Transact Administrator's Guide Back up the database Stop the XProtect Transact Server service to prevent changes to the database being made during the backup process. Note that XProtect Transact will not work while the XProtect Transact Server service is stopped. It is important that you remember to start the service again once you have finished backing up the database. 1. Open Microsoft SQL Server Management Studio Express from the Windows Start menu. 2.
® Milestone XProtect Transact Administrator's Guide Restore the database Most users never need to restore their backed-up XProtect Transact database, but if you ever have the need, use the following process: 1. Stop the XProtect Transact Server service to prevent changes to the database being made during the backup process. Note that XProtect Transact does not work while the XProtect Transact Server service is stopped.
® Milestone XProtect Transact Administrator's Guide Remove the software You can remove your XProtect Transact installation in the following ways: Remove the software from Windows and the Download Manager To remove the XProtect Transact software, follow the normal Windows procedure for uninstalling programs (see the Windows Help for more information). If your surveillance system includes the Download Manager, you should also remove the XProtect Transact plugin from the Download Manager. 1.
® Milestone XProtect Transact Administrator's Guide Get help You can access the XProtect Transact help system by pressing F1 on your keyboard. The help system is context-sensitive, which means it automatically displays a help topic relevant to the area you are working with. Help topic texts may contain various types of links, notably expanding drop-down links that display detailed information when you click them.
® Milestone XProtect Transact Administrator's Guide Glossary A ATM: Automated Teller Machine; an unattended machine that dispenses cash when a personal coded card is used. ATMs are often placed outside banks. AVI: A popular file format for video. Files in this format carry the .avi file extension. C CLK: Connection License Key; a registration key required for every transaction data source that can be viewed simultaneously on the surveillance system.
® Milestone XProtect Transact Administrator's Guide H Host: A computer connected to a TCP/IP network. A host has its own IP address, but may -depending on network configuration - furthermore have a name (host name) in order to make it easily identifiable. HTTP: HyperText Transfer Protocol, a standard for exchanging files across the internet. HTTP is the standard used for formatting and transmission of data on the world wide web. I I/O: Short for Input/Output.
® Milestone XProtect Transact Administrator's Guide T TCP: Transmission Control Protocol; a protocol (standard) used for sending data packets across networks. IP is often combined with another protocol, IP (Internet Protocol). The combination, known as TCP/IP, allows data packets to be sent back and forth between two points on a network for longer periods of time, and is used when connecting computers and other devices on the internet. Troy Box: Popular name for a Troy serial server.
® Milestone XProtect Transact Administrator's Guide Delete an event • 42 Index Delete an event group • 44 A Different source providers • 17 About the SQL Server transaction log • 55 E Add a new source • 19 Edit a configuration • 19, 28, 30 Add an event • 40 Edit a master server • 38 Add an event group • 43 Edit a source • 20 Add line breaks • 18, 26, 29, 32, 35, 36 Edit an event • 42 Administration • 16 Edit an event group • 43 Advanced event features • 19 Events and event groups • 19, 3
® Milestone XProtect Transact Administrator's Guide Managing configurations • 23 T Target audience • 6 Managing server service settings • 14, 16, 20 Test events • 40, 42, 43, 45 Managing sources • 10, 14, 18, 19, 48 The Create/Edit Configuration window • 27, 28, Master setup dialog elements • 39 29, 30, 33, 35 Master/slave setup • 37 The Create/Edit Source window • 19, 20, 21 O The Edit Filter window • 35, 36 Obtaining additional licenses • 10, 12 The Select Input Source window • 36 Omit charact
About Milestone Systems Founded in 1998, Milestone Systems is the global industry leader in open platform IP video management software. The XProtect platform delivers powerful surveillance that is easy to manage, reliable and proven in thousands of customer installations around the world.