36" Laundry Base Cabinet Assembly Guide LB36 IMPORTANT NOTES Before you start, inspect all panels and hardware to ensure you have everything needed. We recommend laying the panels on some cardboard to protect the finish when assembling. In addition to the pre-installed hardware, we recommend adding a bead of white wood glue in the dado grooves, to create the strongest cabinet. www.millspride.com/rta Scan this code for more detailed instructions, assembly videos and to register your cabinet warranty. www.
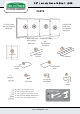
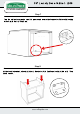
36" Laundry Base Cabinet - LB36 PARTS 1 x Face Frame with Pre-Installed Hardware 1 x Right End Panel with Pre-Installed Hardware 1 x Back Panel with Pre-Installed Hardware 1 x Left End Panel with Pre-Installed Hardware I O 2 x Doors 1 x Integral Toe Kick 2 x I-Beams H F 1 x Fixed Shelf 4x Bumpers 1 x Adjustable Shelf G J 5x L-Brackets 5 x Locking Shelf Rests 20 - #8 x 1/2" Pan Head Screws 16 - #6 x 1/2" Pan Head Screws 8 - #6 x 5/8" Flat Countersink Screws 4 - #8 x 7/8" Pan Washer Head Scre
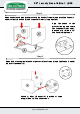
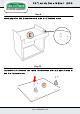
6" Laundry Base Cabinet - LB36 Step 1 Run a bead of wood glue in the grooves in the back of Frame (A) and insert End Panels (C and D) so that L-Brackets (K) and Connector Plates (L) snap together. Align the panels so the grooves line up and secure the Connector Plates and LBrackets with (8) #6 x 1/2" Pan Head locking screws. L K Step 2 Run a bead of wood glue in the lower grooves in Face Frame (A) and End Panels (C and D) and insert Fixed Shelf (F).
36" Laundry Base Cabinet - LB36 Step 3 Run a bead of wood glue in the upper grooves in End Panels (C and D) and insert (2) IBeams (I) I I Step 4 Apply beads of wood glue to recesses in back of End Panels (C and D) and carefully install Back Panel (B) into grooves in End Panels (C and D), so that L-Brackets (K) and Connector Plates (L) snap together. Ensure Fixed Shelf (F) fits into groove in Back Panel (B). www.millspride.
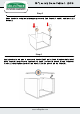
36" Laundry Base Cabinet - LB36 Step 5 Ensure I-Beams (I) are correctly seated and attach them to Face Frame (A) using (2) Silver L-Brackets (G) and (8) #8 x 1/2" Pan Head screws. I Step 6 Insert (5) #6 x 1” Flat Head screws thru holes in Back Panel (B). Tighten them into Fixed Shelf (F) and I-beams (I). www.millspride.
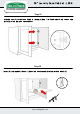
36" Laundry Base Cabinet - LB36 Step 7 Turn the cabinet over, make sure it is square and secure the Connector Plates with locking screws: (8) #6 x 1/2" Pan Head. Step 8 At the toe kick cutout, attach (2) silver L-Brackets (G) to End Panels with (4) #8 x 1/2" Pan Head screws. www.millspride.
36" Laundry Base Cabinet - LB36 Step 9 Attach integral Toe Kick (E) and secure with (4) #8 x 1/2" Pan Head screws. Step 10 Lay the Doors (O) face down on a smooth flat surface and install (4) Hinges (P) using (8) #6 x 5/8” Flat Head screws. O www.millspride.
36" Laundry Base Cabinet - LB36 Step 11 Attach Doors (O) to the Face Frame (A) using (4) #8 x 7/8” Pan Washer Head screws and install (2) clear bumpers on each door. Step 12 Insert (5) Locking Shelf Rests (J) in desired location and install Adjustable Shelf (H). H www.millspride.