60” Laundry Wall Cabinet Assembly Guide - LW60 IMPORTANT NOTES Before you start, inspect all panels and hardware to ensure you have everything needed. We recommend laying the panels on some cardboard to protect the finish when assembling. In addition to the pre-installed hardware, we recommend adding a bead of white wood glue in the dado grooves, to create the strongest cabinet. www.millspride.com/rta Scan this code for more detailed instructions, assembly videos and to register your cabinet warranty.
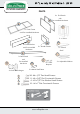
60” Laundry Wall Cabinet - LW60 PARTS 2 x End Panels with Pre-installed Hardware F 1 x Face Frame with Pre-installed Hardware 2 x Doors 2x Fixed Shelves with Pre-installed Hardware G 2 x Divider Panels 1 x Central Shelf I H 1 x Back Panel with Pre-installed Hardware 4 x Soft Close Hinges L M N O J K 4 x Clear Bumpers 2 x Adjustable Shelves 12 x Metal Shelf Rests 24- #6 x 1/2" Pan Head Screws 8 - #6 x 5/8" Flat Countersink Screws 4 - #8 x 7/8" Pan Washer Head Screws 14 - #6 x 1" Flat Countersin
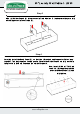
60” Laundry Wall Cabinet - LW60 Step 1 Start by laying the Frame (A) face down on a smooth flat surface. Insert the (2) End Panels (B) into the outer grooves in the Frame (A), as shown, so that the L-Brackets and Connector Plates ‘snap’ together. Align the panels and secure the Connector Plates with locking (8) #6 x 1/2" Pan Head screws (L). Step 2 Slide the (2) Fixed Shelves (C) into the horizontal grooves in the End Panels (B) and Frame (A), so that the L-Brackets and Connector Plates ‘snap’ together.
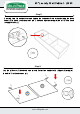
60” Laundry Wall Cabinet - LW60 Step 3 Slide (2) Divider Panels (D) into grooves in Fixed Shelves (C) and ensure they are fully seated in grooves in Face Frame (A). Step 4 Carefully install the Back Panel (E), so that the L-Brackets and Connector Plates ‘snap’ together. This may require a second person. Ensure the Divider Panels are fully seated in the grooves in the Back Panel and the cabinet is square.
60” Laundry Wall Cabinet - LW60 Step 5 Carefully, turn the cabinet over and tighten the Connector Plate screws holding the Back Panel (E) in place. Lock the plates and L-brackets together using (8) #6 x 1/2" Pan Head locking screws (L). Step 6 Lay the (2) Doors (F) face down on a smooth flat surface and install (4) Hinges (H) using (8) #6 x 5/8” Flat Head screws (M). F F www.millspride.
0” Laundry Wall Cabinet - LW60 Step 7 Attach the (2) Doors (F) to the Face Frame (A) using (4) #8 x 7/8” Pan Washer Head screws (N) and install (4) Clear Bumpers (J). F F Step 8 Insert (4) Metal Shelf Rests (K) in the open middle section and install Central Shelf (G). Insert (4) Metal Shelf Rests (K) in each of the outer sections and install (2) Adjustable Shelves (I). I I G www.millspride.