ASSEMBLY AND INSTRUCTION MANUAL (EN) Series: Oil Please read the instructions carefully before use. Take good care of this manual for later use.
Important safety information You must obey common safety guidelines when using electrical products, especially in the presence of children. WARNING! To avoid electric shock or damage due to the heat, always make sure the plug is pulled out before the heater is moved or cleaned. Read the instructions carefully. The product is intended for home use only. Make sure the heater is connected to the house's regular mains (230 V), as it indicated on the heater.
The device cannot be used by children under 8 years of age and persons with reduced physical or mental abilities or lack of experience and knowledge unless they have been given supervision or instruction in the safe use of the device and understand the hazards involved. Children should not play with the device. Cleaning and maintenance should not be done by unsupervised children. Children under the age of 3 should be kept away from the device, unless they are under constant supervision.
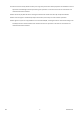
STORE THIS INSTRUCTION MANUAL FOR FUTURE USE! NEVER TOUCH YOUR PANEL HEATER OR ITS CASING WITH WET HANDS! Specifications Model AB-H700MINI AB-H1000DN AB-H1500DN AB-H2000DN Thermostat Mechanical Day/night Day/night Day/night Color White White White White Amperage ~230 V / 50 Hz ~230 V / 50 Hz ~230 V / 50 Hz ~230 V / 50 Hz Power (W) 700 1000 1500 2000 Mill Heat Boost Yes Yes Yes Yes Before first use After unpacking the heater, check to make sure the product was not damaged during transport.
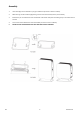
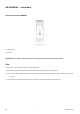
Description of the heater 1. Heat emission 1. Heat emission 2. LED display 2. Indicator light 3. Thermostat 3. OFF/ON 4. Output selector 4. Legs (aluminum) 5. OFF/ON 6. Legs (aluminum) Parts EN 8 screws (4 of which are pre-mounted) 2 foot brackets 2 rails for the feet 5 millheat.
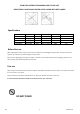
Assembly EN 1. Insert both legs into the brackets so you get a stable foot (as shown in Picture 1 below). 2. Attach the legs to the brackets by tightening 2 screws into each bracket (see the picture below). 3. Remove the pre-mounted screws from the bottom of the heater and place the heater gently on its head to mount the feet. 4. Two screws must be fastened on each foot bracket (as shown in Picture 2 below). 5. NEVER USE THE HEATER BEFORE THE LEGS HAVE BEEN TIGHTLY SCREWED. 6 millheat.
AB-H700MINI — Instructions Control panel for AB-H700MINI 1. Indicator light 2. OFF/ON WARNING: Be sure the foot is fitted correctly and according to the instructions before using the heater! Use Set the heater to OFF. Plug the heater into a grounded outlet. 1. Set the heater to ON. The indicator light will be lit when the heating elements are heating up. 2. To turn off the heater, set the output selector to OFF. If the heater will be left unused for a longer period of time, pull out the plug. 3.
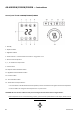
AB-H1000DN/1500DN/2000DN — Instructions Control panel for AB-H1000DB/1500DN/2000DN 1. Standby 2. Daytime setback 3. Nighttime setback 4. Power indicator — Shows whether the heater is using power or not 5. Desired room temperature 6., 7., 8. Indicates the output level 9. Timer function 10. Daytime setback activation button 11. Nighttime setback activation button 12. Function button 13. Timer activation button 14. Thermostat and output selector: i.
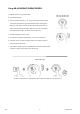
Using AB-H1000DN/1500DN/2000DN 1. Plug the heater into a grounded outlet. 2. Press OFF/ON button. 3. Choose the desired power |, || or |||, by pressing the output selector. Turn the thermostat to the desired temperature while looking at the display. As soon as the room temperature drops below this level, the heater will automatically start again. When the room has reached the desired temperature again, the heater will turn itself off. 4. The thermostat goes from 5 to 35°C. 5.
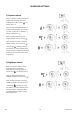
ADVANCED SETTINGS 1) Daytime setback When you want the heater to reduce the temperature during the day (set for weekdays from now on) press . . The display shows "d". Enter the correct weekday. (Monday = 1, Tuesday = 2, Wednesday = 3, Thursday = 4, Friday = 5, Saturday = 6, Sunday = 7). Save by pressing this: . Enter the desired temperature for daytime setback. Save by pressing . Enter the desired number of hours for daytime setback. Save by pressing .
3) Change setback temperature — Daytime Press and hold and press 3 times. Enter the desired temperature for daytime setback. Save by pressing wait for 15 seconds for automatic confirmation. or 4) Change setback temperature — Nighttime Press and hold and press 3 times. Enter the desired temperature for nighttime setback. Save by pressing wait for 15 seconds for automatic confirmation. or 5) Change number of hours — Daytime Press and hold and press 2 times.
7) Cancel (skip) setback period Press and hold and press or once (depending on which setback period you want to cancel). *The heater will skip an active setback period or the next setback period. *During the next setback period, the heater will automatically resume the programmed temperature reduction. 8) Delete a setback program Press and hold or (depending on which setback period you want to cancel) for 3 seconds.
Maintenance 1) For cleaning, always unplug the heater and leave it to cool. 2) Wipe the heater regularly with a damp cloth and dry the surface before turning on the heater again. 3) The heater must be cleaned at least once a month during the heating season. Caution! The heater should never be immersed in water. Avoid using detergents to clean the heater. Never let any water get inside the heater; this can be hazardous. 4) Dust etc. should be removed with a soft cloth.